Documenting My Happy Thoughts with the Blush Memorydex!

Hello friends! Today I’m here to share a new project with you, one that is especially dear to me. This year has been rough for our family—moving and having a new little one during a pandemic has made us all look at life differently. To counter what is going on in the world around us, we try to add a dose of happiness into our lives every day, with walks, music and our favorite foods. I decided that I also needed a dose of that happiness in my crafty space, and today I’m sharing how I did that with the new Heidi Swapp Blush Memorydex Spinner*, only available at Scrapbook.com!

Meghann-Andrew-Scrapbook-com-Blush-Memorydex-Happy-Thoughts-01-IG.jpg

I’ve always loved the idea of “happy thoughts,” like in Peter Pan, the thoughts and memories that make you fly. Well, this project pulls at my heart strings, and each new Memorydex card that I create for the spinner will showcase the most special people and moments that make me happy.

Meghann-Andrew-Scrapbook-com-Blush-Memorydex-Happy-Thoughts-02.jpg

I created my cards by cutting patterned paper using the Memorydex die set. On this title card, I used the Title Builder Vol. 3 stamp to add the words “my” and “thoughts,” and embellished with Heidi Swapp’s beautiful Storyline Chapters collection and the gold Thickers from the Avenue collection by Pebbles, Inc. I love the look of layered paper, labels, tags, vellum and washi tape on this card.

Meghann-Andrew-Scrapbook-com-Blush-Memorydex-Happy-Thoughts-03.jpg

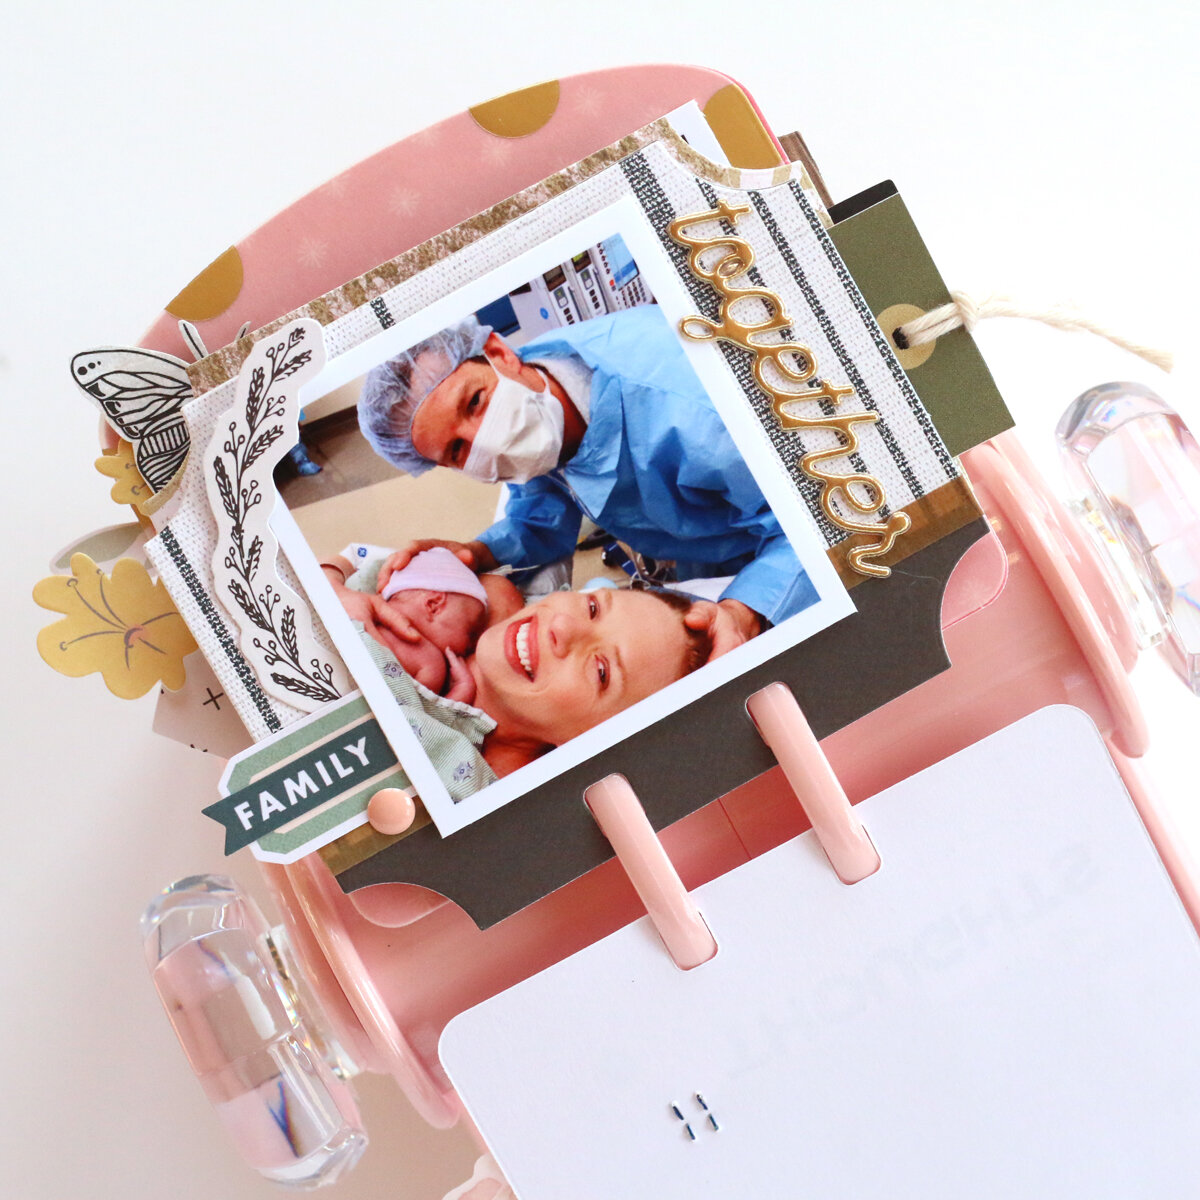
None of these cards are meant to be complicated: a simple mixture of patterned paper, die cuts, tags and a bit of gold thrown in highlights the photos, which are the most important part of this project.

Meghann-Andrew-Scrapbook-com-Blush-Memorydex-Happy-Thoughts-04.jpg

If I choose to add journaling, I’m leaving the back of each card blank. Here I could add my thoughts, the details of the memory, or the date.

What I especially love about this project is that it is timeless. I can add a memory that makes me happy from ten years ago, or just yesterday. It’s all about how each moment makes me feel.

Meghann-Andrew-Scrapbook-com-Blush-Memorydex-Happy-Thoughts-06.jpg

So, when the things going on in the world around me get me down, my plan is to just flip through this Memorydex that stores all of my happy thoughts, the ones that make my heart fly. I can’t wait to share more of my cards with you.

Find all of the products that I used in my Memorydex project below in the shoppable gallery, and consider starting a “happy thoughts” project of your own, or gifting this beautiful Memorydex to someone you care about this Christmas!

* Affiliate links used at no extra cost to you! Clicking to shop helps me pay for this blog and video feed. Thanks so much for your support!

Mixing Old & New: Close to My Heart Celebrate Today and Shimelle's Glitter Girl!

Hello there, friends! I have to say, I am pretty good at purging my supplies, but I do hold onto a few cherished collections, like any that my friend Shimelle has created with American Crafts! I still have products going back to her first collection!

CTMH-Meghann-Andrew-Close-to-My-Heart-Celebrate-Today-Collection-Birthday-Pockets-05.jpg

I recently received the beautiful Celebrate Today collection from Close to My Heart*, and when I saw the gorgeous colors in their Picture My Life cards, I knew I had to use them to document my daughter’s 7th birthday party, and add a few magical elements from Shimelle’s Glitter Girl collection! The combination of the old and new from my stash worked perfectly together. Take a look:

CTMH-Meghann-Andrew-Close-to-My-Heart-Celebrate-Today-Collection-Birthday-Pockets-03.jpg

All of the colors! The gorgeous Picture My Life cards provided the perfect mix of colors to stand up against my colorful photos from my daughter’s painting birthday party. I absolutely loved the colorful, watercolored elements on the cards, and used them to fill pockets and back smaller photos to record the day.

CTMH-Meghann-Andrew-Close-to-My-Heart-Celebrate-Today-Collection-Birthday-Pockets-01.jpg

Because of all of that gorgeous color, not much embellishment was needed! I simply added coordinating stickers from the Celebrate Today collection and die cuts and stickers from the Glitter Girl collection, to add the magical unicorns, border stickers and script words.

CTMH-Meghann-Andrew-Close-to-My-Heart-Celebrate-Today-Collection-Birthday-Pockets-02.jpg

Just a few colorful stars from the Celebrate Today stickers sheet and pretty silver sequins were the only small embellishments I needed to complete my pages!

Watch how this pocket page layout came together in this quick process video:

I am so pleased that I had the Glitter Girl collection still on hand to use alongside the Celebrate Today Picture My Life cards from Close to My Heart. I hope this pocket page encourages you to mix your new stash with older product to create beautiful things! Thanks so much for stopping by today, and happy creating!

CTMH-Meghann-Andrew-Close-to-My-Heart-Celebrate-Today-Collection-Birthday-Pockets-07.jpg

Easy Circus Party Prep with Big Top Dreams!

Hey friends! I was so excited to guest design for Pebbles, Inc. this week, and when they asked me to create some party details with the Big Top Dreams collection*, I was ALL FOR IT! You know I love to throw a party, and when I have a cute collection to craft it with, the task is easy! Your party-goers will never know how easy it really was, though!

Pebbles_MeghannAndrew_BigTopParty_01.jpg

This party set-up may look over the top, but little touches go a long way! Let’s take a look at how you can “WOW!” your invitees with your crafty prowess, starting with their invitations!

Customized invitations, meaning, each one is different, make your friends feel special right from the start! To do this quickly and easily, I stick to the same formula for each one. I started these single-sided A2 cards by printing the details of the celebration on one side each piece of smooth, white cardstock. Next, I grabbed an embossing folder with a frame design, to add a textural element to the cards, and ran each one through my die cutting machine.

Pebbles_MeghannAndrew_BigTopParty_02.jpg

On each invitation I added a piece of patterned paper to fit inside my embossed frame, a phrase ephemera die cut with a mini staple at the top, an icon ephemera at the base, along with a small phrase sticker from the sticker book, three gold puffy star stickers, three rhinestones, and a few extra accent stickers. By adding the same elements to each card and keeping to a similar design, I saved myself time by not re-creating the wheel on each invitation, but made each one individual and special.

Pebbles_MeghannAndrew_BigTopParty_06.jpg

Adding pieces to your party decor that pack a big punch go a long way. Red and white striped party fans add a lot of color to your walls, and rolls of burlap provide great texture, and a good neural to all of the color found in the Big Top Dreams collection. A banner of folded, colorful baking cups topped with ephemera accents is an easy and simple handmade decoration to create in just minutes!

Pebbles_MeghannAndrew_BigTopParty_07.jpg

Your treats can also double as decor for your party and carry your big top theme all of the way to the refreshments, too! Plain milk bottles full of juice can be dressed up with a few simple layers of die cut patterned paper circles, an icon ephemera piece, cardstock star and a puffy letter initial—just to add a bit of personalization for each guest—and arranging them in a pyramid on your refreshment table makes them look like the classic carnival game.

Pebbles_MeghannAndrew_BigTopParty_08.jpg

Don’t forget to send your guests home with a little treat to remember your party by, or feed their elephant! A lovely, layered tag on a goody bag full of in-shell peanuts or kettle corn is the perfect treat! When I create tags for favor bags, I always remember to layer, layer, layer, and just like my invitations, I follow the same equation for each goody bag tag.

Pebbles_MeghannAndrew_BigTopParty_03.jpg

On these, I started with two layers of patterned paper, cut into banner shapes and a sentiment cut from the Best Day Ever patterned paper. I adhered each of these layers with an adhesive foam tab and stapled the top. Next, I added an icon ephemera piece, a cardstock or puffy accent sticker, a gold puffy star sticker, and a gold cardstock heart. Adhering these layered tags to a colorful treat bag will provide that final, lasting detail for your guests! 

Pebbles_MeghannAndrew_BigTopParty_04.jpg

Your party may be “the greatest show" for your friends this summer, and using the Big Top Dreams collection will make it easy and amazing! Thanks so much for stopping by! Be sure to check out the product I used to create this party setup in the gallery below! If you’re interested in seeing more crafty party and celebration decor that I have created, click “celebrating life” in the right sidebar! Happy creating!

*Clicking these links will take you to the Scrapbook.com shop, and when you purchase, I receive a small percentage of the sale. It doesn't cost you any extra, so thanks so much for your support!

Back to School Photo Banner with the Box of Crayons Collection!

Hey there! We're just a few days away from the start of a new school year! For the past couple of years, I have taken my daughter's photograph before her first days of preschool and pre-Kindergarten on our doorstep to mark the occasion. This year, I decided to create a prop—a first day banner— to show how special this day really is, using the Box of Crayons collection* from American Crafts.

AmericanCrafts_MeghannAndrew_FirstDayBanner_01.jpg

Supplies | Box of Crayons collection: Make Something paper, All the Things paper, Cut Here paper, Treat Yourself paper, All Change paper, In the Frame paper, Countdown paper, In the Sky paper, ephemera cardstock die-cuts, alpha sticker book, sticker book, accent and phrase stickers, glitter enamel dots; Star Gazer collection: Rose gold foil Thickers; Stickers and Bling collection: glitter stickers

This cute banner was simple to put together! First, grab 8 different patterns from the Box of Crayons collection. (You can see the exact papers I used in my gallery below!) Cut a banner from each paper, sized around 5" high and 3" wide, either by hand or with a die-cutting machine and software. Next, punch holes at the top left and right sides of each banner.

AmericanCrafts_MeghannAndrew_FirstDayBanner_05.jpg

In between the 5th and 6th banner, add the crayon journaling card from the Box of Crayons cardstock die-cuts, punching holes in it, too. Attach all of the banners with baker's twine, then start the fun part: embellishing! On the crayon card, add small, black glitter alphas for " grade" and the date, with the fun, rainbow stickers from the Box of Crayons alphabet sticker folder spelling out the grade.

AmericanCrafts_MeghannAndrew_FirstDayBanner_06.jpg

On each banner, place a chipboard letter from the Star Gazer rose gold foil Thickers, which are big enough to stand out on the banner, and add a bit of shine. From there, it's all about adding some fun! Fussy-cut several elements from one piece of patterned paper: Make Something. This single piece of paper includes cute elements like the watercolor set and brush, camera, large easel and the "yay" circle.

After the fussy-cutting, grab the Box of Crayons ephemera pack (those glitter scissors!), cardstock stickers and the awesome sticker and washi book to add to the cuteness! The enamel dots also add a different texture and a bit more sparkle! 

AmericanCrafts_MeghannAndrew_FirstDayBanner_10.jpg

I can't wait to take my daughter's first day photo this year with this cute banner! I hope you'll give this fun project a try too! Check out the product I used to create it in the gallery below, and thanks so much for stopping by! 

*Clicking these links will take you to the Scrapbook.com shop, and when you purchase, I receive a small percentage of the sale. It doesn't cost you any extra, so thanks so much for your support!

Elle's Studio Celebrates: New Birthday Layout + Process Video!

Hello! You probably already saw my previous post today that introduced the beautiful, new August 2018 kit and extras* from Elle's Studio, but in this post, I wanted to highlight a couple of the add-ons in particular: the Celebrate stamp and Celebrate journaling tags

First up is my favorite: the Celebrate stamp. This awesome 4" x 6" stamp was created in collaboration with In a Creative Bubble, which is probably why I love it so much! It's clean, graphic and everything a celebrate stamp should be! I LOVE that it includes a big, round balloon, complete with a tassel, as well as create-your-own bunting!

Since you're all starry-eyed over the stamp, don't forget about the Celebrate journaling tags! This set of 10 tags is perfect for your layouts, pocket pages and card fronts, and includes the same awesome fonts and graphic designs as on the stamp. Let's take a look at how I pulled these two products together to document a special birthday photo shoot for my daughter:

EllesStudio_MeghannAndrew_CelebrateFour_01.jpg

Supplies | Celebrate journaling tags, Celebrate stamp, August 2018 kitGo Team wood veneer flags, purple puffy alphabet stickers, gold shapes and dots puffy stickersJune print and cut labels, Noteworthy 12" x 12" paper collection

Don't these photos seem to be just made for the Celebrate products? I had to stamp and watercolor the beautiful balloon over and over again to create ballon clusters for this page!

I also loved adding custom bunting with the Celebrate stamp, and it made it even more fun when my title, created with the Celebrate stamp, a label from the June print and cut labels, and the purple puffy alphabet stickers could rest on the top! 

EllesStudio_MeghannAndrew_CelebrateFour_02.jpg

Instead of telling you how I created this layout, full of stamping, mixed-media and FUN, how about I just show you in this short process video?! Grab a chair and take a 20-minute break to see how much I loved creating this page!

Thanks so much for watching, following and leaving a comment! I appreciate every single one! Be sure to check out the Celebrate stamp and journaling tags, as well as all of the fabulous Elle's Studio product I used on this page, via my gallery below. Thanks for stopping by, and happy creating! 

*Clicking these links will take you to the Elle's Studio shop, and when you purchase, I receive a small percentage of the sale. It doesn't cost you any extra, so thanks so much for your support!

Birthday Greetings in a Hurry with American Crafts!

I don't know about you, but I typically realize that I've forgotten a birthday card right around the time I'm due to leave the house for a party. After that initial "oh sugar!" moment sets in, I typically grab the nearest cute paper crafting products that I have on hand to create a simple greeting, full of color and sparkle. I did this recently with the beautiful Stay Colorful collection* from American Crafts!

This collection is just full of bright colors and celebratory sayings, making it the perfect one to grab when you're short on time! I created three different cards quickly and easily:

Supplies | Mood Ring paper (yellow), Jive Talkin' paper ("hooray), 6" x 6" paper pad (sprinkles), cardstock stickers, self-adhesive sequins, rhinestone stickers

"Hip, hip, hooray!" is the perfect sentiment for a birthday card! This simple design looks like a million bucks when you use a colorful sprinkle background paper and back the sentiment with a bright yellow circle of color! To really focus the eye on the sentiment, I added the "hooray" manufacturer's strip behind the circle. Don't forget the sparkle! I added a few sticker sequins and rhinestones to dress it up.

MeghannAndrew_AmericanCrafts_BirthdayCards_04.jpg

Supplies | 8 Tracks paper (dots), 6" x 6" paper pad ("treat yo' self"), ephemera die-cutscardstock stickers, glitter enamel stars

What better day to "treat yo' self" than on your birthday? This little sentiment, cut from a sheet of patterned paper in the 6" x 6" paper pad was the perfect topper for a multi-colored polka dot, then accented with die-cut ephemera and sticker treats! 

Supplies | 6" x 6" paper pad (teal hearts), Jive Talkin' paper (banner), layered stickers (unicorn), cardstock stickers, enamel dotsrhinestone stickers

Birthdays should be magical, so why not add a magical creature to the card front? I loved adding this pretty ribbon-tailed unicorn to the card front, along with the "ride a unicorn" banner, cut from the Jive Talkin' paper. This card would be perfect for a special little girl! 

These three cards prove that you don't have to run by Target on your way to the birthday party! Create your own cards at home quickly and easily with the Stay Colorful collection from American Crafts, and "wow" that special birthday someone! Be sure to check out the product I used, via the gallery links to the Scrapbook.com store below:

(*All product links contained in this post are affiliate links. You don't pay any extra, but I get a small percentage of your sale! Thanks for your continued support of my YouTube feed and this blog!)

American Crafts Bootiful Night Party Fun!

Since Halloween is my favorite holiday of the year, it was pretty awesome that I received the American Crafts Bootiful Night collection in the design team box that I received recently! As I love throwing a party, I couldn't help but imagine all of this spooky goodness crafted into party supplies! I got to work, and with a few supplies, created tags for treat bags, cupcake toppers and a spooky spiderweb banner! (*All product links are affiliate links. You don't pay any extra, but I get a small percentage of your sale! Thanks for your continued support!) 

MeghannAndrew_AmericanCrafts_BootifulNight_PartySetup_01_BLOG.jpg

This banner was the most successful, and possibly the easiest piece to make! By using the metallic Halloween collection side web die-cuts as a base, I added punched circles of patterned paper, die cuts and stickers to the web, then threaded each web through baker's twine to hang. 

I used the same spider web die-cuts for the base of these cupcake toppers as well, adding the amazing die-cuts, flair and buttons to top them off before backing them with a bamboo skewer to stick into my cupcakes.

MeghannAndrew_AmericanCrafts_BootifulNight_PartySetup_04_BLOG.jpg

These were so simple to make, and when added to a cupcake wrapped with the Bootiful Night 6" x 6" patterned paper, they are dressed and ready to be eaten by spooky little monsters!

MeghannAndrew_AmericanCrafts_BootifulNight_PartySetup_09_BLOG.jpg

To a vellum treat bag, I added this fun tag, created with the 6" x 6" patterned paper, and layered with the ephemera die-cuts, spider web, and flair stickers. I also sewed the tag with my sewing machine and added baker's twine for extra texture before adhering it to my treat bag and filling with our favorite caramel popcorn mix!

MeghannAndrew_AmericanCrafts_BootifulNight_PartySetup_05_BLOG.jpg

This little celebration was so easy and quick to put together with the coordinating products in the Bootiful Night collection! There is still plenty of time to add those handmade touches to your Halloween celebration, so be sure to pick up these "bootiful" goodies today!

MeghannAndrew_AmericanCrafts_BootifulNight_PartySetup_07_BLOG_edited-1.jpg

Looking for a must-have snack for your Halloween celebration? Fill up a cauldron of our favorite sweet mix and watch it disappear! 

MeghannAndrew_AmericanCrafts_BootifulNight_PartySetup_08_BLOG.jpg

Candy Corn Snack Mix Recipe

(adapted from this recipe by Taste of HomeYield: about 5-1/2 quarts.

  • 3 quarts popped popcorn
  • 4 cups Cheerios
  • 4 cups corn or rice Chex
  • 2 cups salted peanuts
  • 1 cup packed brown sugar
  • 1/2 cup light corn syrup
  • 1/4 cup honey
  • 1/4 cup butter, cubed
  • 2 tsp pure vanilla extract
  • 1/2 tsp baking soda
  • 1 package (20 oz.) candy corn
  1. In a large greased roasting pan, combine the popcorn, cereal and peanuts. In a large saucepan, combine the brown sugar, corn syrup, honey and butter; bring to a rolling boil. Boil for 6 minutes, stirring occasionally. Remove from the heat; quickly stir in vanilla and baking soda until mixture is light and foamy.

  2. Immediately pour over popcorn mixture; toss to coat. Bake, uncovered, at 250° for 1 hour, stirring every 15 minutes. Stir in candy pumpkins. Cool completely & enjoy!

In case you missed it, earlier this week I also shared this fun new layout on the American Crafts blog! Be sure to check out the full blog post to find out how I created it! 

MagicMischief_Blog_edited-1.jpg

You can find the Bootiful Night collection here at Scrapbook.com, with the exception of the die-cut leaves, spider web die-cuts. and wooden buttons, which I found on Amazon. Thanks so much for stopping by, and happy crafting your spooky Halloween celebrations!


Pink Paislee Guest Designer: Birthday Week!

I am so excited to announce that I am the guest designer on the Pink Paislee blog today during birthday week! I had such a fun time making these creations using the new Birthday Bash collection, and I hope they inspire you to document and craft your next party! 

To create all of these projects, I worked with a few simple supplies:

Let's take a look at what I created! 

This 12" x 12" layout came together quickly by using a grid design. I made sure to run my elements both vertically and horizontally to create a lot of interest. Don't forget to document your own birthdays, and your hopes and fears for the upcoming year, as I did here!

I so love bunting, hanging at a party or on a layout, and my photo was framed twice- first by the bunting at the top and bottom of my page, then by the die-cut elements and watercolor surrounding the photo of my daughter getting ready to blow out her candle.

I started making one card, but had so much fun with it that I made three! These cards have an extra element of surprise for your recipient, given that each has an acetate window that carries part of the sentiment through to the inside of the card.

I just had to die-cut a balloon background to document this photo of my daughter, taken on her birthday with a bunch of balloons. To make the balloons stand out, I backed them with patterned paper, all from the Birthday Bash collection, then outlined the edges with watercolors, and stitched the balloon strings. This is my favorite project from my guest post! 

If you've been following me here for a while, you know that I'm a big fan of throwing a party, and I especially love making things for kiddos that they can call their own. These fun party hats were cut with this digital die-cut file, then embellished with two rows of crepe paper, sewn on at the bottom and cut with Martha Stewart fringe scissors. I also fringe cut more crepe, rolled it up and stuck it in the top of the hat. To customize each hat, a simple die-cut ephemera piece, topped with an initial and a sequin finishes them off quickly! 

Thanks so much for checking out my projects! Be sure to take a look at the Birthday Bash collection, currently on sale at Scrapbook.com! 

Tutorial Tuesday: Easter Egg Tree

Last year, while shopping in a high-end home store in my area, I found the cutest Easter egg trees, standing about 8" tall, planted in little terra cotta pots, with a big price tag of about $40 each. And I thought: 

I can totally make that.

And I totally did. 

So today, I'd like to share how you can make them too, at a price of way less than $40.

Supplies.jpg

First, gather your supplies. For each tree, you will need: 

  • Foam cone form: I used one 12" high, and one 9" high form, as I like the difference in height on my mantel, but they both fit snugly into the same pot.
  • 22 gauge wire & wire cutters: Look in the floral department of your craft store for this.
  • 3 different types of burlap ribbon: 4" wide wired burlap, 2-1/2" wide colored burlap, and 1" wide metallic burlap & scissors to cut them. I purchased all of my ribbon at Michaels. (Watch for ribbon to go on sale at this time of year.)
  • Decorative foam eggs: I used about 20 eggs for the 12" cone tree, in two different sizes. The tallest egg was 2-1/4" and the smaller egg was 1-1/2". (This is your most expensive supply for this project. I picked mine up at Michaels in the Easter sales last year, which have already begun. Also look at JoAnn Crafts and World Market for different colored eggs.)
  • 2 decorative pots: You will want to be sure that the bottom of your foam cone fits snugly at the top of the pot. (I bought one of these at a time, using a coupon at Michaels.)
  • Hot glue gun and hot glue.

Now, cut your ribbon according to the photo above. To get a good jump-start on your tree, cut about a dozen pieces of each ribbon, then you can cut more from there so that you do not waste any of your ribbon.

Cut the wire into 2-1/2" pieces, enough for the amount of ribbon you've already cut. Go ahead and bend the piece in half, like hairpins. Picking up a piece of ribbon, hold it in the center with your thumb and pointer finger, pinching the sides into the center to create a bow. 

While holding the ribbon bow tightly between your fingers in one hand, carefully slide the wire hairpin over the front of the bow with your other hand and squeeze to keep the bow in place, twisting the wire tightly at the back side, then twisting the length of the wire over itself to create one wire leg to stick into your foam cone.

Once you've created several burlap bows, you can begin pushing the wire end into your form, making a triangular shape with three different bows, so that you leave a space in the middle for a decorative egg. After a while, this process can start to hurt your fingertips, so gloves can be handy for this part. Because of this, I can only complete one tree per day. I need to let my fingers rest afterward! 

Use one of the bows from the first triangle to create another triangle, and then keep going until the entire cone is covered, from top to bottom.

Now, add a big daub of hot glue in the space between your ribbon bows, being sure not to attach your bow with the glue! Be aware of the colors that you are using, so that you don't put too much of the same colored egg in one space. 

Once you have all of your eggs glued on, fill in any gaps where you may be able to see the styrofoam with additional ribbon bows. In this photo, you can see the styrofoam right underneath the yellow egg, so I definitely filled that piece in. The widest burlap ribbon takes up the most space, so I typically used it to fill in any gaps.

Now that your tree is finished, add a large amount of hot glue to the inside edge of the decorative pot you've chosen. Quickly set the base of the cone in your pot to adhere the tree to the pot, being sure not to trap any of your ribbon bow ends between the foam and the pot. I had a hard time doing this fast enough before my glue began to harden, so I ended up squirting daubs of glue to secure the tree once I had it in place on the pot.

Lastly, fluff your ribbon. You can bend the ends of your wired ribbon to give it a pretty bow appearance. Leave your tree as is, or add a few wired floral butterflies flying out of the tree, to add extra springy-ness! 

This really is my favorite home decor DIY project to date. These egg trees look like they cost a fortune, and were picked up at an expensive store! 

Thanks for stopping by, and please share your egg trees with me if you make one! 

Lizzy Turns Three!

On Sunday, we celebrated Lizzy's third birthday, and for the first time, we had a big party with family and friends. Lizzy chose a Frozen theme this year, and for the first time, I didn't have much trouble finding store-bought items, however, I still made a lot for the party! Finding so much snow-themed items on 80% off clearance at Michaels definitely helped keep costs down as well.

My most time-consuming project was the "love is an open door" wreath to greet our guests. The wire mesh and ribbon were all included in the Christmas clearance items at Michaels, so it was a relatively low-cost project! 

As I have done in the past for all of our parties, I bought a couple of yards of cotton fabric from JoAnn Crafts, hemmed it on all sides, added ribbon trim to the bottom and hung it up as a backdrop for Lizzy's birthday banners, which I cut on my Silhouette Cameo. The glittery branches, which were originally $10 each, were only $2 each in the Christmas clearance, and flanked the backdrop on either side in glass vases.

Thanks to some spare cardboard boxes lying around, we created a North Mountain centerpiece and covered the entire island with white tablecloths. Elsa's ice castle topped the North Mountain and held birthday cupcakes, while the entire island had a glittering of snowflake confetti.

IMG_0030.jpg

Over the breakfast bar, we used the same curling ribbon curtain that we created for the Under the Sea themed party that we threw last year for my goddaughter, only we replaced the fish with foam snowflakes purchased at Michaels. 

Snowflakes, tissue paper pompoms and teal balls hung over the breakfast and entry tables, while Frozen swirl hangings hung throughout the kitchen.

In the doorways into the living area and the kitchen we also hung the same snowflakes on fishing line to create a curtain.

My favorite craft project for the entire party were the three centerpieces I created for the tables and breakfast bar, using paper and foam snowflakes, a #3 cut from American Crafts POW! paper with my Silhouette Cameo, and some floral picks in a Ball jar. 

Most of the food at the party had a Frozen theme, like "we finish each others" sandwiches, melte Olaf Greek yogurt cups and Anna's popcorn snowballs.

The chocolate and vanilla cupcakes with teal buttercream went over really well, and I was so pleased that Lizzy wanted cupcakes instead of the typical large cake I usually create. 

On the way out the door, the kid's favor bags were waiting for them on a tulle embellished table. 

I dressed the part, and wore an Anna-inspired outfit for the day. I really do love hosting parties, no matter how little sleep I get the week beforehand!

At the end of the day, after she had a much needed nap, I had just enough energy to take Lizzy's third birthday photos. What a difference a year makes. I know it goes without saying, but man, I love my sweet girly. Happy birthday, my little Lizzy! 

Under the Sea Themed Birthday Party

Over the weekend, we celebrated my goddaughter's 7th and my husband's 37th birthday in a big way with an Under the Sea themed party. It took quite a bit of work to pull off, but we were so happy with how it turned out. Today I'd like to share some of the photos with you.

I sewed a 'sailcloth' curtain (just a piece of natural cotton) to create a backdrop for a fishing net (found at Michaels) and paper banners and shells (cut on my Silhouette Cameo). On the ends of the curtain I hung lengths of turquoise tulle.

Banana dolphins jumped out of the fruit salad.

Croissant crab sandwiches filled a platter.

Another crab hogged all of the hummus.

Sand dollar cookies sat in raw sugar sand.

And many chocolate shells were snatched up by little hands.

Tropical fish (cut with my Silhouette Cameo) swam in the blue waters over our breakfast bar.

A big, pink octopus hung out over the table.

Three beautiful, iridescent jellyfish floated around the table, too.

Each child had a chocolate cupcake with buttercream icing to take home.

And then there was the cake- a complete labor of love. Three layers of chocolate cake with a chocolate mousse layer in between, the covered with buttercream icing waves and surrounded by chocolate shells. It was so heavy, my kitchen scale wouldn't weigh it. 

It was the dolphin cake topper, sculpted by my husband from Wilton Shape-n-Amaze, that really stole the show.

The birthday girl, who was in the pool on the blow-up dolphin most of the time, absolutely loved her party.

This guy had a pretty good time, too. Although, I owe him a birthday do-over for all of the hard work he did helping me to prepare. 

How do you prepare for a themed party? How long does it take you to prepare? Thanks for stopping by! 

The Great British Baby Shower

With five of my friends expecting in our British mum's group, I thought it was necessary to throw a big baby shower brunch. Okay, I know what you're thinking. I'm not British, but I joined an ex-patriate group so that my husband could meet fellow Brits. Since he works, I'm the one who does most of the socializing, and they very nicely accepted me into their group. All of my local friends are British, and lovely, lovely people.

So, back to the baby shower. It seemed appropriate that I make the shower British in some way, so I decided to make it a Paddington Bear theme, however, with very little Paddington Bear decor available, it became a British/Paddington Bear shower. I couldn't have been happier with how the party turned out & I'd love to show you photos from the day.

When you walked in the front door, the entry table was decked out with a vintage Paddington Bear, borrowed from a dear friend for the day, Union Jack flags and bunting and a Paddington sign that I created and cut out with my Silhouette Cameo. The favors were also on this table, so that the girls could grab one on their way out. 

I had a local business,

Carrie's Kitchen

, create custom cookies for the favors. They were so lovely, I [almost] didn't want to eat one! 

In the kitchen and living area, we hung Union Jack bunting and cute British baby clothes on a clothesline, which also doubled as a memory game. 

I pulled globes out of Lizzy's room, and paired them with a Paddington book and teacups.

Over the kitchen island, I paired some Martha Stewart red pinwheels with handmade map-print pinwheels created from patterned paper. Behind them, I hung a large Union Jack scarf.

On the island, I raised Paddington Bear up on a borrowed Union Jack box and pulled decor from around the house, like a teacup, map print candles and a red and white plaque.

On the buffet, I served two breakfast stratas, a smoked salmon plate with bagels, a cheese plate, muffins and scones. For dessert, I made an orange and raspberry trifle, complete with a blueberry & raspberry Union Jack on top.

And what kind of British party would it have been without tea?

On the mantel and in the entryway, I hung bunting with alternating Paddington faces (cut from my Silhouette) and red tissue paper tassels. 

One of my favorite pieces of decor that I made the night before were these large Paddington tags that I hung from the ceiling fan, along with more Union Jack bunting. Each mum-to-be took their tag home as a keepsake from the day.

I love throwing a party, especially one that includes mimosas. 

Thanks for stopping by!