Ali Edwards Story Kit: Documenting Our Home

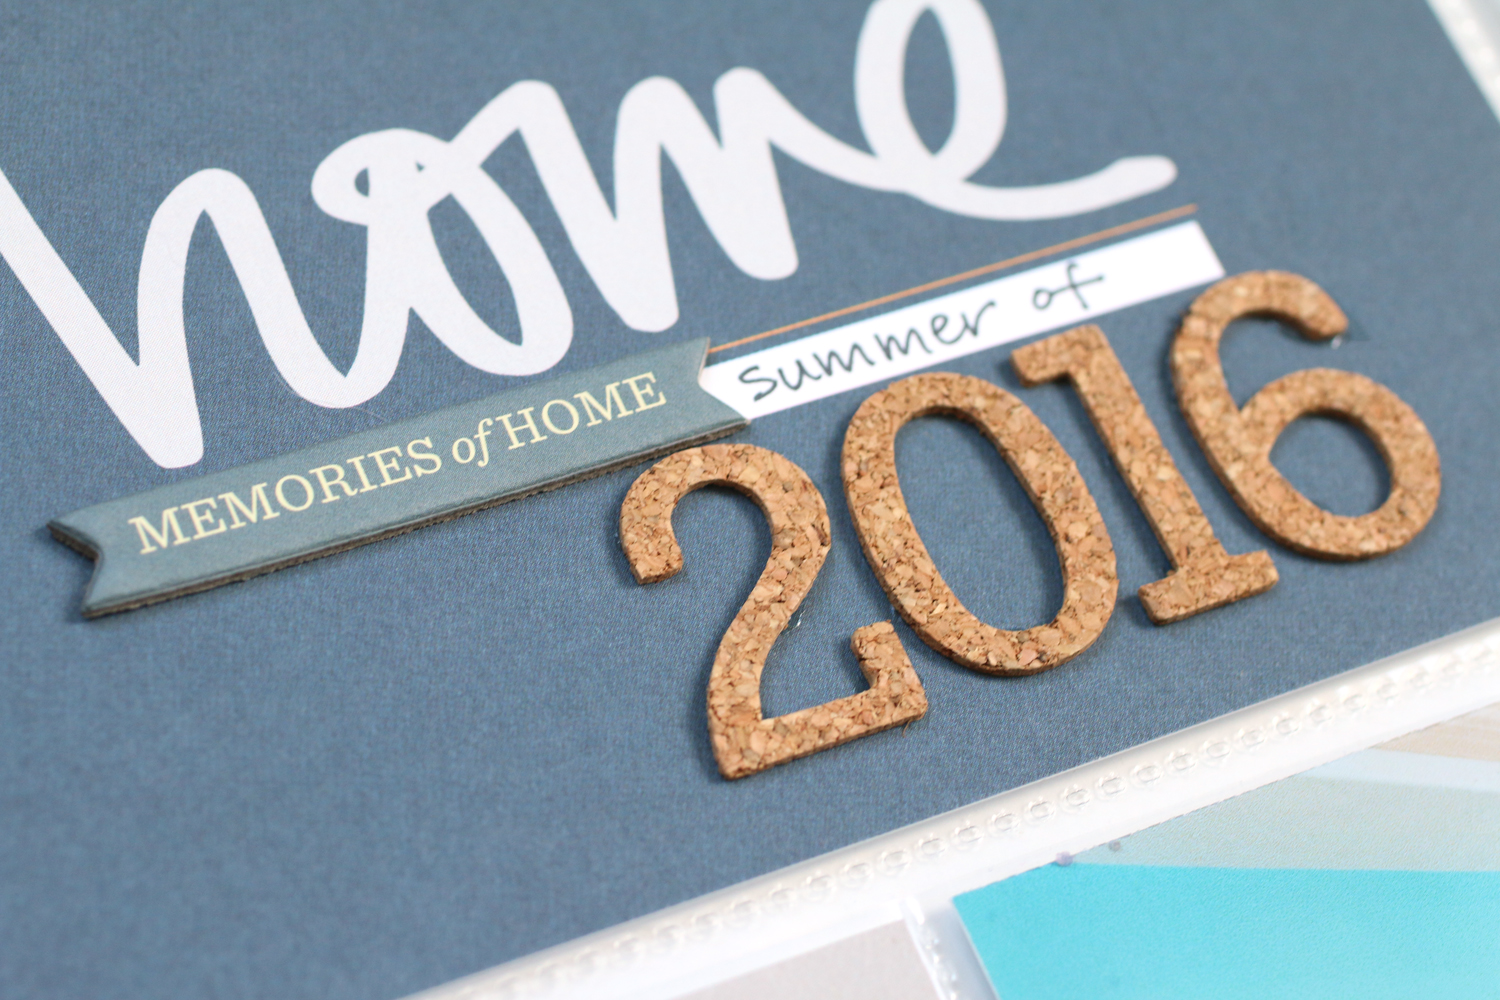
In the summer of 2016, we were hoping to make a big move to Kentucky. However, for some reason that just wasn't in God's plan, so we ended up staying in Texas. We had spruced up our  home to get it ready to lease out, which included professional photos. So to make lemonade out of lemons, I have a really lovely documentation of how our house looked that summer, and I decided to record it in a pocket page using the Ali Edwards Home Story Kit.  

MeghannAndrew_AE_HomePocketPage_01.jpg

This kit included the perfect colors for documenting our home, and I used the "home is" add-on labels to record what home is, from the perspective of each room that I documented. 

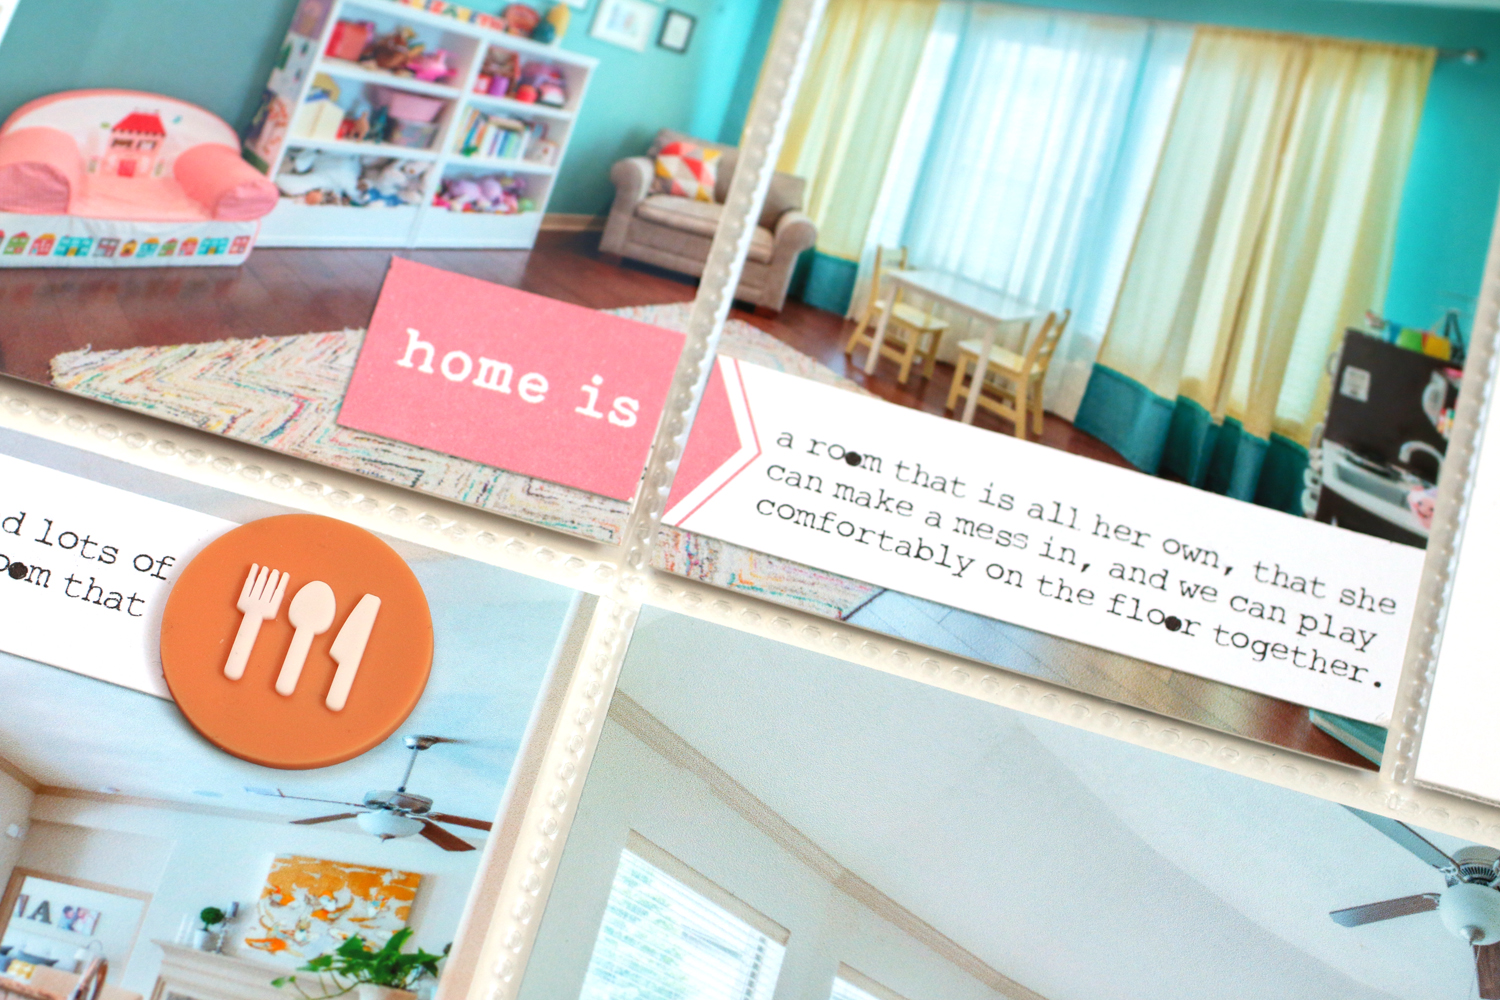
Recording "the story of" my daughter's playroom on the 3" x 4" card was important, as when she became old enough to have enough toys, we decided to forgo a formal dining room to make it her playroom—one of the best decisions we have made in this house! I wanted to get that down in writing.

Even two years later, our bedroom looks completely different now, with new furniture, color on the walls and new bedding. I'm happy to have what it looked like before recorded, and it will be interesting to re-create all of these images again to compare them to our home in 2016.

MeghannAndrew_AE_HomePocketPage_02.jpg

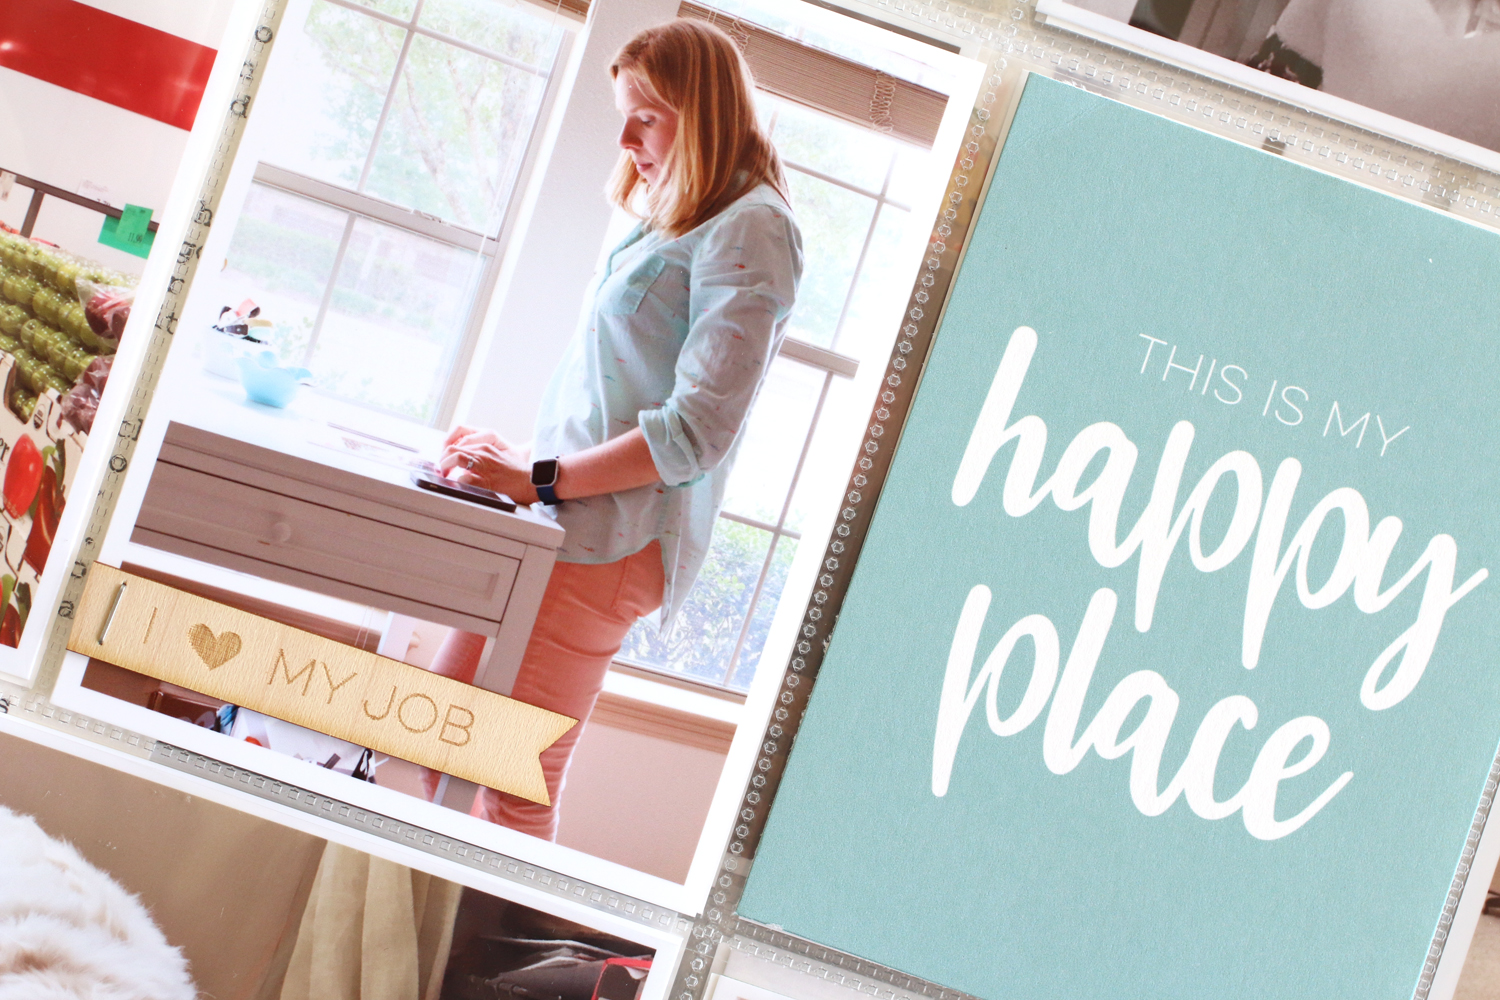
The backside of the layout includes my daughter's room and my creative space—my two favorite places in the house! The teal in the kit worked perfectly with all of the teal in my photos.

This "five senses of home" card was really special to me. I sat down and closed my eyes to think about what home looked, smelled, tasted and sounded like. It makes me happy to have these down on paper.

MeghannAndrew_AE_HomePocketPage_06.jpg

We as a family like to embrace the "less is more" attitude, so it was important for me to add that home is a space that we fill with things that mean something to us, like the Monaco Grand Prix print on the wall in the background of this photo. 

I loved creating with the Home Story Kit, and after creating three projects with it as a guest storyteller, I still have plenty of product to record more memories. I'm so happy to have these photos recorded, as I know that the images and details of each home we've lived in slip away after a few years. 

Thanks so much for stopping by! Happy creating this weekend!

Introducing Title Builder Volume 2!

EllesStudio_May2018_MeghannAndrew_BetterTogether_02.jpg

Today is an exciting day, as my second collaboration with Elle's Studio, Title Builder Volume 2, is now available in the Elle's Studio shop!*

(*All product links contained in this post are affiliate links. You don't pay any extra, but I get a small percentage of your sale! Thanks for your continued support of my YouTube feed and this blog!)

EllesStudio_May2018_TitleBuilderVol2Bundle.jpg

I LOVE creating titles! Not only coming up with clever titles, but also choosing the product to make them! When I launched my class, Terrific Titles, at Big Picture Classes, I wanted to create a product that made title building easier, and that's when I paired with Elle's Studio to bring you the original Title Builder products! Now, Title Builder Volume 2 will add even more title possibilities to your stash! Watch this introduction video to see what you can create with this fun product!

I had so much fun creating with these new products last week! I quickly and easily made three simple projects, with beautiful and poignant titles! I love how easily they come together with these Title Builder products! 

EllesStudio_May2018_MeghannAndrew_ThisSweetGirl_05.jpg

Title Builder has been designed to work as a series of a 6" x 8" stamp, acrylic and wood veneer which you can get in a specially-priced bundle for 15% off the retail cost, or you can buy each piece individually. 

EllesStudio_TitleBuilderVol2_PDFsneak.jpg

With your purchase of the Title Builder Vol. 2 stamp or the bundle, you will also receive a PDF via email with over 100 title combinations that you can create with the stamp only! Add on the words from the acrylic, wood veneer or alphas from your own stash, and the possibilities are endless!

I can not wait to see what you create with these fun, new products! Be sure to tag me, @meghannandrew on Instagram, or simply use the hashtag #EllesStudio if you order, when your box arrives, or when you create with Title Builder Volume 2

U.S.S. Midway Layout + Pocket Page with Process Video

The April kit and extras* from Elle's Studio are so fabulous, I've created another project to share with you today, and this is my favorite type of project—a layout and pocket page combination! I created this project about a wonderful day that we spent on the U.S.S. Midway in San Diego, California.

(*All product links contained in this post are affiliate links. You don't pay any extra, but I get a small percentage of your sale! Thanks for your continued support of my YouTube feed and this blog!)

MeghannAndrew_USSMidway_01.jpg
MeghannAndrew_USSMidway_05.jpg

I loved creating this custom embellishment with the April 2018 cut filesCurrently stamp and Adventure puffy stickers

MeghannAndrew_USSMidway_07.jpg

The new Mini Dated stamp was perfect for adding the date to this die-cut from the April 2018 kit.

While creating, I filmed a video so that you could see my process! Grab a cuppa and have a look:

I also added to the pockets on the back side of this spread, and continued the star theme:

MeghannAndrew_USSMidway_02.jpg

With such a fantastic choice of tags, die-cuts and embellishments this month, this spread was easy, and so fun to put together! Be sure to check out all of the new product in the Elle's Studio shop, including the Noteworthy collection! 

MeghannAndrew_USSMidway_09.jpg

Elle's Studio February 2018 Kit Reveal: January Pockets

The Elle's Studio kit and add-ons released today, and I am excited to share a double pocket-page spread that I created using these new products, along with a few of my favorites from the shop. These pockets record the beginning of January. (*All product links contained in this post are affiliate links. You don't pay any extra, but I get a small percentage of your sale! Thanks for your continued support of my YouTube feed and this blog!)

EllesStudio_MeghannAndrew_JanuaryPockets_01.jpg
EllesStudio_MeghannAndrew_JanuaryPockets_02.jpg

I love these blank tags, designed to fit the graphic icons found in the kit and the Icon stamp. I also added the stamped "in one word" box from the All the Details stamp

EllesStudio_MeghannAndrew_JanuaryPockets_04.jpg

On the right side, I started off with a simple 4" x 6" tag featuring the wood veneer ampersands and the word "life" from the Title Builder Acrylic. I also used another wood veneer snowflake on this side, to balance the left and celebrate a snow day here in Texas.

EllesStudio_MeghannAndrew_JanuaryPockets_03.jpg

I used the Icon Printables, recoloring this striped tag, as well as the hearts tag to match my blue, teal and yellow color scheme. I stamped the balloons from the Happy Birthday Stamp onto one of the bold, striped tags from the kit, fussy cutting them out. I also created a patterned balloon with the Icon stamp.

EllesStudio_MeghannAndrew_JanuaryPockets_08.jpg

Great news! I created a process video while putting this spread together! Check out this short video to see how I focused on keeping my page balanced, and used the "less is more" theory to keep it fairly simple. 

Thanks so much for stopping by! Be sure to check out the February 2018 kit and add-ons while supplies last! 

2018 Monthly Pocket Page Tags with Elle's Studio

Hi there! Since I'm so far behind on my 2017 monthly pocket page documentation, I want to set myself up early for 2018. I plan to stick with monthly spreads, using only phone photo per day, journaled and printed from my Collect App. 

Yesterday, Elle's Studio released a set of new products* for December, and included in those products were the Monthly Puffy Stickers*. White in color, they are perfect for re-coloring, and I was so excited to use them to create 4" x 6" month markers for my pocket page album! (*All product links contained in this post are affiliate links. You don't pay any extra, but I get a small percentage of your sale! Thanks for your continued support!) 

MeghannAndrew_EllesStudio_MonthPuffyStickers_PocketPageTags_02.jpg

I started off these tags by re-coloring my Monthly Puffy Stickers, using one of my favorite products, a Sharpie oil-based marker in metallic gold. These markers are amazing, and I've used them for a number of craft projects—even painting ceramics! I highly recommend them! I left the stickers on the backing and covered them with the oil-based paint, which went on beautifully.

MeghannAndrew_EllesStudio_MonthPuffyStickers_PocketPageTags_04.jpg

Next, I chose the 3" x 4" buffalo check journaling tag from the Love This Printables, opened it in Photoshop Elements, and re-sized it to 4" x 6", placing the check pattern on the base. I also de-saturated the color 100%, making the check pattern gray, a great neutral, which will work with any spread from next year's album. Once the tags were printed on thick, smooth white cardstock, I stamped "hello" and "documenting" in gray using the Title Builder Stamp.

MeghannAndrew_EllesStudio_MonthPuffyStickers_PocketPageTags_03.jpg

Next, I adhered my gold monthly puffy "January" sticker next to my stamped words. I love the way that it looks against the gray buffalo check pattern! 

MeghannAndrew_EllesStudio_MonthPuffyStickers_PocketPageTags.jpg

Since January is the kick-off to a new year, I also re-colored and added "2018" from the Monthly Puffy Stickers to this tag. I created all twelve of the tags for my 2018 album, and I am so excited to have a head-start on an important part of this big project! 

Thanks so much for stopping by today! Check out the products that I used in this simple and easy project below: 

Documenting October with Elle's Studio October Kit + Add-Ons

Hi there! The Elle's Studio October 2017 kit and add-ons went live yesterday, and I shared a new layout and process video with you, but today, I'm switching things up a bit and showing you just how perfect the ES products can be in pockets! I documented our October 2016, and this kit was just made for my photos. (*All product links are affiliate links. You don't pay any extra, but I get a small percentage of your sale! Thanks for your continued support!) 

October2016_Page3_Blog.jpg

At the beginning of the page, we were headed back from a road trip to the mountains. The "life in photos" die-cut circle from the October kit was perfect for dressing up this yellow tag from the Favorite Season printable, and I also added a stamped "love" circle from the So Cozy stamp and a green "x" from the Summer Puffy Stickers. I'm still using them on my layouts! Below that, I added the "notes from this" phrase from the So Cozy stamp, then a piece of chipboard from my stash below. 

October2016_Page3_Closeup3_Blog.jpg

October usually means racing for us, as we go to the Austin Grand Prix each year here in Texas. I loved the way that the diagonal striped 4" x 6" tag from the October kit pointed directly to my "F1 Grand Prix" journaling tag. I also added the "play" stamped circle from the So Cozy stamp in the top corner, to add a little bit of orange.

October2016_Page3_Closeup4_Blog.jpg

 I was happy to get myself in this page, too, sporting my favorite driver, Lewis Hamilton's gear. The next tag's background was created with a piece of the Family Fun 6" x 6" Paper Stack, and was perfect for the "being together tag" from the October Kit, an acrylic heart from the Stars and Hearts Mixed Acrylic and a the heart Vellum Speech Bubble.

October2016_Page3_Closeup2_Blog.jpg

How awesome is this little frame included in the So Cozy stamp? I stamped the frame, then "so cozy" inside of the frame before cutting it out and adhering it directly to my photo with dimensional adhesive. It was the perfect saying for this photo! 

October2016_Page3_Closeup_Blog.jpg

Thanks so much for stopping by today! The new products in the Elle's Studio shop this month are just perfect, and with them I created one of my favorite pocket pages to date! Later, I'll be sharing how I'm doubling this page up with another layout to finish off the month. Until then, be sure to shop these supplies from the gallery below before they're sold out of the shop! Happy creating! 

September Pocket Pages Using the New Elle's Studio Kit!

There are so many project possibilities available with the new September Kit from Elle's Studio! Yesterday, I shared an 8-1/2" x 11" layout, and today, I wanted to show you a double pocket page spread that I created, documenting September 2016. When I create my pages, I carry the same color scheme across a double page spread, and for this layout I chose dark blue, light blue, yellow and orange. (*All product links are affiliate links. You don't pay any extra, but I get a small percentage of your sale! Thanks for your continued support!) 

Sept2016PocketPages_Spread_Blog.jpg

Supplies | September 2017 Kit, Sweater Weather PrintablesDate Night Stamp, Wood Veneer Borders, Thankful Sticker Labels, Autumn Sequins, Happy Birthday Stickers (balloons), Acrylic Summer Shapes (glasses), Foodie Journaling TagsFamily Fun Journaling Tags, Family Fun Bits and Pieces, Family Fun Acrylic Shapes ( blue heart), Family Fun Stamp, Olivia Alphabet Stamp, Dated Stamp, Title Builder Stamp, Happy Birthday Stamp

I love all of the energy in this page, and I really kept the embellishment to a minimum, but it doesn't appear so! On the left side, I used the blue 4" x 6" tag from the new Family Fun Journaling Tags to top my spread, stamping "SEP" over and over in blue ink using the Dated Stamp

The embellishment I used on this side was only the Date Night StampThankful Sticker LabelsWood Veneer Borders and die-cuts from the kit.

Sept2016PocketPages_Closeup1.jpg

I also had to use one of the new Foodie Journaling Tags to document a favorite lunch spot! 

Sept2016PocketPages_Closeup2.jpg

On the right side of the page, I used the Sweater Weather Printables to create a customized 4" x 6" tag for the top of the spread. By taking a 3" x 4" tag from the digital file, duplicating it and mirroring it on a 4" x 6" page, then re-colored it to match my spread.

The entire process only took about three minutes, and I created a tag that works perfectly for this spread! Because a birthday photo was next to the tag, I added the balloons from the Happy Birthday Stickers and Happy Birthday Stamp, along with some Autumn Sequins. I carried the "SEP" title from the left side and added "story" using the Title Builder Stamp

On this side, just like on the left, I used very little embellishment— mainly stamps and die-cuts from the September kit. On this journaling tag placed next to a photo of my new goddaughter, I added "I love being your" and "mother" from the Family Fun Stamp, and added "god" using the Olivia Alphabet Stamp, along with a Family Fun Acrylic Shape heart.

Sept2016PocketPages_Closeup4.jpg

This page came together quickly and easily because the September Kit coordinates so well with the new Family Fun collection. Check out all of the new product in the Elle's Studio shop today to help you document your September memories! 

SCT Summer Edition: Pocket Play

I was so excited to be featured twice in Scrapbook and Cards Today's summer issue, and I loved being a contributing writer for the Pocket Play column. It it, I described how I finally found a way to make pocket page scrapbooking work for me, and I shared a new favorite layout with a favorite color scheme for me: yellow and red with a touch of teal. You can find this color scheme often in my albums. (*All product links below are affiliate links. You don't pay any extra, but I get a small percentage of your sale! Thanks for your continued support!) 

My title pocket was created with the fun, colorful tag from the Happy Birthday Journaling Tags. I started the quote out with the word "memories" from the Live Laugh Love Puffy Stickers and searched online for a quote about memories, finding this one from Rosa Parks. I loved it, and typed it in Photoshop before printing it on the tag. A few more puffy stickers and an Acrylic Birthday Confetti piece finished off the pocket, which introduced the page.

This page documented a surprise trip to my mom and dad's for my father's 60th birthday. I had to create a tag that documented that, and the balloon Happy Birthday Stickers and Dad acrylic and word set helped me add a bit of embellishment to the Happy Birthday Journaling Tags. This may be one of my favorite ever embellished tags in my album, although my sewing machine was acting up that day when I sewed the balloon strings!   

Summer to me means baseball games. I love going to them with my family, and our hometown stadium is so fun to visit. I used the "like it/love it" tag from the April 2017 Kit as a base for my pocket, typing my journaling and adding a cut tag from the Live Laugh Love Bits and Pieces and a piece of printed Live Laugh Love washi tape stickers

Check out the FREE Scrapbook and Cards Today summer issue to red my full article and get loads of summer scrapbooking inspiration! Happy creating! 

Documenting My Love for The Gilmore Girls

Gilmore_Closeup2_Blog.jpg

When I found out that The Gilmore Girls: A Year in the Life was coming out in the fall, I was SO excited, as were most 30-somethings all over the country. But when it was released, the day after Thanksgiving, we were just about to embark on a trip to Hawaii and Disneyland, so I waited. I waited through December, until my husband left for work, and waited again until New Year's Eve, when my daughter was having her tonsillectomy. All of that waiting was completely worth it, and because the event was part of my New Year's celebration, I decided to document it in a pocket page. I even included a photo of The Dragonfly Inn on my TV screen with my twinkle lights on the mantel and a fire in the fireplace. Ah... cozy!  

Supplies | Elle's Studio May 2017 Kit*, Elle's Studio Today Stamp*, Elle's Studio Arrow Stickers*, Unity Stamp Company Lux Girl, misc. die cuts, Colorcast Designs Gilmore-themed wood veneer & acrylic (sold out), misc. sequins (Supplies with an * are affiliate links. You don't pay any extra, but I get a small percentage of your sale! Thanks for your continued support!)

Supplies | Elle's Studio May 2017 Kit*, Elle's Studio Sky Blue Puffy Alphabet Stickers*, Elle's Studio TV Journaling Tags*, Elle's Studio TV Stamp*, Elle's Studio TV Wood Veneer*, misc. cardstock alphabet stickers, misc. sequins, Colorcast Designs Gilmore-themed wood veneer & acrylic (sold out), (Supplies with an * are affiliate links. You don't pay any extra, but I get a small percentage of your sale! Thanks for your continued support!)   

I took my color scheme from the official A Year in the Life image with the beautiful sky blue background, as well as the photo of Lorelai and Rory grabbing a coffee and the morning paper in Star's Hollow. Mixing the beautiful light blue, with navy and pink felt just perfect for this spread. 

Gilmore_Closeup1_Blog.jpg

Back in March, when I attended Scrapbook & Cards Today's Crop and Create Toronto, one of my kind, fellow croppers gave me this Lux Girl stamped image by Angie Bloom and Unity Stamp Company. It reminded me so much of Lorelai, and I knew it would be perfect to use when I was ready to create this spread. I held onto it for three months & coloring it in with watercolor pencils and a water pen was so relaxing. I backed it onto a piece of striped patterned paper from an old Scraptastic Club kit, and cut it in half, so that it would fit across two 3" x 4" pockets. Since she was looking down, I wanted to put a bit of embellishment under her feet, so I added label and heart die cuts, as well as a wood veneer heart.

This 3" x 4" tag that I used on the back side of the page is from the Elle's Studio May 2017 Kit. I knew what words I wanted to add right away, and I used the Elle's Studio Sky Blue Puffy Alphabet Stickers, and another lighter blue set that I had laying around from an old Studio Calico kit. To finish off the tag, I added the wood veneer coffee cup from Colorcast Designs 

Alongside the Colorcast Designs veneer and acrylic pieces, I also used the Elle's Studio TV Wood VeneerJournaling Tags and Stamp. We don't watch much television around here, but I think documenting what little we do watch is important! Since we just started House of Cards on Netflix, you can expect to see another spread using these supplies to document that series later in the year! 

What shows do you watch? Have you documented them yet?

Week In the Life 2017

For the first time in four years, I have successfully finished my Week in the Life project, and I'd love to share it with you! Our life has significantly changed over the last year with my husband on a 28-day rotation, so it was very important to me to finish this project this year. I wanted to see things through my lens, most importantly, see the POSITIVE parts of our life, because to be honest, when my husband is gone, I sometimes feel sorry for myself. This week happened to fall during a week when he was away, so it documents the daily lives of my daughter, dog and I, and as I expected, it was eye-opening. When not in the daily grind, I can see just how blessed we are; to have each other, to have technology to speak and see each other, and to have the means to do fun things and eat great food. This week was also special because it fell on my 34th birthday, and on our March for Babies walk with the March of Dimes, a cause we greatly support raising a former micro-preemie.

I attribute my success in finishing this project to a few things: 

To begin, I created a small cover page to delineate the beginning of WITL in my monthly pocket page spread album. I downloaded the PNG "my story matters" file from the Week in the Life Community page, adding it to the left column of an 8-1/2" x 11" sheet in Photoshop Elements. I then "cut" the multicolor stripe pattern from one of the tags in the Week in the Life Digital Bundle into 1/2" strips and placed them along the left margin. I printed the page, cut it in half and adhered the right side to the back to make it thicker before I punched the holes. For this alone, I'm glad that I purchased the digital bundle, especially since I didn't want a stand-alone album for this project.

Before each day's pocket page, I added another 4-1/4" x 11" cardstock page with the words of the week— an hour-by-hour breakdown of our day. I created these by using the "today's details" image from a 3" x 4" tag in the Week in the Life Digital Bundle to top the left column on my sheet, then I copied and pasted my words from what I documented in my Notes App. After I printed the page, I cut it in half and again adhered the right column to the back of the sheet. I wanted a space to add the date, but since I didn't have room at the top, I stamped the date repeatedly on the left margin in the same color as I had made the "today's details" image. 

I continually mixed up my pocket page designs throughout the week's documentation, but each day had the same setup: I used one 4" x 6" pocket to add the vellum days of the week word from the Week in the Life Digital Bundle. All of my photos were printed with a white border, which makes the different sizes congruent. I also added one or two filler tags, to give myself a break and add a bit of pretty paper. 

I wanted a few different textures for my embellishment, and I chose these Elle's Studio Work Hard Wood Veneer pieces. Although they have a "work" theme, the sayings were easy to incorporate throughout the pages.

I definitely don't often do this, but I stamped directly onto my photos. And yes, I screwed it up a few times, having to re-print the photo. But I love how I used the images in the photos to tie in the stamped words, like in this bath photo of my daughter using the Lens Story Stamp from Ali Edwards.

This might be one of my favorite parts of these pages. I had to take some marketing images for my Terrific Titles class at Big Picture Classes, and the light in my office was just perfect. The "I heart my job" wood veneer was perfect to add to the bottom of the page and the "this is my happy place" tag from the free Elle's Studio NSD digital file , re-colored to match the Week in the Life Digital Bundle was perfect to add next to it.

Even though I hate doing it, I added my own handwriting on a couple of journaling tags. Mainly because this was my LAST STEP of completion, and I was too lazy to scan in the tag and type my journaling up in Photoshop. Just being real.

It was pretty awesome to add photos of my daughter's Spanish performance at school in the album, as well as a complete temper-tantrum breakdown in the bottom right corner. Real life.

Cooking and eating are a BIG part of our daily lives, so of course photos of our meals appear throughout the album. I plan to keep these blue-rimmed plates forever, since I love the way they look against our white farmhouse breakfast table.

The "post midnight" photos from my 34th birthday celebration did not make an appearance in the album, for obvious reasons. 

We are deeply involved in our local March for Babies, benefitting the March of Dimes, so it was pretty awesome to have this documented on the final day of WITL. 

The final page includes a large image of the three of us, taken late Sunday afternoon. To take the photo, I used the timer on the Photos App, propped up against a stone. I love all of the negative space, and just had to add a stamped phrase using the Lens Story Stamp. I found the perfect 4" x 6" tag from the Project Life Everyday Edition, and simply added in the dates from the week using the Elle's Studio Dated Stamp

So, an epic project is complete. Thanks for getting through this epic blog post, too! Happy creating!

December Project Life Spreads

I'm about six months behind with my Project Life spreads from 2016, but I'm trying not to let that stop me from finishing up this project. I wanted to start with the 'elephant in the room,' my December spreads. It's definitely the month that I've taken the most photos, so there was a lot to document. Plus, I decided early on not to take on a December Daily album project this year, so these pages are all that I'm documenting for the month.

I started off with my first page setting the tone for the entire month. I typically try to choose a multicolored card that can set my color scheme, and I did that with the multicolored starburst card in the second row. From there, I chose other tags to coordinate with that one to fill the remainder of my pages. The bright color scheme worked perfectly for the things that we did this month, including a trip to Hawaii and Disneyland.

I kept my embellishment quite simple, but used a lot of stamps to create and add to my filler tags.  I love the Magic Journaling Cards no. 1 from In a Creative Bubble, and I was excited to use that 4" x 6" castle tag, embellished with just a few rhinestones.

Page four was all about the week leading up to Christmas, which I spent with my family, so I had lots of journaling to add. On the right side, I put my Christmas present tags in the pockets. My parents loved them, and took some of them home, so these were the leftovers.

My final page was all about the week after Christmas and my daughter's surgery. You might just see a little sneak peek on this page of fun things to come from Elle's Studio. Stay tuned! 

I can't wait to wrap up 2016 in it's album. I guess I had better get to work documenting and filling those pockets! 

Elle's Studio August Exclusive Kit Reveal!

I'm so excited to tell you that the Elle's Studio August exclusive kit and add-ons are now available in the Elle's Studio shop! August is typically one of my favorite kits of the year, and this one definitely did not disappoint! 

The kit is full of great colors and awesome sayings. Also, the die-cuts are now being packaged on 4" x 6" sheets, ready to be easily punched out, and I created a short video to show you how easy they are to remove from their sheets, which make them so much easier to see all together in one place.

Don't forget the digital printables and cut files that coordinate with the kit! 

I started my projects out this month with a double pocket page spread! It's been a LONG time since I created one of these, and I just added a few stamps and items from the Sunny Days collection. There is so much packed in the kit that I had plenty of tags left to create a layout and still have leftover supplies! 

I just had to use the Read stamp to include these colorful little stamped books on the "sunshine and ___" tag! 

For my second project, I went back to my roots and created a 12" x 12" layout! The "long hot summer days" tag was my muse for this layout, and I printed out photos from an impromptu splash pad encounter this summer.

These are definitely some of my favorite photos from the summer, and this kit was perfect to document them! 

Be sure to stop by the Elle's Studio shop to check out all of the new items this month, and be sure to check out the sale items in the shop this month! 

Documenting May

No matter how many traditional layouts I create, I still LOVE my monthly pocket page spreads. They allow me to get so many more photographs in my album which I don't have time to create layouts for, and document a huge portion of our daily lives as a family. 

For the month of May, I got to work on my Project Life spreads, using the May 2016 This Life Noted kit and add-on from Scraptastic Club.

I started off with a double page spread, using a red, pink and yellow color scheme. The majority of my journaling was done with the Collect App. I kept my pockets fairly simple, using die-cuts from the kits, and filling a lot of spaces in with the This Life Noted stamp, included in the kit.

This month included Mother's Day, so of course I had to include the "cool mom" card in my spread!

Spread two for the month has a blue, teal and yellow color scheme. Using yellow on both spreads ties them together, even though they have very different color schemes.

There were so many fun embellishments included in the kits this month! I especially loved the Project Life Currently Ephemera included in the add-on. The little cameras were perfect for adding a little something to my cards.

To add a bit of a title to my spread, I used the Fancy Free Thickers from the Cake by the Ocean kit (sold out) on my 4" x 6" card.

Page 5 again uses yellow, but with just teal this time. I used very simple embellishments on this page, but I love how it all turned out. I will use the same color scheme for the beginning of June, which will go to the right of this page.

Thanks for stopping by! How are you doing with your pocket page album? So far, I've been able to keep up, with help from the Collect App and my Scraptastic Kits! 

Jot Magazine: Boston Pocket Page Spread

The next issue of Jot Magazine is due to release tomorrow, but before you have a brand-spankin' new issue to drool over (I've seen some of the projects from my DT members, and you will be so inspired!) I'm here to share a pocket-page spread from Issue 12 that may be my favorite in my 2015 album.

If you've ever had a look at my pocket pages before, you would see that I use a monthly format and the Collect App for my journaling. With this spread below, I'm documenting in more detail a trip that we took, so I tend to go with full-size photos and longer journaling. This isn't something that I can keep up with on a weekly, or monthly basis, but I love doing it for special events throughout the year when I have a lot of photos to document. 

Boston supplies | Ali Edwards Go Story Kit, Cards: Scraptastic Club ("today & days of the week); Embellishments: Scraptastic Club (labels), Pink Paislee (star, arrow & "itinerary"), Studio Calico (flair, chipboard hearts); Stamps: Elle's Studio ("love you and me" & cutlery), Scraptastic Club ("today's story").

This spread documents our trip to Boston in September, and I took cues from my photos when choosing my color scheme. It's quite photo-heavy, and embellishment light, which I prefer. I typically only embellish my filler cards and small amounts of the negative space in my photos. 

The Ali Edwards "Go" Story Kit was perfect for these photos- both in the color scheme and in the theme to document our long weekend away in a city that we loved. I also used a lot of labels to jot down specifics from my photos. I get coordinating labels with my Scraptastic Club kits each month, but you can also find some (for free!) from Kaitlin Sheaffer

Boston Right.jpg

To add embellishment to the "Go" kit, I used pieces from the Pink Paislee Atlas collection- it paired perfectly with the kit and worked well with the travel theme. 

Negative space in my photos were the perfect place to house small groupings of embellishment. This photo is one of my favorites from the entire trip, and printing it in black and white made it really stand out in the spread.

Be sure to check out the Jot Magazine home page tomorrow, when Issue 13 will be ready to peruse with a cup of coffee! You will be amazed at what the Jot Girls have in store for you! 

October/November Project Life Spread

I have to say, every time my This Life Noted kit from Scraptastic arrives, I'm so excited to flip through the cards to see what color combination I can use on my next spread! What's even more exciting is when two different kits coordinate to create a fantastic spread, like with the October (sold out) and November TLN kits.

This spread documents the end of October and beginning of our November, so I felt it was appropriate to mix both the October and November kits, and uses a gold, orange and teal color scheme. I really wanted to use the big pumpkin 3" x 4" card for our Halloween photo, and I stamped it with the This is Halloween stamp set from October.

My favorite card in the spread is this 4" x 6" leaf card from the October kit, which I added teal watercolor to, to tie into my color scheme. I also stamped "I want to remember these moments" with the November Ain't No Sunshine stamp set.

The right side of the spread continued the color scheme, as well as the watercolor and painted effects that I loved with both of these kits.

The exclusive embellishments in this month's kit were fantastic, especially the puffy stickers, which are also available a-la carte in the shop

It's crazy to think that with a few more spreads, this year will be completely wrapped up in my album! Thanks for stopping by & happy Wednesday! 

September - October Project Life

Life is super busy lately. If you missed my announcement on Instagram, I have an upcoming class in January at Big Picture Classes that I am hard at work on. With that added to the things that I already have going on, as well as general life, I'm finding the need to keep my Project Life pages simple even greater at the moment.

On this spread, which highlights the end of September and beginning of October, I used the October This Life Noted kit and stamp from Scraptastic Club.

Every month when I open my TLN kit, there are so many possibilities for a color scheme on my spread. This month, I chose navy, citrine yellow and grey. I love how clean and modern it feels. 

Left_blog.jpg

I completely allowed myself to have a few filler cards this month with minimal decoration, but I made up with it by adding more journaling to a couple of cards, like the "book review" card, and another which I made my own by stamping "enjoying" on a cut-apart and pasting at the top.  

With the switch to October on the right side of the spread, I created a new month card with the stamp and some grey alphas included in the kit. I put minimal decoration on this page again, just to keep the process quick and simple. 

That's it! Another spread in the books. It's amazing that I'm almost finished with my second year on this project, and I'm loving it more and more every month! 

Thanks for stopping by! 

July Project Life Spreads

Hello there! Today I’m sharing a TLN spread that I created with the Scraptastic Kit Club's August This Life Noted and Wednesday Night kits documenting the final days of our July. The green and turquoise cards and paper in the kits worked perfectly with the photos from our trip home to Kentucky. 

To bring attention to our trip to Kentucky, I created two customized cards in the center of my spread with my Silhouette Cameo and papers from the Wednesday Night kit & add-on. I topped the cards with a flair badge and "long way home” cutout from the TLN kit.

In between the left and right sides of my spread, I added a hand-sewn pocket, sized 3-1/4” x 8” to house a photo of my daughter and I from a day of hiking, as well as our hiking trail guide on the back.

The TLN stamp, which I stamped with Staz-On directly onto my photo worked perfectly with the “that was fun” cutout that I punched with a circle punch. To finish off my embellishment grouping, I added the “go somewhere new” banner and a wood veneer heart.

The right side of my spread included some tough days, which required hidden journaling, housed under the “refresh & renew” tag, which I attached with washi tape from my stash.

And that's a wrap with July in our Project Life album! Now, on to August. It feels great only being a month behind! 

June Pocket Page Spreads

Hi there and happy FRIDAY! Today on the Scraptastic Club blog, I shared the second half of my June pocket page spreads, using the This Life Noted kits, and I wanted to share my entire month of June here with you, too! 

The first half of my month started with our trip to Savannah, so I used a bit more color than I normally would on a spread. I used the June 2015 This Life Noted kit to complete the spread. 

My favorite card for the spread - possibly in the entire album so far - is this custom 4" x 6" card. To create it, I just cut large letters out with my Silhouette Cameo, twice, in color and in grey to create a shadow. After adhering them to the card, I cut it in half so that it fit in two 3" x 4" sleeves and then journaled at the bottom, finishing off with a stamped car from the June 2015 Can't Go Home stamp set (sold out.)

My second spread, created with the July 2015 This Life Noted kit, shows the second half of my month. In this spread, I included a few cards printed with typed journaling to give more information about the stories shown. I love the yellow, grey and tomato red color scheme on this spread.  

My favorite card on this spread was, once again, a 4" x 6" card, placed at the top of my spread. To create it, I added "June," stamped with the awesome July 2015 Sentiments Series v.10 alphabet stamp. To this, I added a tag with the "#summer" sticker, along with the yellow sunburst and cork quote embellishment.

I also loved the stamp set included in the July 2015 TLN kit. The "game changer" bubble couldn't have been more perfect for this card about new spin bikes at the gym. 

Thanks for stopping by and taking a look at my album. Be sure to check out the TLN kits if you're in the market for a pocket page kit subscription. They make documenting our everyday so much easier! 

Around the web...

Summer is busy around here. We have been enjoying time spent with family, going on adventures and taking it easy at the same time. I have been living in the moment, which means that I haven't shared everything that I've been doing around the scrapbooking web-o-sphere lately. So today, I'd just like to give you a head's up on a few places I've been featured.

Basic Grey June Guest Designer

I was so excited to be asked as the Basic Grey guest designer for the month of June! I created four different layouts using the Tea Garden collection, which at first I was afraid would be a bit busy for me. However, the beautiful colors drew me in and I created four projects that I absolutely love, not to mention am so proud of. Check out the original guest designer post on the Basic Grey blog to see my other projects. 

Pocket Talk Podcast

Layout featured in Jot Magazine, Issue 10.

Layout featured in Jot Magazine, Issue 10.

Earlier this month, I sat down to have a chat with the lovely Jess Forster on her podcast, Pocket Talk. I have been a listener since episode one, and when she asked me to chat with her, I was so excited. In my episode, episode 12, we chat about my pocket page documentation failures and successes, as well as how I photograph and edit my pocket page photos for design team work. 

Traveler's Notebook for Scraptastic Club

Yesterday, I was featured on the Scraptastic Club blog using the packed, beautiful "Can't Go Home" kit and add-on to make a traveler's notebook insert that I plan to use on an upcoming trip to Boston. The process was so easy and I can't wait to use it to document my trip! 

If you want to be sure to catch everything I'm up to in my personal, as well as scrapbooking life, I update my Instagram account regularly, so be sure to follow me there! 

Thanks for stopping by and I hope you're having a wonderful summer! 

Two Page Layout Challenge

Today on the Scraptastic Club blog, myself and some fellow design team members were challenged to create a two-page spread. After thinking about it (and dreading it!) I decided that a two page spread didn't have to be two 12"x12" layouts! I decided to document an event which I had several photos of and create one 12"x12" layout and one pocket page spread, so that I could share all of the other photos that complete the story of a family road trip to San Antonio in April 2014.

To say that I love this spread is an understatement. Everything about it makes me happy- from the beautiful colors in the Scraptastic Club's May 2015 Janglin' kit and add-on, to the perfect cards from the April 2015 TLN kit that worked so well with the photos. 

Since the Pinkfresh Studio background patterned paper that I used was quite busy (the bright colors called to me!) I kept the rest of the layout as simple as possible. To break up the vertical lines on the left, I added a manufacturer's strip just underneath the orange horizontal line, which also served as a place for my title AND helps to draw your eye from the photo to the pocket page spread on the right.

To break up all of the lines on the page, I added a triangle of three circles, punched from another Pinkfresh Studio In The Clouds paper in the kit. These circles housed additional embellishments and a part of my title.

On the right side, I chose cards from the April 2015 TLN kit that had the same colors as on the left. The three cards I chose were perfect accompaniments to my photos and the story. 

San Antonio closeup 2 blog.jpg

To create balance from the left to the right sides, I added circular elements to my pocket pages. On this card, I traced a dashed circle around the 'let's go' title and added mini alphas, vellum arrows and enamel dots. 

This 'weekend adventure' card was embellished with more circles- punched, from a die-cut pack, a sticker sheet and a flair badge. It's purely for embellishment & it is my favorite on the spread.

That's all from me today! Thanks for stopping by! How do you feel about double-page spreads? Do they intimidate you?