Scrapbook and Cards Today: Blue Skies and Butterflies Kit Layout

Hello there! I am so excited to share one of my favorite layouts created so far this year, using the beautiful Blue Skies and Butterflies Kit from Scrapbook and Cards Today Magazine. If you've never purchased one of their kits before, you're in for a treat! They include the latest products from the industry, along with beautiful exclusives, plus a well-designed, useful stamp! I created a few projects with the kit, and as a bonus, instructions on how to create them can be found in a full-color download when you purchase the kit.

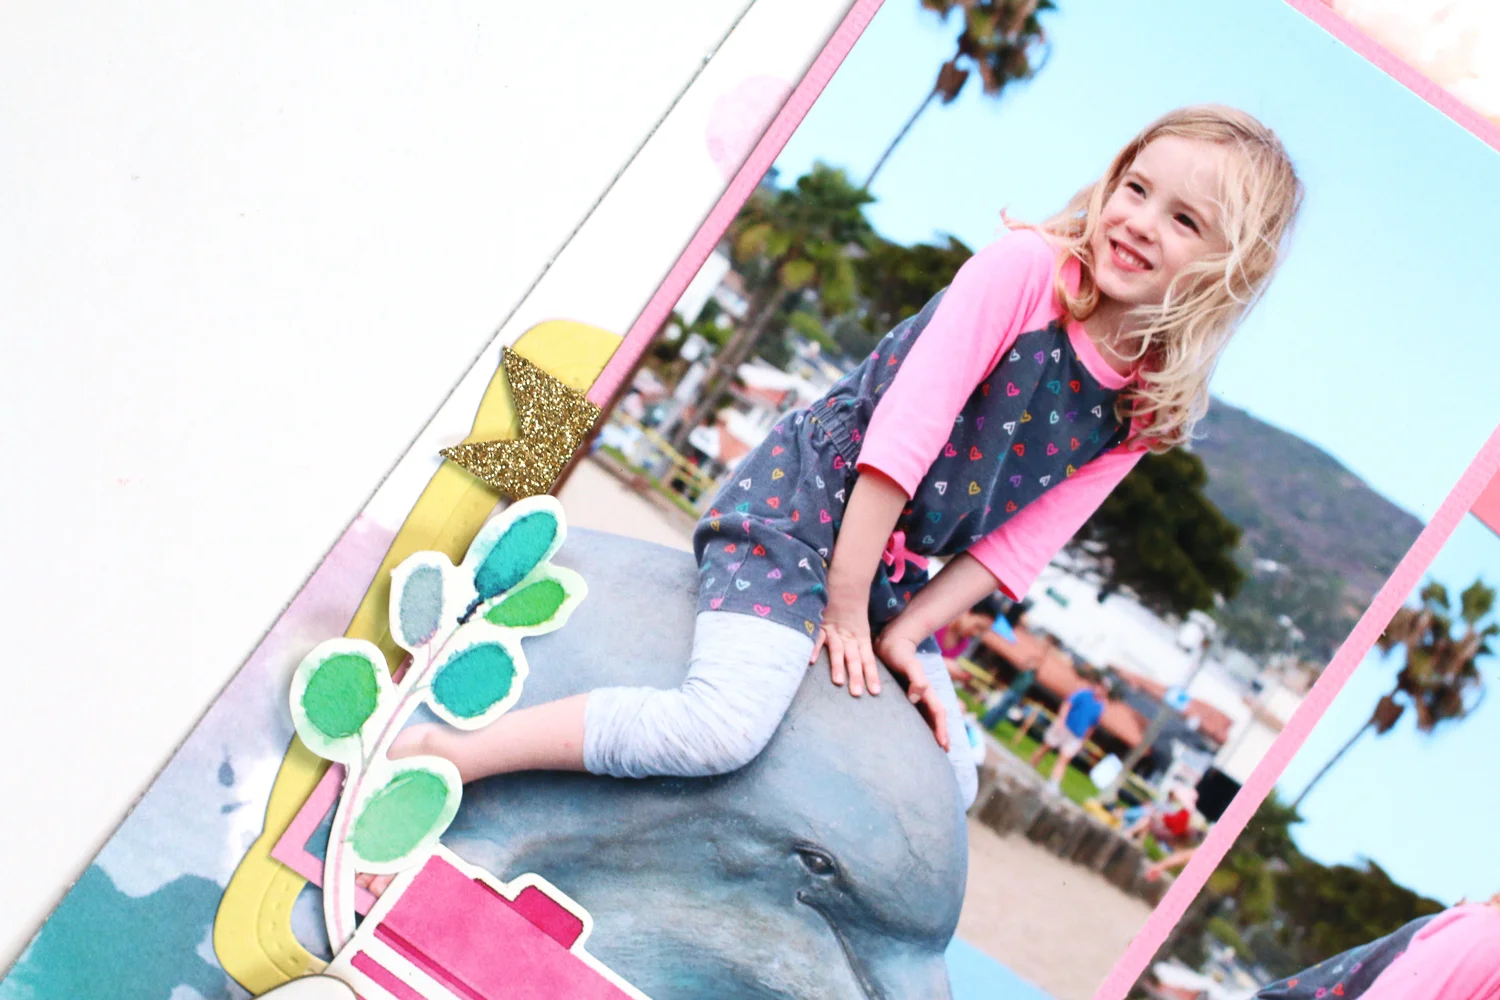
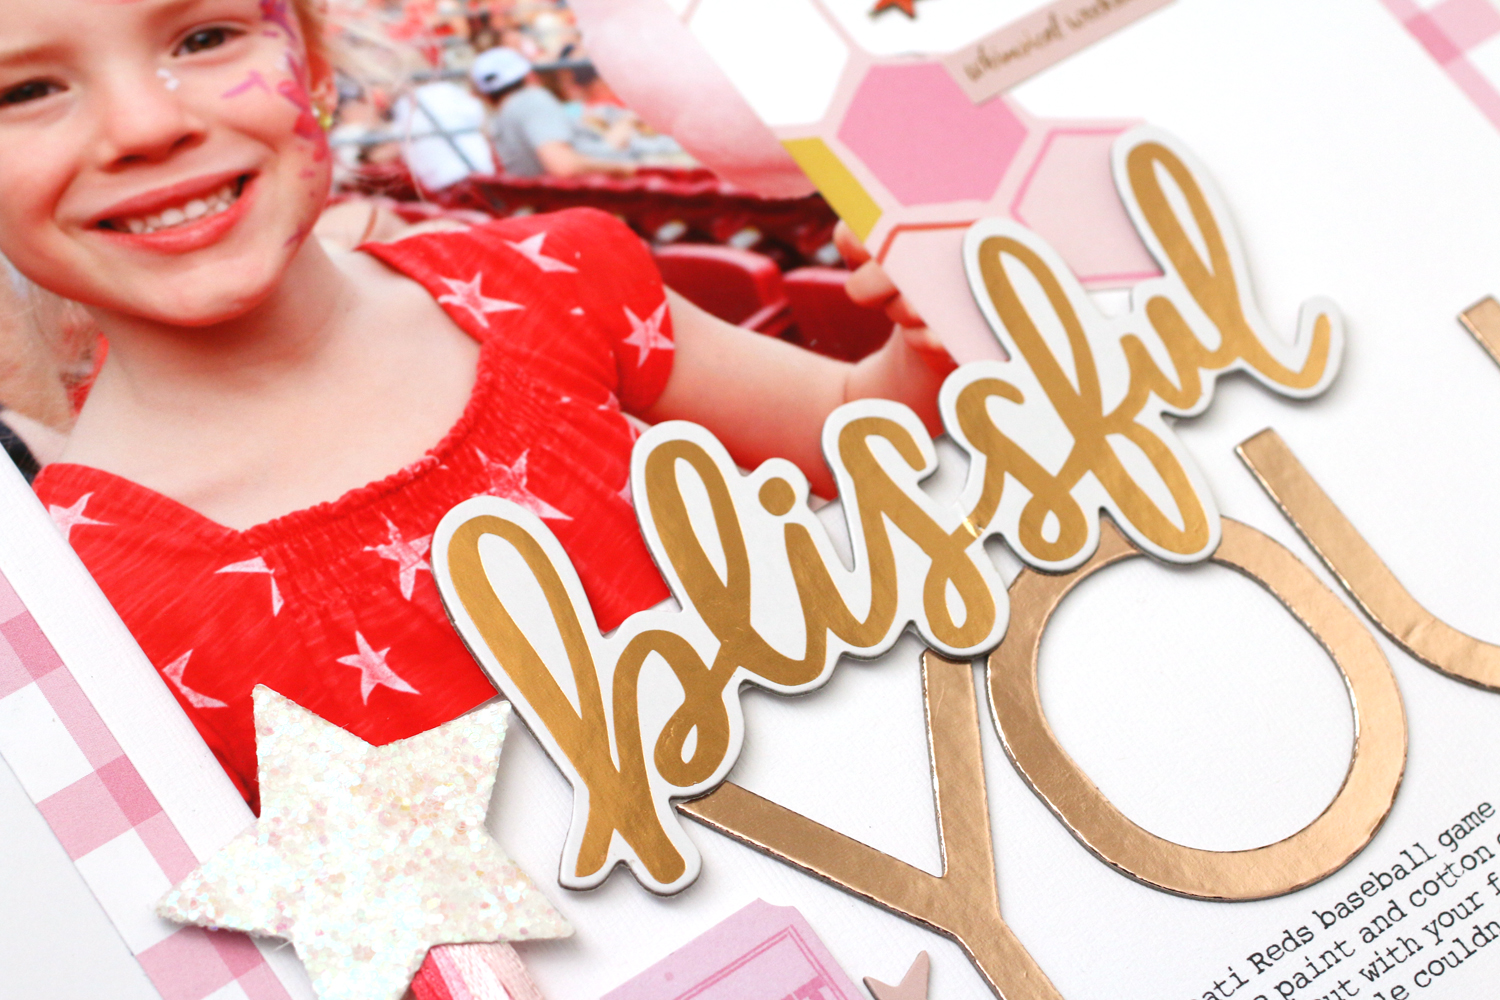
This was my favorite creation using the kit—a 12" x 12" layout documenting a favorite photo of my little girl.

MeghannAndrew_SCTSpringDelivered_ShineOn_01.jpg

I have held on to this photo for AGES, as I loved it so much, and didn't have the "perfect" products to go along with it. That all went out the window when my Blue Skies and Butterflies Kit arrived! I wanted the layout to be playful and a bit haphazard, but colorful and fun, just like my little girl.

MeghannAndrew_SCTSpringDelivered_ShineOn_04.jpg

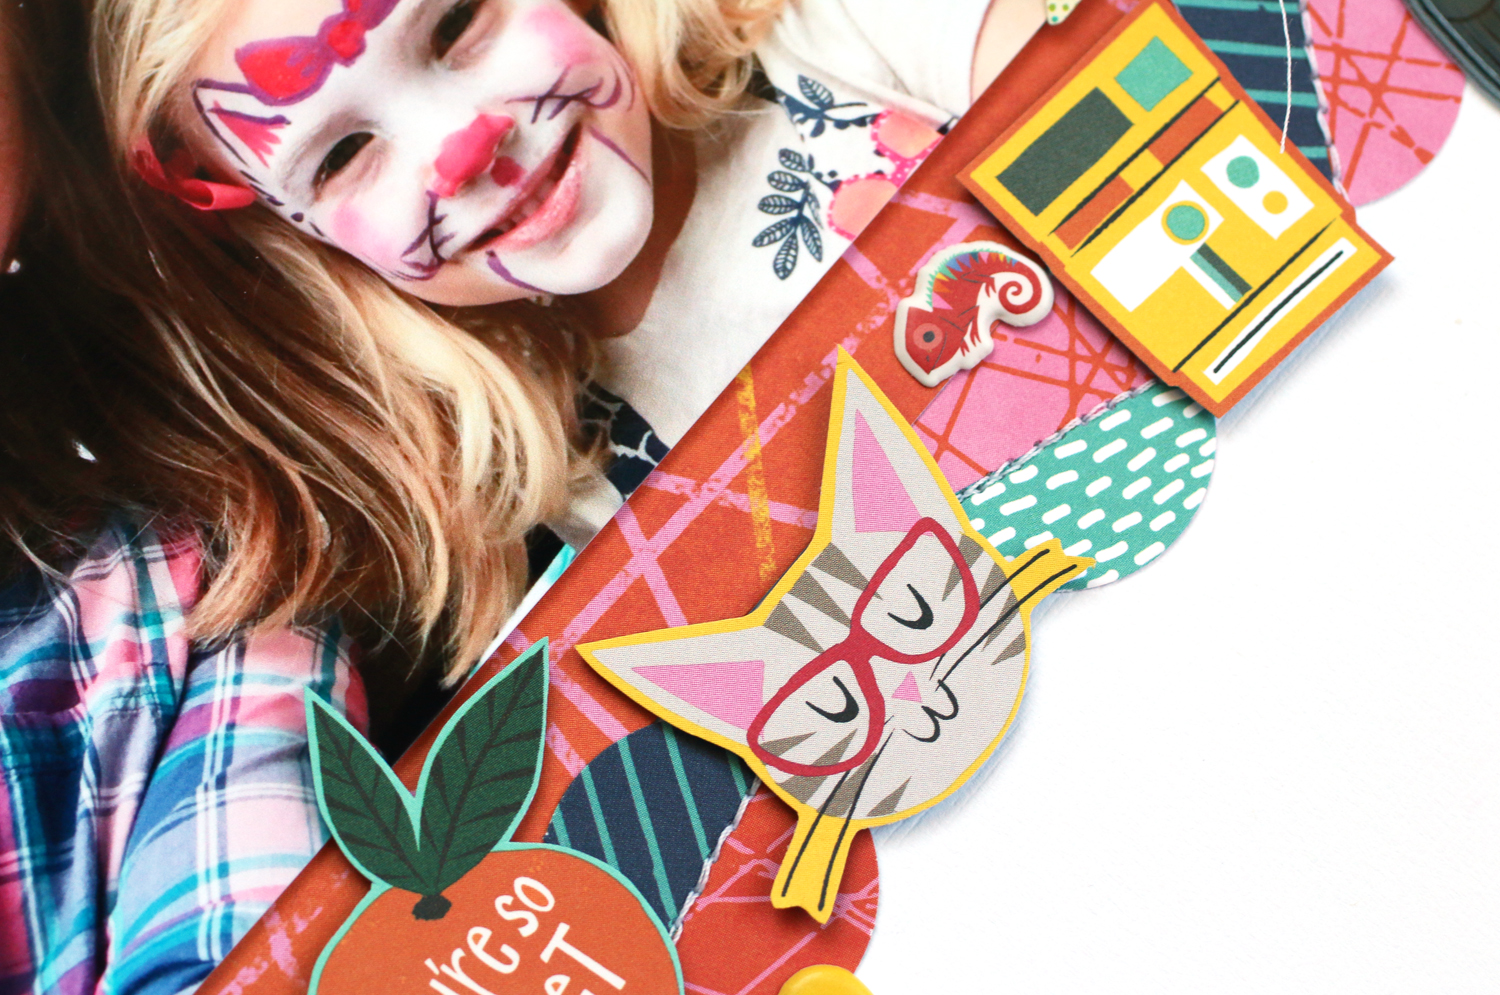
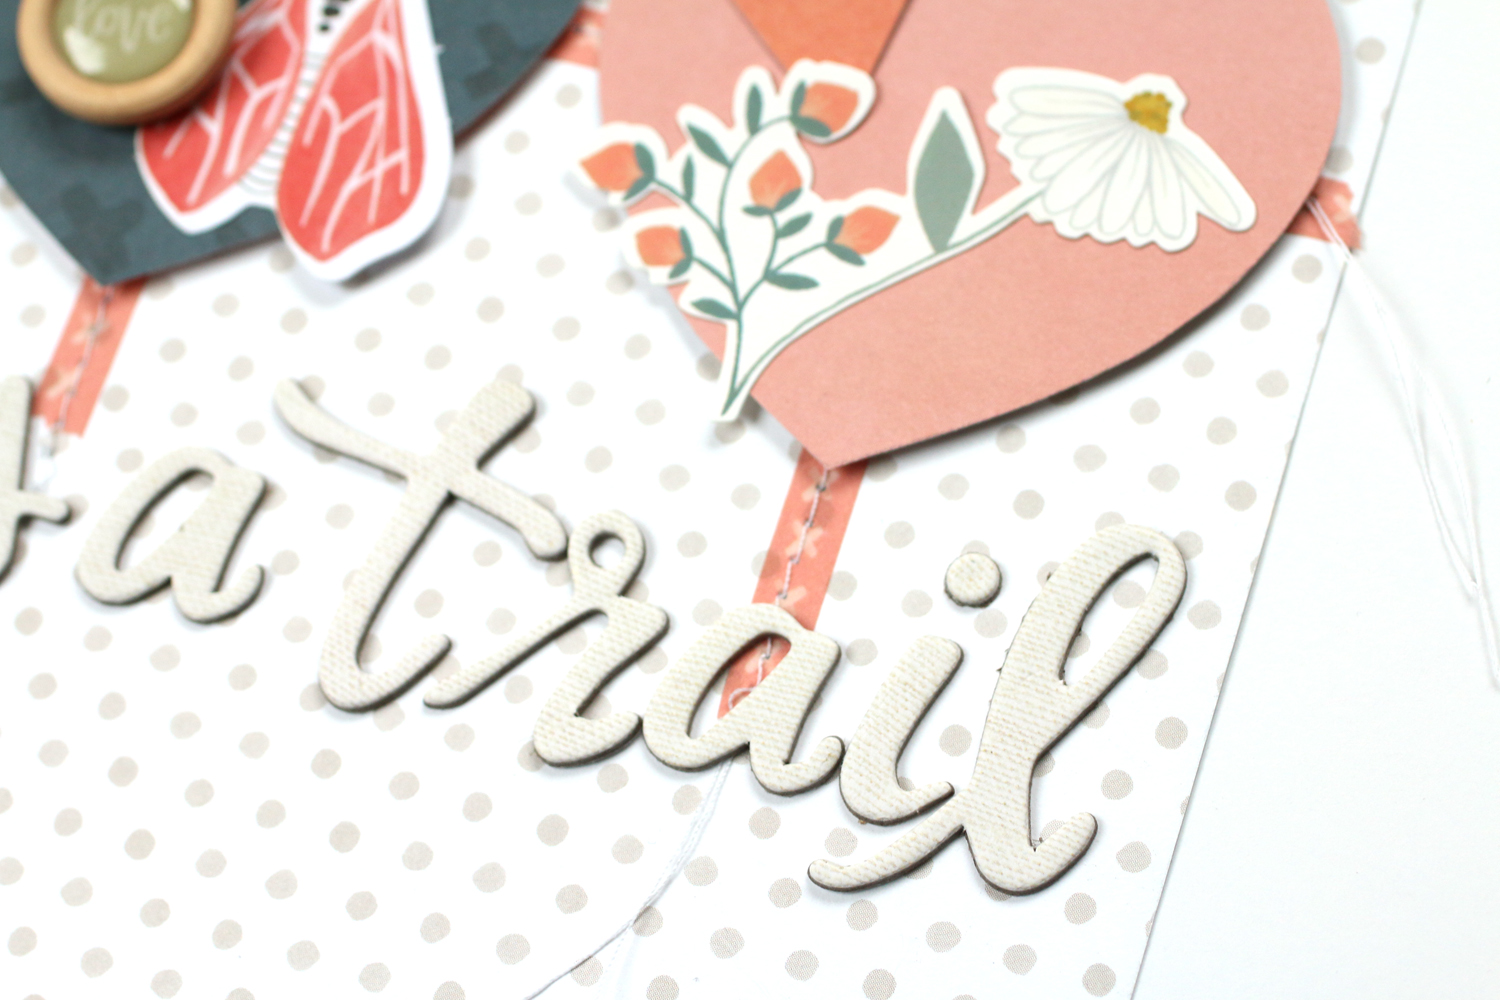
Do you see those adorable little pinwheels? They are from the exclusive stamp, which I stamped onto patterned paper from the kit! I love all of the beautiful colors included in this kit—from spring to fall, they will work with any season you want to scrap! 

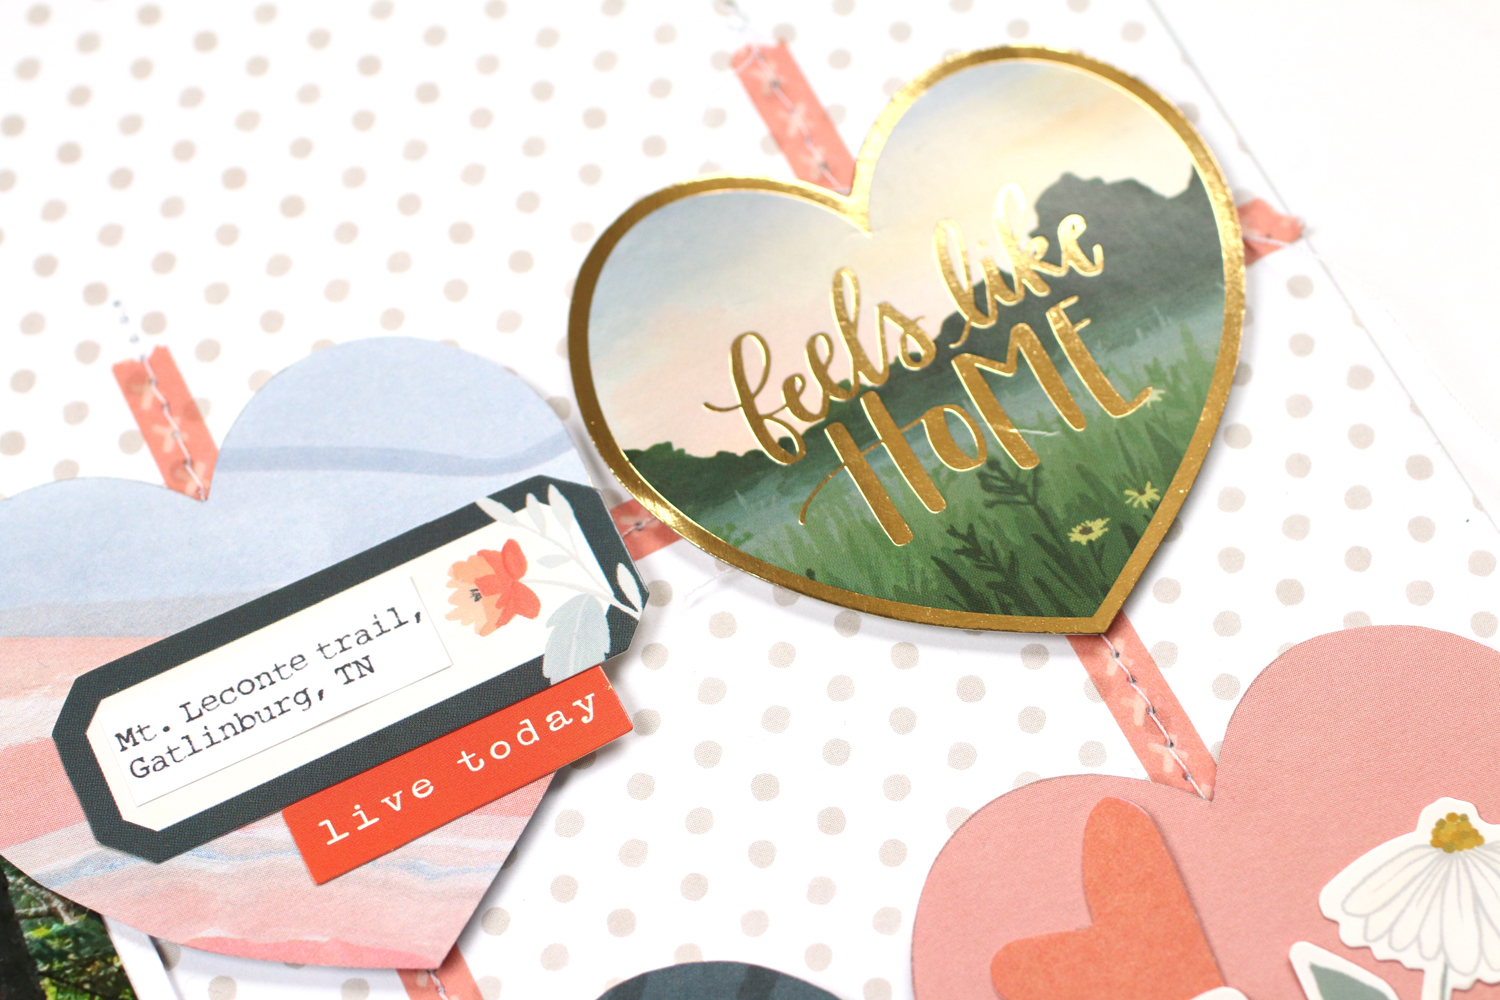
I also did a bit of fussy-cutting on this layout. Those lovely American Crafts All the Good Things butterflies and Pink Paislee Pick Me Up frame just needed to be cut out and added to this page. I even used the frame to add a tiny bit of journaling, along with the date of the photo.

MeghannAndrew_SCTSpringDelivered_ShineOn_02.jpg

Another exclusive download that you will receive when you purchase the kit is a sheet of large tags—great for journaling or adding to your page for embellishment, like I did with the black and white gingham tag here. I simply cut a banner notch at the bottom to hang it from the base of my heavily-layered photo mat. 

Those tiny little bows (included on the exclusive stamp in the kit) stamped around my page added the perfect girly touch and tiny elements that I love to add around embellishment groupings.

MeghannAndrew_SCTSpringDelivered_ShineOn_05.jpg

You know, I'm not a massive fan of sparkle, but the Heidi Swapp frame and "shine on" glitter Thickers from the All the Good Things collection included in this kit added just the perfect touch to this layout, and made my photo the focus of all of the lovely layers included on this page. Plus, the glitter on them does not come off—a must for this glitter-phobic girl!

MeghannAndrew_SCTSpringDelivered_ShineOn_03.jpg

I really loved working with this kit! Stay tuned to see more projects that I created using it, and be sure to grab one of the Blue Skies and Butterflies Kits while supplies last! Happy creating!

Elle's Studio March 2018 Reveal: Hello Easter

Hello! I'm here to share my second layout created with the March 2018 Kit and add-ons from Elle's Studio, which released today. To see all of the new product that was released today, as well as my first layout and process video, go to my previous reveal blog post

Easter is a big theme in this month's kit, and the beautiful colors in the kit were a perfect match to my daughter's dress that she wore for an Easter egg hunt at her school last year.

"Hello Easter" supplies | March 2018 Kit, Happy Day printables, Big Moment phrase stickers, vellum and wood veneer bunnies, little acrylic heartsHappy Moments stamp, Title Builder stampLive Laugh Love puffy stickers, XOXO 6" x 6" Paper StackFamily Fun 12" x 12" Paper Collection

How cute are these vellum bunnies? I love their fun, bright colors! I used them to flank my photos and draw attention to them. The Live Laugh Love puffy stickers flowers were also perfect to peek out from behind my photos.

EllesStudio_MeghannAndrew_HelloEaster_05.jpg

My title is often my favorite part of a layout, and this one is no exception! I used the word "hello" from the Title Builder stamp and layered it with the word "Easter" from this month's Happy Moments stamp. I love that beautiful handwritten font!  

EllesStudio_MeghannAndrew_HelloEaster_04.jpg

To the right of the title, I added the "love this so much" circle die-cut from the Happy Day printables. The "big smiles" Big Moment phrase sticker matched the pink paper from the XOXO 6" x 6" Paper Stack perfectly, and a flower from the Live Laugh Love puffy stickers finished off the grouping. To add a tiny bit of yellow and some texture to my paper strips, I used the dots border from the Happy Moments stamp. I love all of the fun sayings, patterns and images on this stamp!

EllesStudio_MeghannAndrew_HelloEaster_02.jpg

Be sure to check out all of the product I used on this layout while supplies last, and happy creating!

Elle's Studio March 2018 Reveal!

The March 2018 Elle's Studio kit and add-ons* are live, and full of color and spring themes for your paper crafting projects! I filmed an unboxing video, so that you can see each piece from the latest release here: 

(*All product links contained in this post are affiliate links. You don't pay any extra, but I get a small percentage of your sale! Thanks for your continued support of my YouTube feed and this blog!) 

The colors in the March 2018 kit are really amazing! From rainbow stripes to a bold kelly green and beautiful cerulean blue, this kit offers a wide palette to choose from:

EllesStudio_March2018_Kit.jpg
EllesStudio_March2018_Add-Ons.jpg

Finally, you can get more "bang for your buck" with these awesome Happy Day printables and March digital cut files:

EllesStudioMarch2018Digitals.jpg

With all of the gorgeous color in this month's kit, I was inspired to document a photo full of colorful balloons, from our most recent trip to Disneyland. 

EllesStudio_MeghannAndrew_DisneyMoment_01.jpg

One of a Kind Disney Moment by Meghann Andrew – supplies used | March 2018 Kit, March Labels, One of a Kind Wood Veneer, Cerulean Blue Puffy Alphabet StickersPuffy Star StickersHappy Moments Stamp, Family Fun 12" x 12" Paper CollectionLive Laugh Love 12" x 12" Paper Collection

Watch this process video to see how the page came together, and how I created that fun title from several of the add-ons this month!

I will be sharing my second layout created this month here later today, but until then, you can shop the items that I used in my One of a Kind Disney Moment layout here:

Altenew "Our Family" Scrapbook Kit: Cali Life

I finally had the opportunity to meet May with Altenew* at Creativation, and it was so lovely to finally put a face to someone who I have corresponded with for a couple of years now! This company is making amazing things; including stamps, inks, dies AND paper products, and I was totally humbled when she handed me their newest scrapbook kit, Our Family*, to create with, no strings attached. It's taken me a while to have time to crack it open, but when I did, I was so inspired to document a beautiful day we shared together in Laguna, California. (*All product links contained in this post are affiliate links. You don't pay any extra, but I get a small percentage of your sale! Thanks for your continued support of my YouTube feed and this blog!) 

MeghannAndrew_CaliLife_BLOG.jpg

Supplies | Altenew "Our Family" scrapbook kit, Crate Paper Carousel ephemera die-cuts, Crate Paper Carousel chipboard stickers, Crate Paper Carousel stars

The base for my layout was created with a gorgeous multi-colored "painted" background from the Our Family scrapbook kit. I knew as soon as I saw it that it would be the perfect backdrop for these colorful photos from an adventure at a beach playground. 

MeghannAndrew_CaliLife_03_BLOG.jpg

The elements in the kit, like these colorful chipboard alphabet stickers, paired perfectly with my photos, as well as the Crate Paper Carousel collection ephemera die-cuts. I love their thin font, as well as their painted border.

MeghannAndrew_CaliLife_02_BLOG.jpg

To add to my title at the bottom of the page, I paired those alphabet stickers with the "life" chipboard sticker, also from the Our Family scrapbook kit, which topped the die-cut camera, accented with the chipboard sticker heart. My layout didn't need much more embellishment, but the Carousel stars and gorgeous enamel dots from the Our Family scrapbook kit finished off the page.

MeghannAndrew_CaliLife_04_BLOG.jpg

This page was so fun to create with this beautiful kit! See my video below for the full process of its creation, as well as a look into the kit itself before I got to work:

Thanks for watching! What will you document with the gorgeous Altenew Our Family scrapbook kit? Happy creating! 

Shimelle Box of Crayons: Say Yes Often

MeghannAndrew_AmericanCrafts_BoxofCrayons_SayYesOften_04BLOG.jpg

I was so excited to see my friend, Shimelle, release another beautiful collection with American Crafts called Box of Crayons. This playful, vibrant collection is so fun to create with, and before I attended the Creativation show in Phoenix, I was able to create two new layouts that were displayed in Shimelle's lovely booth of new product. 

The first layout that I created is all about remembering to say "yes" every once in a while to fun things. I keep to a pretty strict routine, and sometimes I need a reminder to break it every once in a while, and this page is an attempt to remind myself to do just that.

MeghannAndrew_AmericanCrafts_BoxofCrayons_SayYesOften_01BLOG.jpg

As soon as I saw the "say yes often" cut-apart on the Say Yes Often paper, I based my layout around it, and found a photo from a time when I said, "yes," to my daughter having her face painted at the zoo, which brought us so much happiness. 

MeghannAndrew_AmericanCrafts_BoxofCrayons_SayYesOften_02BLOG.jpg

I started my layout with a base of the Promise patterned paper. I loved having that bold stripe on the background. I printed my photo at 4" x 6" and placed it to white cardstock, adding the super fun photo corners to it, with the "say yes" card next to it. To frame it, I added a manufacturer's strip of cameras to the top, and below, a fun orange strip from the All the Things patterend paper to give the weight below my photo that I needed. 

MeghannAndrew_AmericanCrafts_BoxofCrayons_SayYesOften_03BLOG.jpg

To this strip, I added circles from the On a Roll patterned paper, shapes fussy-cut from the Snapshot, and All the Things patterend paper, which I ran through with my sewing machine and adhered with dimensional adhesive to give the layout texture and dimension. I also added the awesome glitter shaker sticker toucan, which was appropriate for documenting a day at the zoo, and the fun mini puffy stickers,

MeghannAndrew_AmericanCrafts_BoxofCrayons_SayYesOften_05BLOG.jpg

This layout was so easy to create, with only a few supplies! The Box of Crayons collection is definitely one of my favorites this spring, and with all of the versatile colors and patterns, I know this is one that I will use year-round! Be sure to pick up the products that I used to create this layout at Scrapbook.com with the gallery below, and happy creating!

Elle's Studio February Kit: The Best of 2017

There was something so inspiring about the Elle's Studio February digital cut files, and as soon as I saw the camera die-cut, I was inspired to repeat it over and over on an 8-1/2" x 11" layout to tell the best stories of 2017. (*All product links contained in this post are affiliate links. You don't pay any extra, but I get a small percentage of your sale! Thanks for your continued support of my YouTube feed and this blog!) 

EllesStudio_MeghannAndrew_TheBestof2017_01.jpg

Supplies | February 2018 kit, February digital cut files, February blank label stickers, wood veneer icons, shapes and dots puffy stickers, 2017 small black acrylic, All the Details stamp, Title Builder stamp, Icon stamp, XOXO 6" x 6" paper stack, Live Laugh Love 6" x 6" paper stack, Family Fun 6" x 6" paper stack, Family Fun 12" x 12" paper collection

I wanted to create a 2017 wrap-up layout to add to the end of my 2017 album, and when I got my colorful, die-cut patterned paper cameras on the page, created with the February digital cut files I wasn't left with much room for journaling. I racked my brain to figure out how I could make it work, then realized that I could change the die-cut file to add a journaling spot behind each camera, that would wrap up the highlights of each month from 2017. 

EllesStudio_MeghannAndrew_TheBestof2017_04.jpg

Adding the journaling behind my photos made this layout interactive—definitely one to pull of of the sleeve in your scrapbook album. I love how colorful the cameras are against that clean, white background, and I tried to coordinate the colors in my photos with the patterned paper colors to make them pop off the page. 

EllesStudio_MeghannAndrew_TheBestof2017_05.jpg

The 2017 small black acrylic was the perfect start to my title, and using it in black created the perfect amount of contrast I needed on this page to keep it graphic and bold. 

I loved creating this layout, and I filmed a process video while doing it! In it, you can see how I modified the camera die-cut to add my journaling behind my patterned paper cameras in Silhouette Studio software. I hope you can grab a cuppa (or—who are we kidding—a glass of wine) and have a watch!

You can find all of the product that I used on this layout in the Elle's Studio shop by clicking on the gallery images below. Thanks for your support and happy creating!

1Canoe2 Twilight Collection: Home is a Trail

I was so excited to receive the newest collection from American Crafts and 1Canoe2, Twilight. This collection is the perfect mix of pretty and outdoorsy, and that combination totally fits my style and my personality! (*All product links contained in this post are affiliate links. You don't pay any extra, but I get a small percentage of your sale! Thanks for your continued support of my YouTube feed and this blog!)

AmericanCrafts_MeghannAndrew_HomeIsATrail_01BLOG.jpg

As soon as I saw the colors in this collection, I thought of a photo of myself at the end of a long hike to Mount LeConte in the Smoky Mountain National Park. Once I saw the "incandescently happy" cut-apart card from the Feels Like Home patterned paper, I knew that this memory was meant to be documented with Twilight.

AmericanCrafts_MeghannAndrew_HomeIsATrail_02BLOG.jpg

This beautiful "Feels Like Home" heart sticker from the Twilight cardstock stickers became the template for three other patterned paper hearts, which I arranged on a washi tape grid and topped with embellishment. 

AmericanCrafts_MeghannAndrew_HomeIsATrail_03BLOG.jpg

How gorgeous are these fabric Thickers? I love the font and the gorgeous neutral hue. I paired these with the "home" foil die cut from the Twilight ephemera pack to create my title.

AmericanCrafts_MeghannAndrew_HomeIsATrail_05BLOG.jpg

I hid my journaling underneath my photo, accessible with a paper clip flag. I topped the journaling card with the date stamped with the Twilight rotary stamp. I just love the small, clean font on this date stamp.

To see all of the other details that I added to this page, you can check out my process video:

And don't forget to shop the beautiful products I used on this page while they are ON SALE and supplies still last! You can see all of these products in the gallery below:

Dear Lizzy Stay Colorful: Treat YoSelf

Hello! The newest collections from American Crafts are my favorite from the recent Creativation show releases, and today I'm sharing a layout created with the Stay Colorful collection* from Dear Lizzy! I love that the color scheme on this collection is so wide. From deep blues and bright pinks, to warm fall-toned hues like I used below, you can document a wide range of memories with this collection. (*All product links contained in this post are affiliate links. You don't pay any extra, but I get a small percentage of your sale! Thanks for your continued support of my YouTube feed and this blog!)

AmericanCrafts_MeghannAndrew_TreatYoSelf_01BLOG.jpg

This photo was taken after a REALLY hard "mom day." My husband saw that I needed a break, and took my daughter away, leaving me to re-charge my batteries over a cappuccino and macaron on a recent trip to Seattle. I snapped this photo after crying a bit, and calling my mom. (As you do in these kind of circumstances.) 

AmericanCrafts_MeghannAndrew_TreatYoSelf_03BLOG.jpg

Even though this wasn't necessarily a happy moment, it deserved to be documented, and how better than with a pretty photo and beautiful product to match? I initially reached for the Stay Colorful collection because of the lovely "treat Yo self" tag in the ephemera pack, which matched the colors in my photo perfectly. 

AmericanCrafts_MeghannAndrew_TreatYoSelf_02BLOG.jpg

On my white cardstock background, I wanted to add a bit of soft color. I almost reached for my watercolors, but then remembered the All the Good Things Art Crayons from Vicki Boutin. When rubbed on a piece of plastic and brushed with a stiff blender brush in a circular motion on the white cardstock, I created a beautiful glow to back my embellishment and frame my photo.

AmericanCrafts_MeghannAndrew_TreatYoSelf_05BLOG.jpg

The "Groovy" patterned paper was perfect for fussy-cutting and adding these large florals to frame my photo. I also added a large feather die-cut from the All the Good Things ephemera pack to ground the flowers. Below, I stamped the word "relax" in dark yellow ink with the Stay Colorful clear acrylic alphabet stamps. (These are SUCH a great deal at only $3.49!)

AmericanCrafts_MeghannAndrew_TreatYoSelf_04BLOG.jpg

These Stay Colorful foiled cardstock stickers are really beautiful, and I added this one at the top of my photo to bring some teal up to the top corner of my page. I also grabbed the "my happy place" banner from the All the Good Things finishing embellishments to layer over the floral. Stamping a few of the asterisks from the Stay Colorful clear acrylic alphabet stamps to add to the diagonal line of embellishment, which goes right through my photo, finished off my page. 

I loved creating this 8-1/2" x 11" layout! It came together so quickly by using these gorgeous products that had me so inspired! Be sure to check out all of the product I used today via this gallery, ON SALE now at Scrapbook.com! Thanks for stopping by!

Elle's Studio February 2018 Kit Reveal: January Pockets

The Elle's Studio kit and add-ons released today, and I am excited to share a double pocket-page spread that I created using these new products, along with a few of my favorites from the shop. These pockets record the beginning of January. (*All product links contained in this post are affiliate links. You don't pay any extra, but I get a small percentage of your sale! Thanks for your continued support of my YouTube feed and this blog!)

EllesStudio_MeghannAndrew_JanuaryPockets_01.jpg
EllesStudio_MeghannAndrew_JanuaryPockets_02.jpg

I love these blank tags, designed to fit the graphic icons found in the kit and the Icon stamp. I also added the stamped "in one word" box from the All the Details stamp

EllesStudio_MeghannAndrew_JanuaryPockets_04.jpg

On the right side, I started off with a simple 4" x 6" tag featuring the wood veneer ampersands and the word "life" from the Title Builder Acrylic. I also used another wood veneer snowflake on this side, to balance the left and celebrate a snow day here in Texas.

EllesStudio_MeghannAndrew_JanuaryPockets_03.jpg

I used the Icon Printables, recoloring this striped tag, as well as the hearts tag to match my blue, teal and yellow color scheme. I stamped the balloons from the Happy Birthday Stamp onto one of the bold, striped tags from the kit, fussy cutting them out. I also created a patterned balloon with the Icon stamp.

EllesStudio_MeghannAndrew_JanuaryPockets_08.jpg

Great news! I created a process video while putting this spread together! Check out this short video to see how I focused on keeping my page balanced, and used the "less is more" theory to keep it fairly simple. 

Thanks so much for stopping by! Be sure to check out the February 2018 kit and add-ons while supplies last! 

Elle's Studio February 2018 Kit Reveal

It's that time of the month again! The Elle's Studio February 2018 kit and add-ons are live and I have an unboxing video below to show you all of the latest and greatest product that hit the shop today! (*All product links contained in this post are affiliate links. You don't pay any extra, but I get a small percentage of your sale! Thanks for your continued support of my YouTube feed and this blog!)

The February 2018 kit is a rainbow of colors, with a range of sayings and graphics. I love the fun, bold stripes, mixed with the softer florals and prints.

EllesStudio_February2018_Kit.jpg

In addition to the kit, the add-ons come in a range of colors and textures, with fun, graphic icons to add to your projects. From left to right, you can see: cork speech bubbles, Brave acrylic, wood veneer camerasFebruary icon labels, The Best banner stickers, Icon stamp, Shapes and Dots puffy stickers, February blank label stickers, wood veneer icons, ampersand wood veneer, Kind acrylic

EllesStudio_February2018_Add-Ons.jpg

I also both the digital cut files and Icon Printables heavily this month! There are so many great items here to re-use over and over again on your projects! 

EllesStudioFebruary2018Digitals.jpg

My first project was a 12" x 12" layout that I created using a kit-driven color scheme, with everyday photos from our favorite weekend activity: an after gym class smoothie treat!

EllesStudio_MeghannAndrew_SmoothieLove_01.jpg

Be sure to check back later this afternoon, when I will share my second project created with the February 2018 kit and add-ons! If you like pocket pages, you'll want to stop back! 

SCT Winter Issue: For the Love of Travel

I was so excited when we received our assignments for the Scrapbook and Cards Today winter issue because we were to document something that we loved. Well, aside from my family, my next love is travel! I love going new places, eating new foods and taking in the culture wherever I go. It was only natural that this is what I decided to document for the issue. 

So, I sat down to create my layout, and made a single 12" x 12" layout. 

LoveOfTravel.jpg

I loved my layout, and was so happy with how it turned out. It wasn't until I went to send it to the editor for review, when I saw that I had the assignment wrong... it was supposed to be a 12" x 12" double page spread! After my initial moment of panic wore off, I decided to take a deep breath and challenge myself to making this the right side of a double page spread, and what I created ended up being one of my favorite layouts from 2017, using the Escape the Ordinary collection from Pinkfresh Studio. (*All product links contained in this post are affiliate links. You don't pay any extra, but I get a small percentage of your sale! Thanks for your continued support of my YouTube feed and this blog!)

LoveofTravel_Double_BLOG.jpg
LoveofTravel_Closeup_03.jpg

My challenge, after I created a single-page layout that I loved, was to create a complementary page to that layout, and I feel like I did just that with the left side of the spread. You can see how I created my initial page, including how I used the print and cut method on my Silhouette Cameo to add a circular photo to my layout, as well as the decisions I made when I made this a double-page spread instead of a single page, on the following process video:

Thank you so much for stopping by! I hope this video has shown you that there are no "accidents" in crafting—only opportunities for more creativity! Happy creating! 

Dear Lizzy Stay Colorful: Unicorns and Sparkles

Have you had a chance to check out the new, beautiful collections being released this month from American Crafts? The Stay Colorful collection* from Dear Lizzy is one of my favorites (although it's hard to choose between them all!) and includes beautiful springy colors and fun, playful graphics. I used it to create a layout all about my daughter's rose-tinted glasses. (*All product links contained in this post are affiliate links. You don't pay any extra, but I get a small percentage of your sale! Thanks for your continued support of my YouTube feed and this blog!)

AmericanCrafts_MeghannAndrew_UnicornsandSparkles_01BLOG.jpg
AmericanCrafts_MeghannAndrew_UnicornsandSparkles_02BLOG.jpg

After I selected my photo, which was perfect for this beautiful collection, I then pulled out the die-cut "unicorns and sparkles" to create my title. This sparked my idea to die-cut my own "sparkles," and place them along the right side of the layout. After adhering them, I added some machine stitching for extra texture. Of course, I had to add the cute unicorn from the cardstock stickers, too. 

AmericanCrafts_MeghannAndrew_UnicornsandSparkles_04BLOG.jpg

With all of the weight added to the right side of the page, I needed some elements to add some weight to the left, so I grabbed the ephemera with foil accents pack to add some elements to the top left corner of my photo. 

You can see how I went about making the decisions for this page firsthand by watching my process video:

Be sure to check out the Stay Colorful collection, and each of the products I used on this layout via the gallery below. 

Thanks so much for stopping by the blog today! I'm on my way to Creativation 2018 in Phoenix, so be sure to follow me on Instagram for new product enabling! Have a great weekend! 

Thank You Greetings with American Crafts

I started my paper crafting journey as a cardmaker, and creating cards is a way for me to get back to my original love of paper crafting—a small canvas on which to get creative, and send a little sunshine someone's way. When American Crafts challenged me to create "thank you" cards with their latest collections, I was excited to get into the product to see what would inspire me.

AmericanCrafts_MeghannAndrew_ThankYouCards_01BLOG.jpg

These three cards were created in 5 minutes, 7 minutes and 10 minutes with beautiful supplies from Dear Lizzy Star Gazer, Shimelle Glitter Girl and Vicki Boutin All the Good Things collections. Can you guess which is which? 

AmericanCrafts_MeghannAndrew_ThankYouCards_03BLOG.jpg

"You are Magical" card supplies | Dear Lizzy Star Gazer collection: Make a Wish patterned paper,   Ephemera with foil accents, washi tape; Vicki Boutin All the Good Things collection: Ephemera; Shimelle Glitter Girl collection: Mixed embellishment pack

5-Minute Thanks | For my first card, "you are magical" is the perfect greeting to thank someone for something special. To go along with the "magic," I chose a pretty polka-dot background, with a dark blue star washi tape to ground my die-cut focal point. Just a few sequins finished off the card.

AmericanCrafts_MeghannAndrew_ThankYouCards_02BLOG.jpg

"Thanks" card supplies | Shimelle Glitter Girl collection: Make a Statement patterned paper, cardstock stickers, glitter shaker stickers, washi tape, Thicker alphabet stickers, enamel dotsMixed embellishment pack

7-Minute Thanks | This was another simple and easy card to create, taking only just a few minutes more than the previous card, the main reason being that I had more product to place, and I had to be sure those Thickers were straight on the card front. That's where the washi tape came in handy. I used it to give me a nice straight line from which to gauge where I placed my alphabet stickers. I LOVE this card. I love the clean, white background with the fun color pop on the border. I also LOVE those awesome glitter shaker stickers—they're perfect for cards or scrapbook pages!

AmericanCrafts_MeghannAndrew_ThankYouCards_04BLOG.jpg

"You're the Best" card supplies | Vicki Boutin All the Good Things collection: The Little Things patterned paper, Foundations media paper, dies and clear acrylic stamps—set 2, finishing embellishments, art crayons—set 1 warm, waterbrush set; Other: StazOn Jet Black ink

10-Minute Thanks | This ten-minute card used the least amount of supplies of all three that I created, but took the most time. Why? Because I used the beautiful dies and clear acrylic stamps to create the colorful flowers at the bottom corner of the design. By using Staz-On ink on the Foundations media paper, my flowers were ready to color in quickly with the amazing art crayons, in the warm tones to offset the background green trellis. Just a few of the pretty enamel dots finished it off! 

Scrapbook supplies can easily double as card making supplies, and a beautiful handmade "thank you" can be created in just minutes using the awesome Dear Lizzy Star GazerShimelle Glitter Girl and Vicki Boutin All the Good Things collections from American Crafts! Thanks so much for stopping by today! 

Elle's Studio January 2018 Kit: "Get To Work"

For my second layout created with the new January 2018 kit and add-ons*, I wanted to focus on some fitness goals I have for 2018, and filling in the "GOALS" tag from the January 2018 kit was the perfect way to start my page. (*All product links contained in this post are affiliate links. You don't pay any extra, but I get a small percentage of your sale! Thanks for your continued support of my YouTube feed and this blog!)

EllesStudio_MeghannAndrew_GetToWork_01.jpg
EllesStudio_MeghannAndrew_GetToWork_02.jpg

Getting goals written down on paper is the first step toward achieving them, and I hope this layout starts me off in the right direction!

EllesStudio_MeghannAndrew_GetToWork_03.jpg

Start hitting your 2018 documenting goals by ordering the January Kit and add-ons from Elle's Studio! Thanks so much for stopping by, and for supporting this blog with your clicks!

Click here to see my first blog post of the day, which introduces the kit and add-ons, and includes a full kit unboxing video, as well as a layout process video!

Elle's Studio January 2018 Reveal!

Wow! I'm so excited to be a part of Elle's Studio, a company that I truly love, for another year! 2018 is going to be great for ES. There is a brand new team and so much good stuff on the horizon. For now, let's talk about the brand spankin' new January 2018 kit and add-ons* that just hit the shop! I've shown all of the new product in the following unboxing video. Grab a cuppa and take a look! (*All product links contained in this post are affiliate links. You don't pay any extra, but I get a small percentage of your sale! Thanks for your continued support of my YouTube feed and this blog!) 

This beautiful and packed January 2018 kit features a royal color palette of reds, dark blue, purple and seafoam green—a perfect palette to document your January! 

In addition to the kit, there is a whole selection of add-ons this month, including a die-cut package, something ES has never offered before, and a new coordinating 6" x 6" paper stack!

EllesStudio_January2018_AddOns.jpg
26678386_1830876060256833_4084796128122171869_o.jpg

Plus, don't miss the amazing Heart of Gold Chipboard Stickers! They are just beautiful! Last but not least, there are new digitals in the shop today!

EllesStudioJanuary2018Digitals.jpg

The All My Love Printables and January Digital Cut Files will be the perfect addition to your digital library! I was so inspired by the "I love you more than" saying in the digital cut file, that I decided to create a layout around it, with a really fun and beautiful mixed-media page background.

EllesStudio_MeghannAndrew_ILoveYouMoreThan_01.jpg

"I Love You More Than" Supplies | January 2018 KitJanuary Digital Cut FilesHugs and Kisses Puffy StickersStar Chipboard StickersXOXO 6" x 6" Paper Stack, Family Fun 12" x 12" Paper Collection

You can see exactly how I created my page background, and how the rest of my layout came together in this short process video:

Stop back by the blog later today, at 3pm CST to see my second layout created with the newest goods from Elle's Studio! It's all about getting right to work! In the meantime, pick up your kit at the introductory price of only $9.99 today only! I have a feeling this one is not going to be around for long! 

Creating Cards with Ranger's Letter It Collection!

Given my love for stamping, I was SO excited to be contacted by one of my affiliate partners, Scrapbook.com*, to try out a new product line from Ranger called Letter It, which is ON SALE right now! Naturally, once I checked out the beautiful product, I jumped at the chance to create with it! 

The Letter It collection contains beautifully designed stamp sets in handwritten fonts, embossing powders, inks, pens and pearlescent powders, and I had so much fun making cards with it this week! 

(*I received this product to sample from Scrapbook.com, and all comments in this post are my honest opinion of the product, written after I had fun creating with it. All product links contained in this post are affiliate links. You don't pay any extra, but I get a small percentage of your sale! Thanks for your continued support of this blog and of my work!) 

MeghannAndrew_RangerLetterIt_01.jpg
MeghannAndrew_RangerLetterIt_05.jpg

With a few pieces of scrap patterned paper, and this beautiful new collection, I created three simple cards in no time! I love the beautiful script font, that I could not replicate myself—much easier to stamp than to hand write! This wedding stamp set created the perfect card when topped with sparkly embossing powder, and paired with a couple of fussy-cut flowers.

MeghannAndrew_RangerLetterIt_06.jpg

The ink pads in this collection show off the stamps so beautifully without any extra product needed, but the cute paintbrush and paint palette from the Amy Tangerine Sticker Book and Hustle and Heart 6" x 6" Paper Pad worked so well with this simple greeting to create a lovely card in less than 3 minutes.

MeghannAndrew_RangerLetterIt_07.jpg

Also included in this collection was a product I have never used before—pearlescent powder! It was like magic watching the metallic powder stick to the stamped words to create this celebratory card. 

Do you want an up-close look at all of these cards coming together? You're in luck! I have a process video for each of them, and I also show off the really beautiful Letter It metallic markers that would be perfect for lettering your envelopes!

Be sure to check out these awesome Letter It products at Scrapbook.com, where they are currently on SALE! The stamps sets are definitely a bargain! Thanks so much for stopping by and happy creating! 

Going BIG with Dear Lizzy Star Gazer

AmericanCrafts_MeghannAndrew_BlissfulYou_03_BLOG.jpg

Hello, hello! I've not yet gotten into the Christmas mood over here, so instead of a festive red and green creation this week, I'm here to share a bright and colorful page using the Dear Lizzy Star Gazer collection* from American Crafts. (*All product links contained in this post are affiliate links. You don't pay any extra, but I get a small percentage of your sale! Thanks for your continued support!) 

AmericanCrafts_MeghannAndrew_BlissfulYou_01_BLOG.jpg
AmericanCrafts_MeghannAndrew_BlissfulYou_04_BLOG.jpg

On this layout, I wanted to show you that you CAN certainly pull off big alphas and embellishments on an 8-1/2" x 11" layout, as long as you keep enough white space on the page. Watch this process video to see how the layout came together—quickly and easily!

Love this collection? It's on sale! Shop via these links to pick up Star Gazer while supplies last!

2018 Monthly Pocket Page Tags with Elle's Studio

Hi there! Since I'm so far behind on my 2017 monthly pocket page documentation, I want to set myself up early for 2018. I plan to stick with monthly spreads, using only phone photo per day, journaled and printed from my Collect App. 

Yesterday, Elle's Studio released a set of new products* for December, and included in those products were the Monthly Puffy Stickers*. White in color, they are perfect for re-coloring, and I was so excited to use them to create 4" x 6" month markers for my pocket page album! (*All product links contained in this post are affiliate links. You don't pay any extra, but I get a small percentage of your sale! Thanks for your continued support!) 

MeghannAndrew_EllesStudio_MonthPuffyStickers_PocketPageTags_02.jpg

I started off these tags by re-coloring my Monthly Puffy Stickers, using one of my favorite products, a Sharpie oil-based marker in metallic gold. These markers are amazing, and I've used them for a number of craft projects—even painting ceramics! I highly recommend them! I left the stickers on the backing and covered them with the oil-based paint, which went on beautifully.

MeghannAndrew_EllesStudio_MonthPuffyStickers_PocketPageTags_04.jpg

Next, I chose the 3" x 4" buffalo check journaling tag from the Love This Printables, opened it in Photoshop Elements, and re-sized it to 4" x 6", placing the check pattern on the base. I also de-saturated the color 100%, making the check pattern gray, a great neutral, which will work with any spread from next year's album. Once the tags were printed on thick, smooth white cardstock, I stamped "hello" and "documenting" in gray using the Title Builder Stamp.

MeghannAndrew_EllesStudio_MonthPuffyStickers_PocketPageTags_03.jpg

Next, I adhered my gold monthly puffy "January" sticker next to my stamped words. I love the way that it looks against the gray buffalo check pattern! 

MeghannAndrew_EllesStudio_MonthPuffyStickers_PocketPageTags.jpg

Since January is the kick-off to a new year, I also re-colored and added "2018" from the Monthly Puffy Stickers to this tag. I created all twelve of the tags for my 2018 album, and I am so excited to have a head-start on an important part of this big project! 

Thanks so much for stopping by today! Check out the products that I used in this simple and easy project below: 

Elle's Studio December 2017 Reveal!

We at Elle's Studio are so excited to finish of 2017 on a high note with a new exclusive kit and coordinating add-ons! Take a look at all of the new product on offer with this unboxing video! (*All product links contained in this post are affiliate links. You don't pay any extra, but I get a small percentage of your sale! Thanks for your continued support!) 

This month, there are so many products to get your December memories documented, as well as get ready for a new year to begin! Let's take a look at the December 2017 Kit:

What a great mix of 3" x 4", 4" x 6" and die-cuts to use on any project! To coordinate with the kit, we also have some great add-ons to add to your box this month.

Also on offer this month: the great Winter Favorites Printables and December 2017 Digital Cut File to use over and over again on your projects!

I started out with the Christmas tree from the December 2017 Digital Cut File on my background when I created this layout about our kick-off to Christmas last year in Hawaii. 

I was completely inspired by the Twinkle Puffy Stickers to create an oversized, colorfully decorated tree on my layout to document this colorful celebration of Christmas in Hawaii. 

MeleKalikimaka_02_BLOG.jpg

I absolutely had to use the lyrics to one of my favorite Christmas songs by Bing Crosby, Mele Kalikimaka, for my title. You can see how this layout came together in the following process video!

You can find all of the product used on this layout in this easy-to-shop gallery:

Thanks so much for stopping by, and happy creating! 

American Crafts Vicki Boutin Mixed Media Layout: "Hello Princess"

Hello there! I'm constantly trying to push myself in my designs, and this week I decided to switch things up and get a bit messy in my studio with the new Vicki Boutin All the Good Things collection* from American Crafts. (*All product links contained in this post are affiliate links. You don't pay any extra, but I get a small percentage of your sale! Thanks for your continued support!) 

HelloPrincess_BLOG.jpg
HelloPrincess_Closeup01_BLOG.jpg

This mixed-media challenged girl (yes, that's ME!) had SO much fun playing with the mixed media products in my friend Vicki's new collection! I just love how simple and easy the process was after I watched the videos on her YouTube feed on how to use the art crayons and glaze.

HelloPrincess_Closeup02_BLOG.jpg

The Dear Lizzy Star Gazer collection paired so well with the All the Good Things collection on this layout. I was so excited about the mixed-media background, that I created a process video to show you how you can do it, too! Take a look:

I hope this layout inspires you to break out of your scrappy comfort zone and try something new today! Be sure to check out all of the product I used on this layout at Scrapbook.com via the gallery below: