American Crafts Bootiful Night Party Fun!

Since Halloween is my favorite holiday of the year, it was pretty awesome that I received the American Crafts Bootiful Night collection in the design team box that I received recently! As I love throwing a party, I couldn't help but imagine all of this spooky goodness crafted into party supplies! I got to work, and with a few supplies, created tags for treat bags, cupcake toppers and a spooky spiderweb banner! (*All product links are affiliate links. You don't pay any extra, but I get a small percentage of your sale! Thanks for your continued support!) 

MeghannAndrew_AmericanCrafts_BootifulNight_PartySetup_01_BLOG.jpg

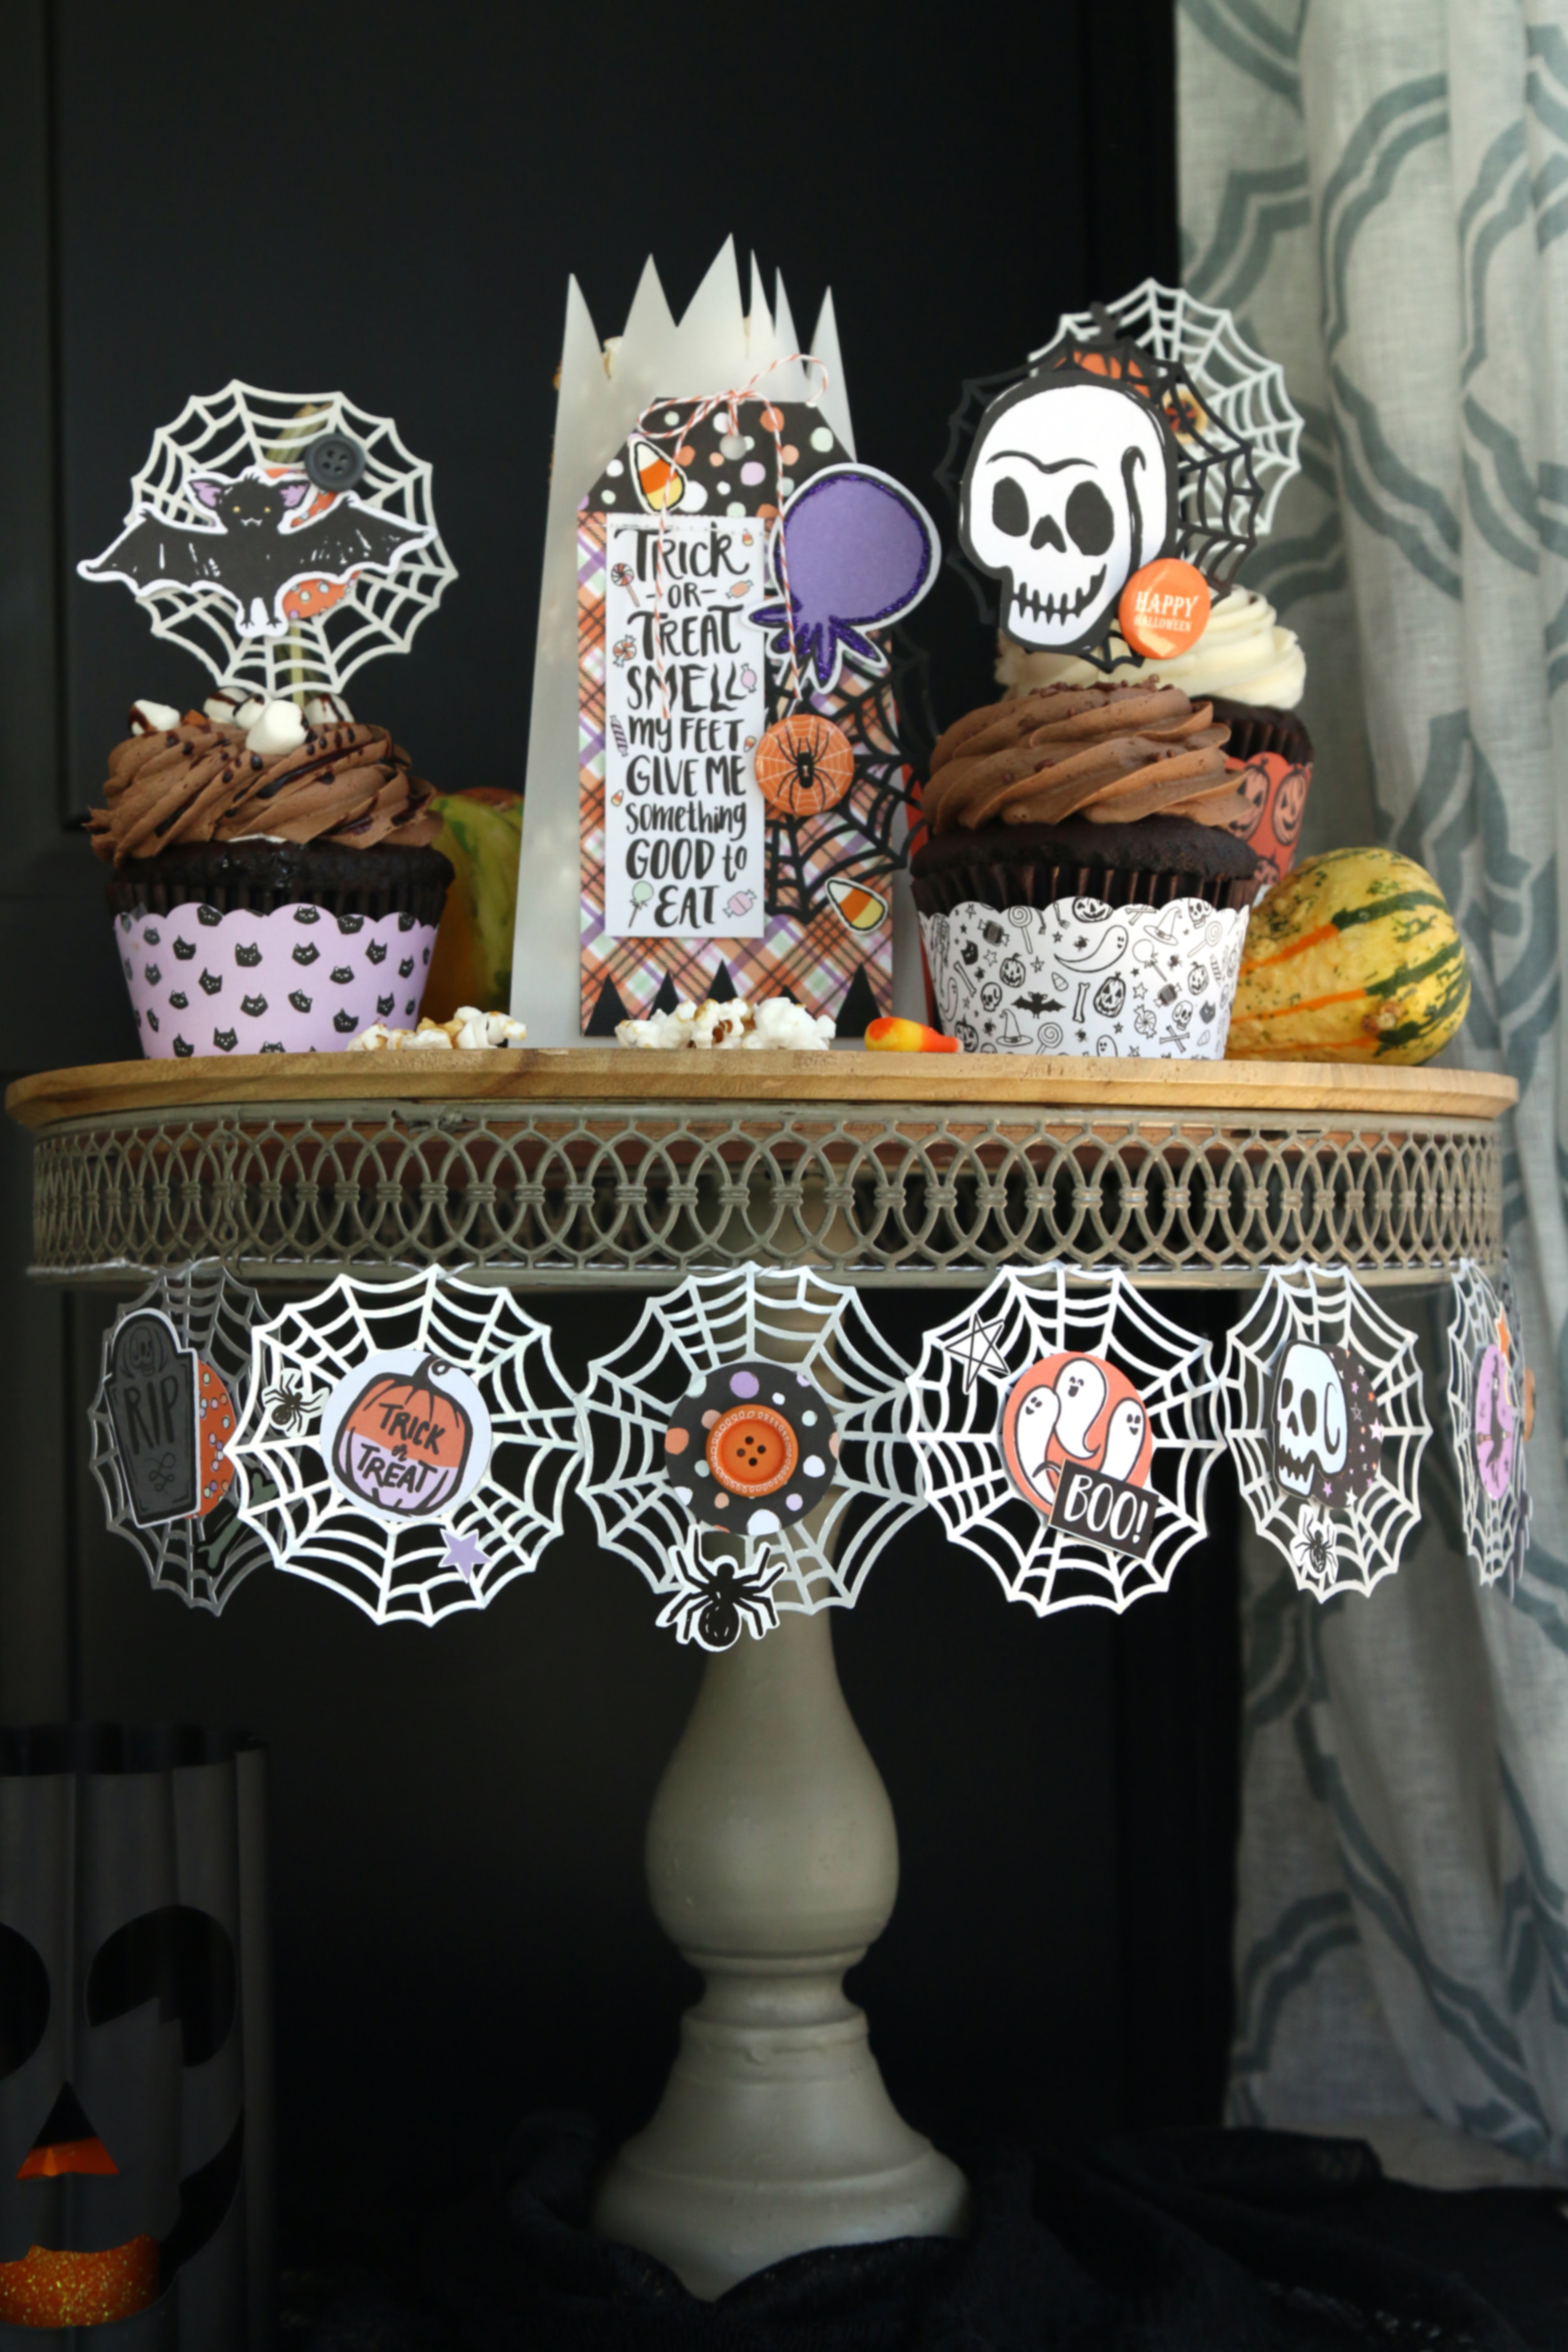
This banner was the most successful, and possibly the easiest piece to make! By using the metallic Halloween collection side web die-cuts as a base, I added punched circles of patterned paper, die cuts and stickers to the web, then threaded each web through baker's twine to hang. 

I used the same spider web die-cuts for the base of these cupcake toppers as well, adding the amazing die-cuts, flair and buttons to top them off before backing them with a bamboo skewer to stick into my cupcakes.

MeghannAndrew_AmericanCrafts_BootifulNight_PartySetup_04_BLOG.jpg

These were so simple to make, and when added to a cupcake wrapped with the Bootiful Night 6" x 6" patterned paper, they are dressed and ready to be eaten by spooky little monsters!

MeghannAndrew_AmericanCrafts_BootifulNight_PartySetup_09_BLOG.jpg

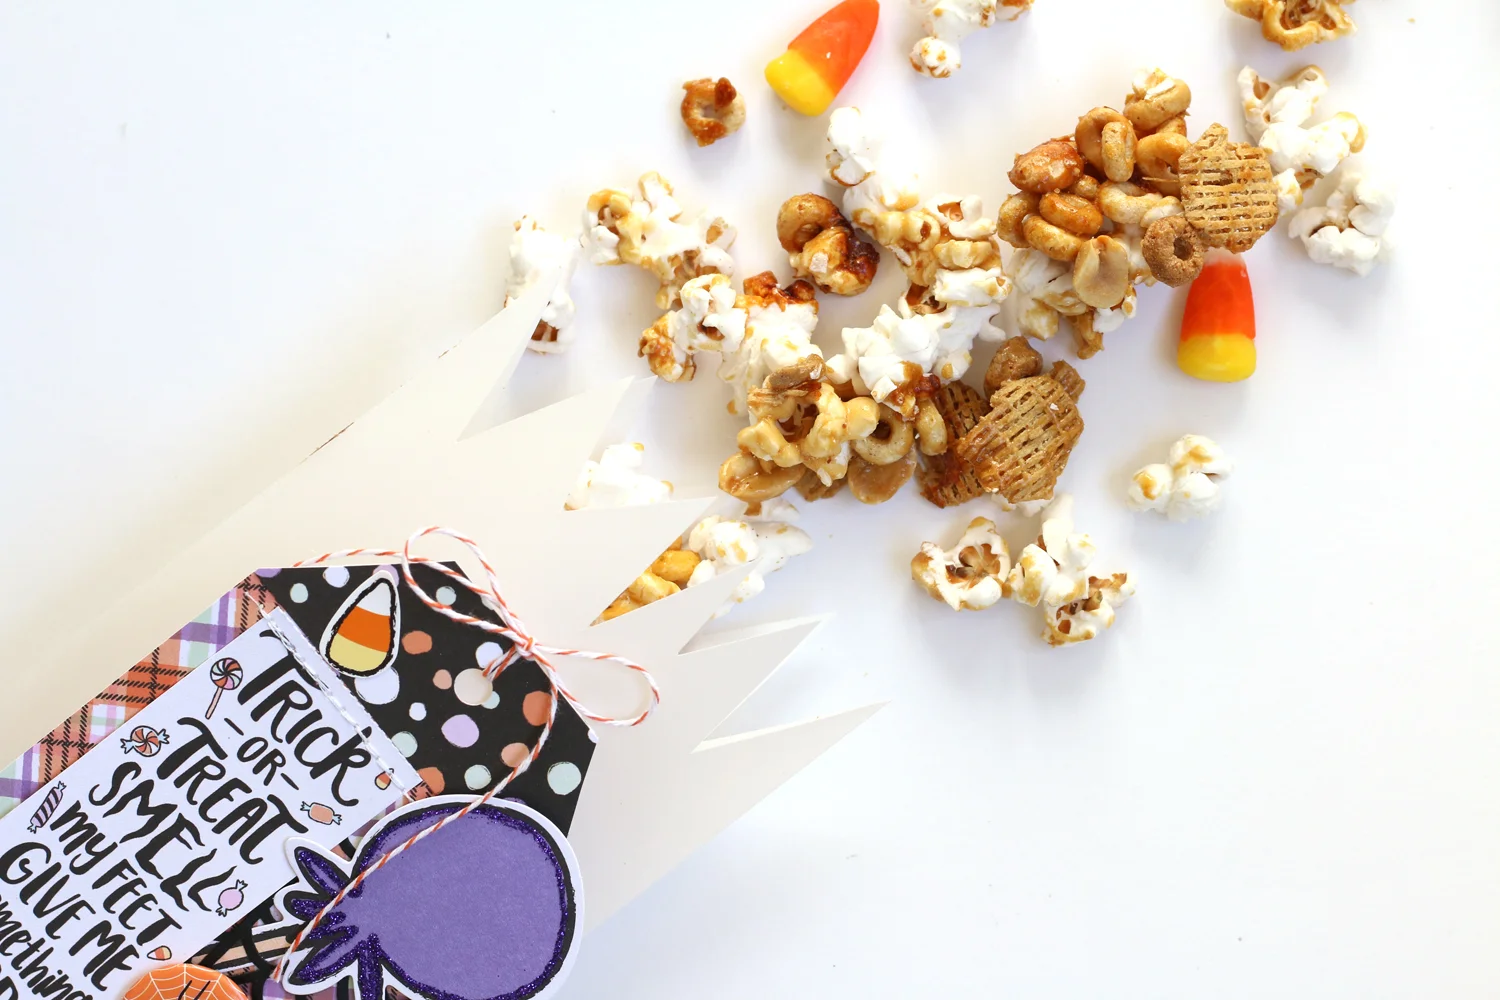
To a vellum treat bag, I added this fun tag, created with the 6" x 6" patterned paper, and layered with the ephemera die-cuts, spider web, and flair stickers. I also sewed the tag with my sewing machine and added baker's twine for extra texture before adhering it to my treat bag and filling with our favorite caramel popcorn mix!

MeghannAndrew_AmericanCrafts_BootifulNight_PartySetup_05_BLOG.jpg

This little celebration was so easy and quick to put together with the coordinating products in the Bootiful Night collection! There is still plenty of time to add those handmade touches to your Halloween celebration, so be sure to pick up these "bootiful" goodies today!

MeghannAndrew_AmericanCrafts_BootifulNight_PartySetup_07_BLOG_edited-1.jpg

Looking for a must-have snack for your Halloween celebration? Fill up a cauldron of our favorite sweet mix and watch it disappear! 

MeghannAndrew_AmericanCrafts_BootifulNight_PartySetup_08_BLOG.jpg

Candy Corn Snack Mix Recipe

(adapted from this recipe by Taste of HomeYield: about 5-1/2 quarts.

  • 3 quarts popped popcorn
  • 4 cups Cheerios
  • 4 cups corn or rice Chex
  • 2 cups salted peanuts
  • 1 cup packed brown sugar
  • 1/2 cup light corn syrup
  • 1/4 cup honey
  • 1/4 cup butter, cubed
  • 2 tsp pure vanilla extract
  • 1/2 tsp baking soda
  • 1 package (20 oz.) candy corn
  1. In a large greased roasting pan, combine the popcorn, cereal and peanuts. In a large saucepan, combine the brown sugar, corn syrup, honey and butter; bring to a rolling boil. Boil for 6 minutes, stirring occasionally. Remove from the heat; quickly stir in vanilla and baking soda until mixture is light and foamy.

  2. Immediately pour over popcorn mixture; toss to coat. Bake, uncovered, at 250° for 1 hour, stirring every 15 minutes. Stir in candy pumpkins. Cool completely & enjoy!

In case you missed it, earlier this week I also shared this fun new layout on the American Crafts blog! Be sure to check out the full blog post to find out how I created it! 

MagicMischief_Blog_edited-1.jpg

You can find the Bootiful Night collection here at Scrapbook.com, with the exception of the die-cut leaves, spider web die-cuts. and wooden buttons, which I found on Amazon. Thanks so much for stopping by, and happy crafting your spooky Halloween celebrations!


Lizzy Turns Three!

On Sunday, we celebrated Lizzy's third birthday, and for the first time, we had a big party with family and friends. Lizzy chose a Frozen theme this year, and for the first time, I didn't have much trouble finding store-bought items, however, I still made a lot for the party! Finding so much snow-themed items on 80% off clearance at Michaels definitely helped keep costs down as well.

My most time-consuming project was the "love is an open door" wreath to greet our guests. The wire mesh and ribbon were all included in the Christmas clearance items at Michaels, so it was a relatively low-cost project! 

As I have done in the past for all of our parties, I bought a couple of yards of cotton fabric from JoAnn Crafts, hemmed it on all sides, added ribbon trim to the bottom and hung it up as a backdrop for Lizzy's birthday banners, which I cut on my Silhouette Cameo. The glittery branches, which were originally $10 each, were only $2 each in the Christmas clearance, and flanked the backdrop on either side in glass vases.

Thanks to some spare cardboard boxes lying around, we created a North Mountain centerpiece and covered the entire island with white tablecloths. Elsa's ice castle topped the North Mountain and held birthday cupcakes, while the entire island had a glittering of snowflake confetti.

IMG_0030.jpg

Over the breakfast bar, we used the same curling ribbon curtain that we created for the Under the Sea themed party that we threw last year for my goddaughter, only we replaced the fish with foam snowflakes purchased at Michaels. 

Snowflakes, tissue paper pompoms and teal balls hung over the breakfast and entry tables, while Frozen swirl hangings hung throughout the kitchen.

In the doorways into the living area and the kitchen we also hung the same snowflakes on fishing line to create a curtain.

My favorite craft project for the entire party were the three centerpieces I created for the tables and breakfast bar, using paper and foam snowflakes, a #3 cut from American Crafts POW! paper with my Silhouette Cameo, and some floral picks in a Ball jar. 

Most of the food at the party had a Frozen theme, like "we finish each others" sandwiches, melte Olaf Greek yogurt cups and Anna's popcorn snowballs.

The chocolate and vanilla cupcakes with teal buttercream went over really well, and I was so pleased that Lizzy wanted cupcakes instead of the typical large cake I usually create. 

On the way out the door, the kid's favor bags were waiting for them on a tulle embellished table. 

I dressed the part, and wore an Anna-inspired outfit for the day. I really do love hosting parties, no matter how little sleep I get the week beforehand!

At the end of the day, after she had a much needed nap, I had just enough energy to take Lizzy's third birthday photos. What a difference a year makes. I know it goes without saying, but man, I love my sweet girly. Happy birthday, my little Lizzy! 

The Great British Baby Shower

With five of my friends expecting in our British mum's group, I thought it was necessary to throw a big baby shower brunch. Okay, I know what you're thinking. I'm not British, but I joined an ex-patriate group so that my husband could meet fellow Brits. Since he works, I'm the one who does most of the socializing, and they very nicely accepted me into their group. All of my local friends are British, and lovely, lovely people.

So, back to the baby shower. It seemed appropriate that I make the shower British in some way, so I decided to make it a Paddington Bear theme, however, with very little Paddington Bear decor available, it became a British/Paddington Bear shower. I couldn't have been happier with how the party turned out & I'd love to show you photos from the day.

When you walked in the front door, the entry table was decked out with a vintage Paddington Bear, borrowed from a dear friend for the day, Union Jack flags and bunting and a Paddington sign that I created and cut out with my Silhouette Cameo. The favors were also on this table, so that the girls could grab one on their way out. 

I had a local business,

Carrie's Kitchen

, create custom cookies for the favors. They were so lovely, I [almost] didn't want to eat one! 

In the kitchen and living area, we hung Union Jack bunting and cute British baby clothes on a clothesline, which also doubled as a memory game. 

I pulled globes out of Lizzy's room, and paired them with a Paddington book and teacups.

Over the kitchen island, I paired some Martha Stewart red pinwheels with handmade map-print pinwheels created from patterned paper. Behind them, I hung a large Union Jack scarf.

On the island, I raised Paddington Bear up on a borrowed Union Jack box and pulled decor from around the house, like a teacup, map print candles and a red and white plaque.

On the buffet, I served two breakfast stratas, a smoked salmon plate with bagels, a cheese plate, muffins and scones. For dessert, I made an orange and raspberry trifle, complete with a blueberry & raspberry Union Jack on top.

And what kind of British party would it have been without tea?

On the mantel and in the entryway, I hung bunting with alternating Paddington faces (cut from my Silhouette) and red tissue paper tassels. 

One of my favorite pieces of decor that I made the night before were these large Paddington tags that I hung from the ceiling fan, along with more Union Jack bunting. Each mum-to-be took their tag home as a keepsake from the day.

I love throwing a party, especially one that includes mimosas. 

Thanks for stopping by!