A New Year at Elle's Studio, and a NEW Exclusive Kit!

We at Elle's Studio are so excited about a fresh new year. A new design team to bring you inspiration, as well as a new kit

This bright and cheerful kit is full of color to help you document the beginning of your year, including your goals and intentions for 2017!

To coordinate with the kit and help you get in the Valentine mood, the Love You journaling tags are perfect! 

Last, the True Love printables and January cut files will be in your digital library to help you document your memories. 

On my first layout, I pulled the pink, red and blues out of the January kit to create this 8-1/2" x 11" layout with a favorite photo of my daughter bundled up at Disneyworld. The fun stitched banner using circles cut from 12" x 12" paper, as well as tags from the kit, was inspired by a 3" x 4" tag in the kit that featured a colorful, circular banner, which you will see featured on my next layout!

BundledUp_closeup2_blog.jpg

I love a stamped title, and mixing the "you" from the All My Heart stamp with the Olivia alphabet stamp turned out perfectly! 

My second 8-1/2" x 11" layout documents another Disneyland memory, a moment with my daughter at a princess breakfast. It features the 3" x 4" tag from the January kit that inspired the layout above, and to match it, I added a stitched column of colorful cardstock hearts along the left side of the layout. My 3" x 4" photo and the three other tags sat perfectly on the Sunny Days woodgrain paper. 

I couldn't resist making little Mickey head figures on this layout using the new sequin mix! This is definitely one of my new favorite layouts to date. 

Be sure to pick up a January 2017 exclusive kit and start documenting 2017 today! 

A Ten Minute Process Video: Family Fun

Two months ago, I created a layout using the November 2016 exclusive kit from Elle's Studio, and made a process video while creating, but ran out of time to edit and share it! If you're in the mood for a quick and easy process video, look no further! 

This layout came together quickly using the Elle's Studio November 2016 exclusive kit and 'Tis the Season collection. The November kit is currently out of stock, but you can always subscribe so that you don't miss out on any future kits! If you have holiday memories to document, be sure to check out the other products I used on this layout at the Elle's Studio shop: 

Documenting to Heal: The Climb

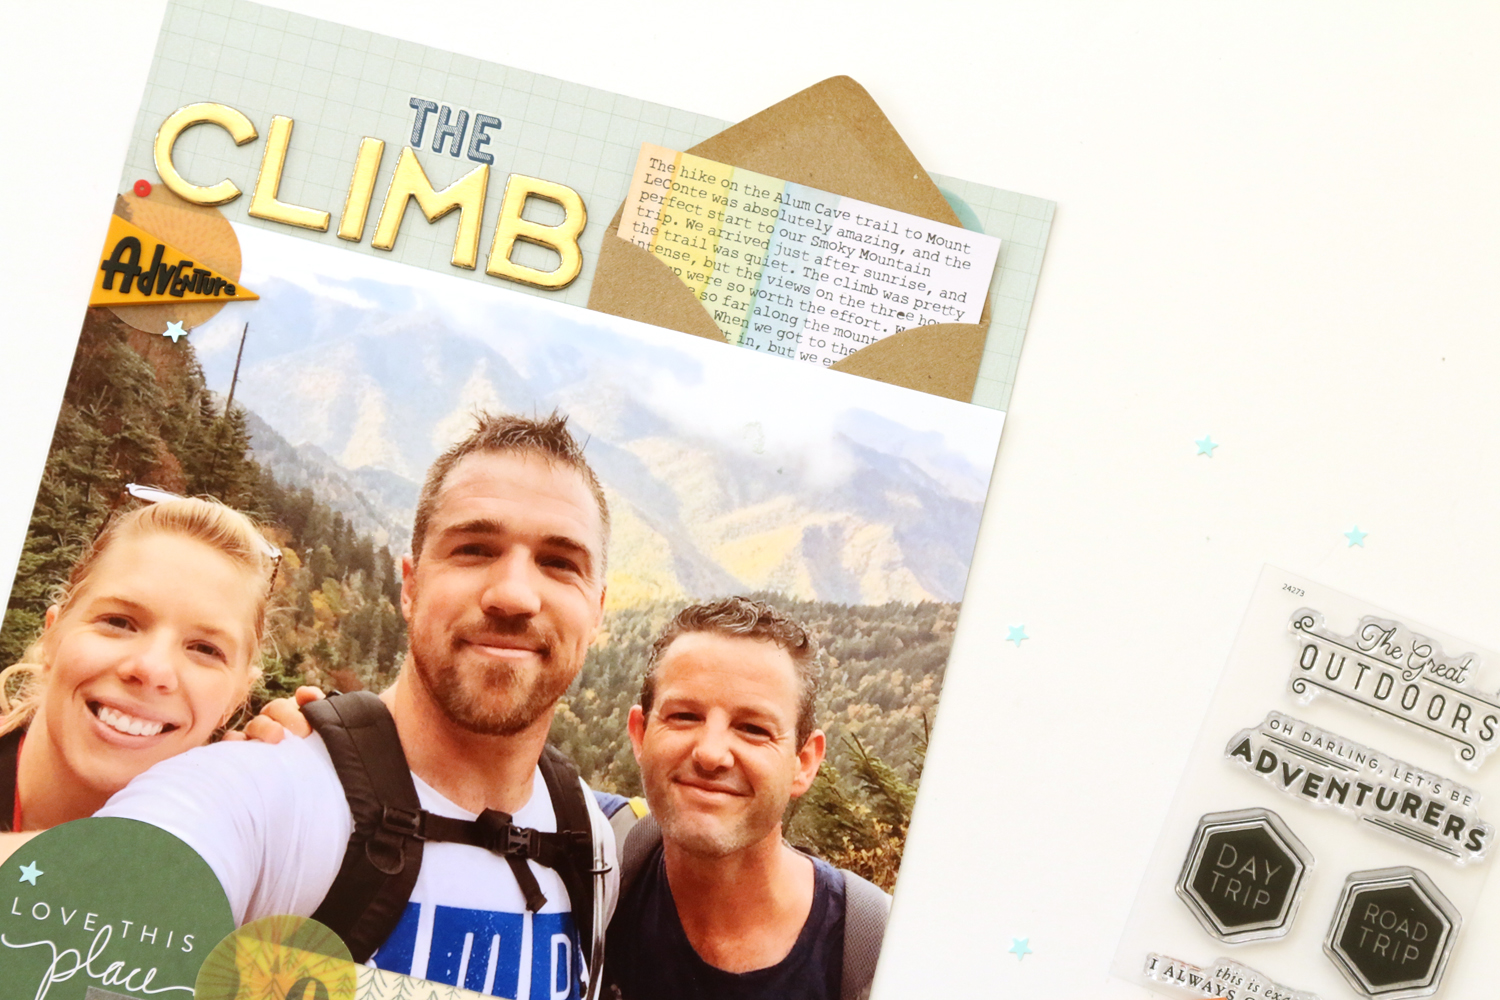
A few months ago, we took a family trip to the Smoky Mountain National Park. My parents and brother drove down from Kentucky, and we drove up from Texas to spend five days together in a beautiful chalet overlooking Mount LeConte. A few weeks later, the beautiful house that we stayed in, and the forest surrounding it, burned in a devastating fire. 

Even though we don't own the house that burned, I loved it, and had a very hard time after hearing the news. So, after cleaning my house thoroughly, (because that's what I do when I'm upset) I decided to start scrapbooking the trip. Along with the creative process I enjoy, scrapbooking can be quite cathartic when it comes to dealing with loss.

I purchased the Studio Calico Lost River scrapbook kit and documenter kits because I knew they would be perfect for documenting this trip to the mountains, and wow, were they spot on. The colors and patterns will work perfectly with so many of my photos, and I know that I will kill these kits!

3" x 4" pocket page cards are perfect for using as embellishment, too, as I did here with the "love this place" card. I paired it with the lovely vellum circles from both the scrapbook and documenter kits.

My simple title was accented with another embellishment cluster below. I loved the rubber pennants in the scrapbook kit- they were my favorite embellishment from the kit offerings.

The journaling tag I chose includes all of the colors from the layout, as well as my photo, and on it I included my typed journaling, sliding it in to a kraft envelope which was tucked behind my photo. I wanted to add a bit of color and pattern to the envelope, so I carefully trimmed a 3" x 4" tag from the documenter kit and added it to the envelope flap. The closed envelope creates an arrow which leads your eye to the photo.

Thanks for stopping by. What hard times in your life have you worked through on a scrapbook page? I'd love to hear if this works for you too! 

Elle's Studio December Exclusive Kit Reveal

It's that time of the month again- the Elle's Studio December exclusive kit is live and perfect for adding to your holiday memory keeping projects! Whether you purchase a one-off kit, or start a new subscription so that you're ensured a new kit each month, you'll love what's new in the shop today!

The bright, fun colors of the December kit will allow you to use it for a variety of projects. This kit is jam packed with 4" x 6" and 3" x 4" tags, as well as a variety of bits and pieces to use as embellishment.

The add-ons this month will also give you more options to embellish your projects! You can choose from the Winter acrylic, Celebrate acrylic, Winter acrylic stars, Holly acrylic, Cheers acrylic, Happy New Year acrylic, Celebrate stamp, and December labels that coordinate with the colors in the kit.

The digital Celebrate printables and cut files are also perfect to add to your digital library.

In addition to the Date It stamp, the Malia lowercase alphabet stamp is also available in the shop! The uppercase Malia stamp has been a favorite of mine, and I know that I will get a lot of use out of this one, too! 

Supplies | December exclusive kit, Celebrate stamp, Joy journaling tags, acrylic snowflake'Tis the Season 12" x 12" paper collection, 'Tis the Season puffy stickers

My first project has a Christmas theme, and features a favorite photo of my daughter and my brother I used a lot of white space here, adding texture with a doily underneath my photo mat, created with the 'Tis the Season 12" x 12" paper collection. The "very merry details" tag from the December kit was my favorite this month, so I added that to the left side of my photo. I also used the Celebrate stamp to add "remember magic" to the small tag at the bottom of the journaling tag. To add that big pop of red, and create a title, I used the "jolly" tag from the Joy journaling tags, and finished off the layout with the lovely acrylic snowflake.

Supplies | December exclusive kit, Celebrate stamp, Date It stamp, Winter acrylic stars, 'Tis the Season 12" x 12" paper collection, 'Tis the Season acrylic, letter and number stickers- gray, letter and number stickers- red

My second layout is a review of the year, inspired by the "favorites of the year" 4" x 6" tag in the kit. I loved pairing it with the multicolor stripe 3" x 4" tag, and I pulled those colors throughout the layout, by using the strips from the 'Tis the Season 12" x 12" paper collection, the little tags from the kit at the top left corner, and the Winter acrylic stars. 

Thanks so much for stopping by today, and be sure to check out the Elle's Studio shop for these new releases, as well as a great "Celebrate the Season" sale: 25 products are available for $2 or less! 

Altenew Scrapbook Kit Release Blog Hop + Giveaway

Hello there! I am so excited to be participating in the Altenew Reflection scrapbook kit release blog hop today, and if this is your first visit to Brioche and Blessings, thanks for stopping by! I had so much fun opening and creating with this beautiful kit! 

The bright and vibrant colors in this kit will take you back to all those happy moments captured at home or abroad. From trendy watercolor painted papers, to beautiful cityscape postcards and a wide assortment of embellishments, this kit is perfect for creating gorgeous layouts, wall art, mixed media projects, and many more!

Altenew_Scrapbook_Kit_Numbers.jpg

The kit contains: 

  1. 48 sheets of 12”x12” patterned paper (two of each design)

  2. One 8.5”x11” cardstock sticker sheet

  3. Two 6”x12” alphabet puffy sticker sheets

  4. 20 8.5”x3.5” watercolor cityscape postcards

  5. One 2x3 photopolymer clear stamp set

  6. 20 epoxy buttons with adhesive back

  7. 34 cardstock and acetate die cuts

  8. 12 origami wood veneer shapes

  9. Two white resin decorative frames

  10. One 8.5”x11” chipboard sticker sheet

  11. One rubber roller stamp

The travel-themed elements of the kit had me pull out a couple of favorites from a family trip to Paris in 2014. I gravitated toward the beautiful green and blue watercolor designs, which worked perfectly with the beautiful, blue sky in my photos and accented with pops of bright pink.

There are SO MANY embellishments to choose from in this kit, but I was drawn to the the "let the adventures begin" wreath chipboard. It inspired me to add four circular elements to the right side of my photo mat.

With so many different elements in this kit, the bright colors and clean design, the Reflection kit is definitely one that should be a treat to yourself this Christmas! 

There are so many talented ladies who also have gorgeous projects to share using the Reflection scrapbook kit, so be sure to hop along all of their blogs: 

Altenew

Jessy Christopher

Stephanie Buice

Eunyoung Lee

Vincenza Gudor

Flora Monika Farkas

Raquel Bowman

Aimee Dow

Kim Stewart

Lilith Eeckels

Meghann Andrew < YOU ARE HERE > 

Ashley Horton

Evelyn Yusuf

Want to win your own Reflections scrapbook kit? To celebrate this release, Altenew is giving away a $50 gift certificate to THREE lucky winners! Please leave a comment on the Altenew blog by Wednesday, December 14th at 11:59pm EST for a chance to win. The winners will be announced on the Altenew blog on Thursday, December 15th.

You can also leave a comment here by December 15th at 5pm EST to win a $30 gift certificate to the Altenew shop! Thanks so much for stopping by and be sure to check out all of the lovely inspiration along the hop today! 

Talk to Me About Titles!

Adding a title to my layout is one of my favorite parts of the design process, however, I understand that it can be a source of frustration for some of us scrapbookers! I'm brainstorming something new and exciting over here, and I'd love to have some feedback from you, my lovely blog reader!

Talk to me about titles.

Answering the questions below in a comment is all you need to do to be entered into a drawing to win an Ali Edwards Click Story Kit! 

  1. Do you always include a title on your layouts? If so, do you plan this alongside your photos/supplies, or is it typically an afterthought?
  2. Do you find titling difficult? What do you find hard about adding a title to your page? The actual title itself, or choosing the products that make it up? 
  3. Do you have a hard time coming up with the words of a title, typically, or do you find that it comes easily with the story you want to tell? 
  4. Think of your favorite layout, and how this title just worked for your page. What makes a "good" title to you, both the words of the title, and design-wise?
  5. What is you #1 favorite product for creating titles? (For example, a Silhouette Cameo, or Thickers alphas

Giveaway will remain open until Friday, November 18th at 9am CST, and is open to internationals!

Thanks so much for your feedback and I can't wait to read your answers!

Using Diagonal Lines with Shimelle Products!

Yesterday, I had a new layout featured on the Shimelle.com blog, and it's a favorite one of mine! 

I typically tend to shy away from bold paper, like this Ranger pattern in the Starshine collection, but when I realized I could use it to create emphasis on my photos, I was excited to take advantage of those bold diagonal lines.

All of my embellishments were placed along the diagonal, so that I didn't break up those lines. I also tried to color block the red embellishments to the red lines, and the blue embellishments to the blue lines, so that there was a sense of continuity.

My favorite part of the layout is the placement of this acetate arrow, which really draws attention to the vertical row of photos and houses my title. It was definitely one of those "happy accidents" that it fit perfectly on top of the photo of the Beefeater, the pointed to my journaling.

I was so excited about creating this layout that I created a process video: 

Be sure to check out all of the Shimelle products used in this layout. I love how the different collections work perfectly together! 

Thanks for stopping by & have a great weekend! 

Elle's Studio November Exclusive Kit Reveal!

Can you believe it's November, and the year is almost over? That means there's only two Elle's Studio exclusive kits left for 2016, and the November kit is spectacular! 

Document your November and get ready for December with the November 2016 exclusive kit, in which fall colors pair with Christmas classics. You'll also want to check out all of the awesome add-ons that coordinate with the kit this month: 

From top to bottom: Thanksgiving Acrylic, Love Wood Veneer, Merry Christmas Acrylic, Large Acrylic Stars, Good Cheer Stamp, Joy Journaling Tags, Acrylic Snowflake, Gingerbread Wood Veneer, Acrylic Christmas Trees, Stars and Hearts Frosted Acrylic, Christmas Wood Veneer Attachers, FaLaLa Acrylic, Bah Humbug Acrylic, Twinkle Acrylic, Deck the Halls Wood Veneers

My first project this month is a combination of an 8-1/2"  x 11" layout with an adjoining pocket page, and I combined this month's kit with the Sunny Days and the Autumn mini collection for an autumnal spread.

My second project is a 12" x 12" layout with a Christmas theme, featuring a series of three fun photos of my little family.

Supplies | November 2016 exclusive kit, Stars and Hearts Frosted Acrylic, ’Tis the Season 12” x 12” paper collection, Family acrylic, Malia alphabet stamp.

In addition to the kit and add-ons this month, there are also some new 2017 products to plan your Project Life album for next year that you'll want to pick up in the shop.

From top to bottom: Monthly Wood Veneer Tabs, 2017 Large Black Acrylic, 2017 Large White Acrylic, 2017 Small Black Acrylic, 2017 Small White Acrylic, Date It Stamp, Right Now Journaling Tags, 2017 3" x 4" Calendars, Monthly Journaling Tags

Check out all of the new offerings in the shop this month, perfect for all of your end of year documenting! Happy creating! 

Elle's Studio October Exclusive Kit Reveal- With Subscriptions!

I am so excited to share the new October exclusive kit from Elle's Studio with you this month, not only because it is gorgeous, but also because this month is the first month that Elle is offering kit subscriptions with NO CANCELLATION FEE. How great is that? Anyone who subscribes today will  also receive a free acrylic gift, so check out all of the amazing new products in the shop! 

You will definitely want to start your subscription this month! Take a look at the October kit!

Those gorgeous colors and patterns definitely won me over! The add-ons, which include the Autumn wood veneer, Autumn wood veneer attachers, Family acrylic, Family Fun stamp, Autumn leaves acrylic mix and Autumn journaling tags, are perfectly designed to coordinate with your kit, and will inspire you to document your October memories!

And, get more "bang for your buck" by ordering the October cut files and Love My Tribe printables

My first layout turned out exactly as I had planned- crisp and clean, but still with an autumnal feel.

With just a few supplies, I created this layout about how much I yearn for fall each year! By backing the die-cut cardstock page with a stamped and misted piece of cardstock, I created a lot of texture on my background, and topped it with pieces from the exclusive kit and add-ons. 

My second layout has a much more playful feel.

There were so many lovely smaller tags in the the kit this month, along with the digital cut files and acrylic pieces- I just couldn't stop layering! 

Have questions about the new subscription format? Check out the ES blog for any questions you may have. Grab your kit via subscription before they're gone- these lovelies are sure to sell out fast! 

Jot Magazine Issue 15: Everyday Magic

Hi there! Jot Magazine Issue 15 has been out for almost two weeks now, and if you haven't checked it out, you won't want to miss all of the inspiration in store for you there! Today I'd like to share a layout I created for the first gallery in this issue, the Sparkle gallery! 

“Everyday Magic” Supplies | Cardstock: Bazzill. Patterned paper: Studio Calico. Journaling cards: Project Life. Stamps: Elle’s Studio, Studio Calico. Dies: Elle’s Studio. Embellishments: Ali Edwards, Studio Calico, Evalicious, Studio Calico, Color Cast Designs, Pink Paislee, American Crafts. Ink: Stampin’ Up, Tsukineko.

This layout was inspired by a beautiful moment I shared at my daughter doing an ordinary thing: pushing the shopping cart (or trolley for my British friends) from the store to the car, and since the parking lot was empty that morning, racing as fast as we could down the aisles. I was lucky enough to have my phone in my hand at the time to capture the moment.

The beautiful star background cut file, created by Elle's Studio, was backed with silver POW! paper from American Crafts, cut from a sheet of white cardstock. To add a bit of color, I painted teal watercolor paint around where I would place my photo and journaling. I love the dreamy quality it gives my background.

Next, I started layering. I pulled the gorgeous blue patterned paper from the Wink Wink scrapbook kit from Studio Calico. It had that gorgeous watercolor paper feel that I was looking for. To offset that dark blue, I chose reddish-orange cards from the Project Life Everyday Edition core kit (one of my favorites!), and my color scheme was nailed down. 

Although this was not a color scheme that I've used before, I found it quite easy to find embellishments in my stash to match. My title was created with a mix of Pink Paislee glitter alphas, that were a long-ago exclusive from Studio Calico, and the "magic" acrylic word, from the Ali Edwards Magic Story Kit, one of my favorites. I also used a few pieces of chipboard from this kit that were perfect for this story, especially the "magical ordinary moments" circle.

This could possibly be one of my favorite layouts of the year. Simple and so my style- documenting a magical moment with my little. 

Thanks for stopping by! Happy Monday! 

Elle's Studio September Exclusive Kit Reveal!

Can you believe it is already September? I always find this month strange- summer is not quite over, but I'm yearning for fall, and the Elle's Studio exclusive kit this month has the best of both seasons! Take a look at this beautiful kit!

There are SO many embellishments that coordinate with the kit this month, including the vellum hearts, foodie wood veneer, Right Now stamp, Collecting Moments acrylic, Best Ever acrylic, Fall acrylic, Autumn acrylic, Awesome acrylic and Autumn stars.

Lastly, the Hello Autumn printables and September cut files are a must-buy! 

I was so excited about the herringbone pattern in the digital cut file this month, that I made it the focus of the design on my first layout.

I absolutely love the simplicity of this layout. Although it was a bit time-consuming backing the cut file with tiny pieces of colorful paper, the outcome is so worth it to me! This is easily one of my favorite layouts of the year.

My second layout was created for my Disneyland album, which is always a work in progress!

Supplies | September exclusive kitSeptember cut filesSunny Days 12" x 12" paper collection, Sunny Days puffy stickersEveryday Labels puffy stickers- gray, Marie alphabet stamp, Autumn acrylic stars

I again used the September cut files to cut "documented" to place under my photo, which I then placed on top of the bold stripe on the "Adventures" pattern from the Sunny Days collection. Because I wasn't using orange in this album, I simply cut out the orange stripe and adhered the design back together on my background! 

The title was so much fun to create, and was stamped with the Marie alpha stamp in multiple colors. I then stitched over the letters, so that the title looked like a banner, and added some puffy and acrylic stars.

Watch out for another project from me coming next week, using the September kit and add-ons!

This month is very exciting, because Elle is doing a free shipping offer! Any orders $50+ shipping  to the U.S. should use code SHIPUSA and international orders of $75+ use code SHIPINT. Happy shopping, and happy creating! 

Jot Magazine September Mood Board

I am so excited to be the guest pinner for the Jot Magazine mood board this month! 

I am really loving sunset colors and aztec patterns right now, and this mood board certainly reflects that. My layout started with a photo of my daughter and goddaughters on a walk through  the woods.

InTheWoods_blog.jpg

Going through my stash, I began pulling patterned papers with the colors and patterns that reflected the mood board. My favorite image of the painted leaves, had to be used on my layout, so I grabbed a BlockWalla wood leaf stamp, along with my acrylic paints to fill in some of the spaces.

There is a lot of layering of colors and patterns on this page, and with all of the layers surrounding my photo, I kept my embellishment very simple, using a lot of old items from my stash, including this last piece of the Amy Tangerine fabric leaf border.

The Jot Girls projects inspired by this board are so amazing! Be sure to check them out and upload your own creation for a chance to win a fantastic prize! 

Pink Paislee Guest Designer: Birthday Week!

I am so excited to announce that I am the guest designer on the Pink Paislee blog today during birthday week! I had such a fun time making these creations using the new Birthday Bash collection, and I hope they inspire you to document and craft your next party! 

To create all of these projects, I worked with a few simple supplies:

Let's take a look at what I created! 

This 12" x 12" layout came together quickly by using a grid design. I made sure to run my elements both vertically and horizontally to create a lot of interest. Don't forget to document your own birthdays, and your hopes and fears for the upcoming year, as I did here!

I so love bunting, hanging at a party or on a layout, and my photo was framed twice- first by the bunting at the top and bottom of my page, then by the die-cut elements and watercolor surrounding the photo of my daughter getting ready to blow out her candle.

I started making one card, but had so much fun with it that I made three! These cards have an extra element of surprise for your recipient, given that each has an acetate window that carries part of the sentiment through to the inside of the card.

I just had to die-cut a balloon background to document this photo of my daughter, taken on her birthday with a bunch of balloons. To make the balloons stand out, I backed them with patterned paper, all from the Birthday Bash collection, then outlined the edges with watercolors, and stitched the balloon strings. This is my favorite project from my guest post! 

If you've been following me here for a while, you know that I'm a big fan of throwing a party, and I especially love making things for kiddos that they can call their own. These fun party hats were cut with this digital die-cut file, then embellished with two rows of crepe paper, sewn on at the bottom and cut with Martha Stewart fringe scissors. I also fringe cut more crepe, rolled it up and stuck it in the top of the hat. To customize each hat, a simple die-cut ephemera piece, topped with an initial and a sequin finishes them off quickly! 

Thanks so much for checking out my projects! Be sure to take a look at the Birthday Bash collection, currently on sale at Scrapbook.com! 

Elle's Studio August Exclusive Kit Reveal!

I'm so excited to tell you that the Elle's Studio August exclusive kit and add-ons are now available in the Elle's Studio shop! August is typically one of my favorite kits of the year, and this one definitely did not disappoint! 

The kit is full of great colors and awesome sayings. Also, the die-cuts are now being packaged on 4" x 6" sheets, ready to be easily punched out, and I created a short video to show you how easy they are to remove from their sheets, which make them so much easier to see all together in one place.

Don't forget the digital printables and cut files that coordinate with the kit! 

I started my projects out this month with a double pocket page spread! It's been a LONG time since I created one of these, and I just added a few stamps and items from the Sunny Days collection. There is so much packed in the kit that I had plenty of tags left to create a layout and still have leftover supplies! 

I just had to use the Read stamp to include these colorful little stamped books on the "sunshine and ___" tag! 

For my second project, I went back to my roots and created a 12" x 12" layout! The "long hot summer days" tag was my muse for this layout, and I printed out photos from an impromptu splash pad encounter this summer.

These are definitely some of my favorite photos from the summer, and this kit was perfect to document them! 

Be sure to stop by the Elle's Studio shop to check out all of the new items this month, and be sure to check out the sale items in the shop this month! 

Elle's Studio: Today You Are Three

Yesterday on the Elle's Studio blog, I shared a recent favorite layout with a photo that I've hesitated scrapbooking since January- that was until I pulled out my Documented mini collection

Elle’s Studio Supplies | Documented journaling tagsDocumented stampLittle Moments 6” x 6” paper stackSunny Days 12” x 12” collection packSunny Days 6” x 6” paper stackThe Story Of stamp.

This photo, taken on Lizzy's third birthday back in January, just always had me stumped. Because Lizzy was wearing fuchsia, I really didn't have any product that would go along with the photo, and almost made the photo black and white to scrapbook it. That was, until I pulled out my Documented journaling tags

The colors that I found in these journaling tags couldn't have been more perfect with this photo! By layering the Documented journaling tags with Little Moments 6" x 6" papers on a clean, white background, this layout came together so quickly! 

To mimic the balloons that Lizzy was holding in the photo, I punched circles from a Documented 3" x 4" journaling tag, the purple polka dot paper from Little Moments 6” x 6” paper stack, and a die cut from the Project Life Everyday collection. I taped bakers twine to the back before adhering them with dimensional adhesive, then tied them all together with a knot before adhering the knot to my journaling tag to keep it in place. 

I wanted to add some weight to the top and bottom of my layout, and the More Stars paper from the Sunny Days 12” x 12” collection pack was perfect to go along with the Documented supplies. To create my title, I used both the The Story Of stamp and the Documented stamp to stamp "today you are" before adding silver Thickers to finish off the layout. I kept the rest of the layout simple by adding a few acrylic, and puffy stars, and a bit of shimmer mist droplets. 

Be sure to check out the exclusive Documented products in the Elle's Studio shop before they disappear! 

Shimelle.com: Taking Inspiration From Planners

Today on Shimelle.com, I'm sharing a new layout that I created, taking inspiration from my favorite planner, my Get to Work Book!

I had so much fun creating this layout. For the full post, as well as to see Shimelle's lovely page that was also inspired by planners, check out Shimelle.com

Jot Magazine Issue 14: Once Upon a Time

Jot Magazine issue 14 has been out for a few weeks now, and if you haven't checked it out yet, I'd love to share a layout I created for the Storytelling section. This month's theme was "once upon a time," which immediately made me think of our trip to Disneyland at the end of last year, so I decided to create another 8-1/2" x 11" layout to add to my Disneyland album.

Supplies | Cardstock: Bazzill Basics. Patterned paper: Simple Stories. Journaling tags: Project Life, Elle's Studio. Stickers: Simple Stories, Crate Paper, Studio Calico. Stamps: In a Creative Bubble, Studio Calico. Wood veneer: American Crafts. 

When we first arrived at the park, the first ride we came to with a short line was the Flying Dumbo ride. Walking up to it, Lizzy was just amazed. I was so happy that I had my camera ready to capture the joy and excitement in her face. 

I loved the floral & sequin paper from Simple Stories that I chose for my background, but when I cut it to 8-1/2" x 11", the gold "I am" words were still visible in the right corner. So I simply covered that area with sequins and flowers cut from another corner of the paper. I continued my red, yellow, turquoise, white and black color scheme from the rest of my Disney layouts throughout the page, layering tags, washi, and stickers to create a whimsical, girly layout.

Title work is always my favorite part of a layout, and I had fun creating this one with Crate Paper Thickers, an older alphabet stamp from Studio Calico, and epoxy gold alphas from Studio Calico.

I'm loving having this memory documented in my Disneyland album! What will you create with the theme of "once upon a time?"