Documenting my Whole30 Journey with Elle's Studio September Kit

Back in March, I went on a journey with Whole30, and it changed my life, my body and my mind. I started the program to kick my sugar habit, as I really have a sweet tooth and always wanted sweets after a meal. I wanted to document this month in my album, and the Elle’s Studio September 2018 kit and add-ons*, full of food-themed products, was perfect for this project.

EllesStudio_MeghannAndrew_Whole30_01.jpg

I could tell you all about how I created this layout and pocket page spread, but why not watch my process video instead?

The back side of the pocket page was not included in my process video, so here’s a look at how it turned out.

EllesStudio_MeghannAndrew_Whole30_02.jpg

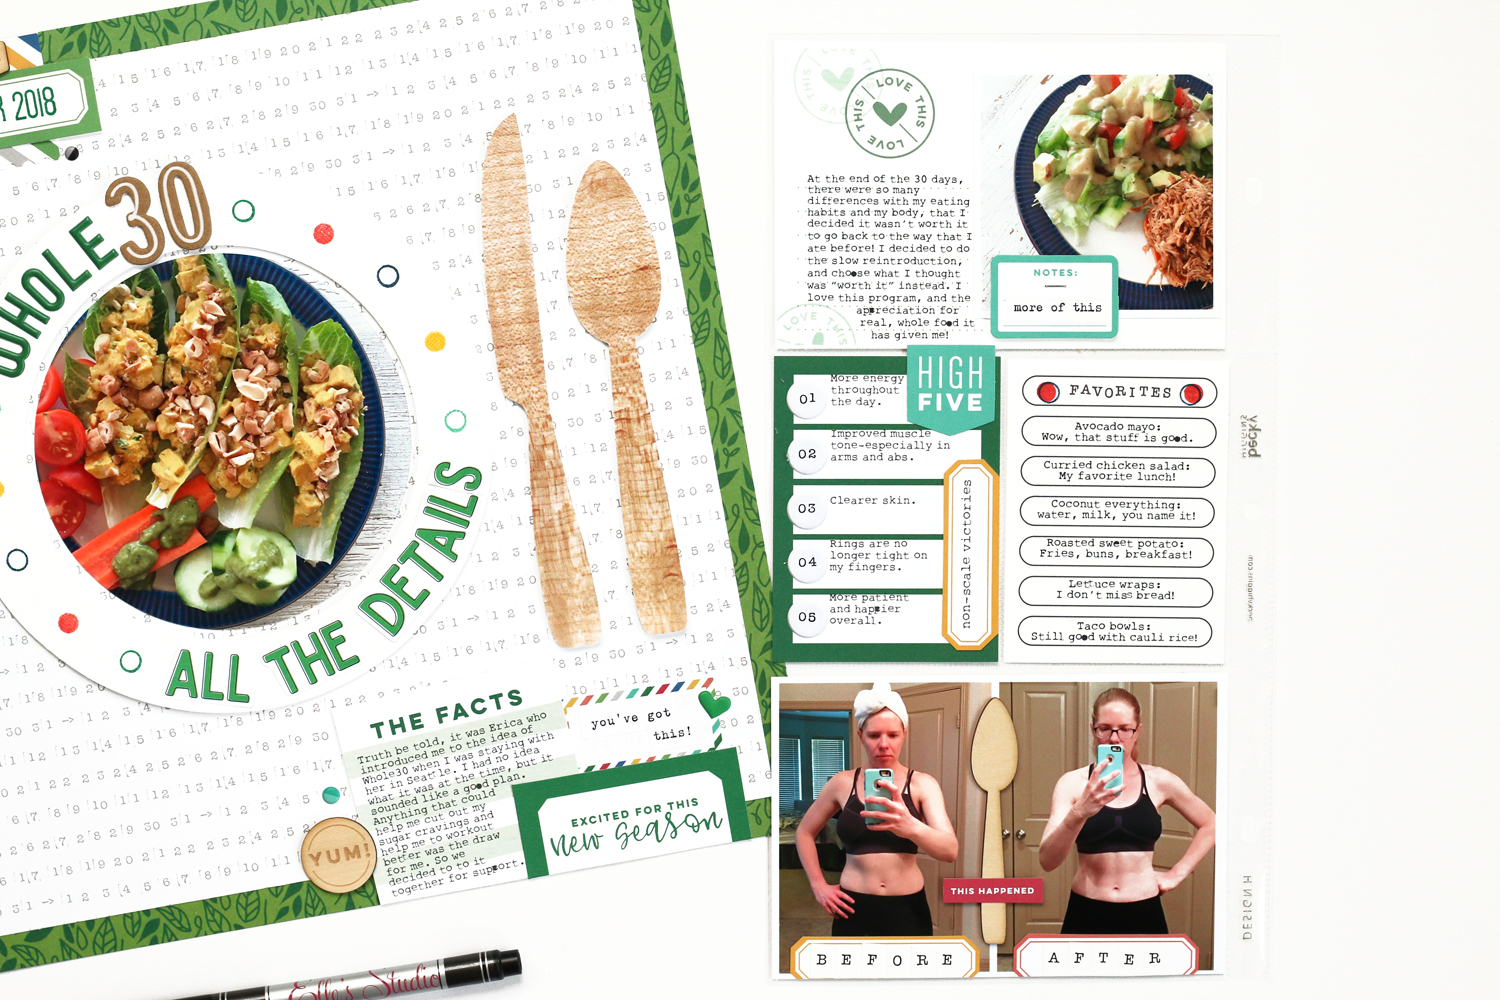
At the top of the page, I used a digital tag from the New Season printables to add my journaling on the left side of the 4” x 6” pocket, then adhered a 3” x 3” photo of one of my favorite dinners on the right side. The “notes” die cut from the September kit and “more of this” Here and Now phrase sticker finished off the pocket.

EllesStudio_MeghannAndrew_Whole30_11.jpg

Can I just say that I have been hoarding the circle numbers in the Noteworthy puffy stickers since the collection released in April!? I finally had a good excuse to use them: to document my non-scale victories—or things that I noticed changing in my body besides my weight. Next to that, on the “favorites” New Season printables tag, I added a list of my favorite foods and meals during my month of Whole30.

Even though I did not start this program to lose any weight, my before and after image is pretty telling—I lost fat, gained muscle and just felt better overall. I also kicked my “need” for sugar! I added my before and after photos to the bottom pocket, separating them with the wooden spoon from the Good Eats wood veneer, adding the “this happened” die-cut from the September kit to the top. At the bottom, I added the words “before” and “after” to the colorful September labels using the new Hazel white alpha stickers.

EllesStudio_MeghannAndrew_Whole30_12.jpg

This has to be one of my favorite projects in my album—both because I love the product that I used and the subject that I’m documenting so much! Be sure to check out all of the product I used on this spread in the gallery links below, which will take you directly to the Elle’s Studio shop. Thanks so much for stopping by! If you’re interested in the Whole30 program, be sure to check out their website for all of the details!

*Clicking these links will take you to the Elle's Studio shop, and when you purchase, I receive a small percentage of the sale. It doesn't cost you any extra, so thanks so much for your support!

Tangerine and Vanilla Bean Marmalade

There are a few things that I look forward to in winter: cooler temperatures, allowing us to spend extended periods outdoors, winter holidays, and citrus fruit. Here in southern Texas, our winters are quite mild, and come December and January, the tangerines and lemons are ripe for picking. Having a good friend with a humongous tangerine tree definitely has its perks, and I don't mind picking for a couple of hours in the beautiful weather to take home a few bags of the sweet, juicy fruit.

Now, if you're one of my British friends, who are often marmalade purists, you appreciate the bitterness that comes with traditional marmalade. I, however, do not, which is why I was on the hunt for a different recipe. After a bit of searching, I found the best solution to my marmalade malady and tweaked it a bit to fit my tastes. Be warned, that when you finish the last jar, tears will be shed, and you will be wishing for winter's return.

Tangerine and Vanilla Bean Marmalade

(recipe adapted from Lemons and Lavender)

Ingredients:

  • 4 lbs. tangerines, washed, blemishes cut off of the skin, and cut in half lengthwise
  • 2 Meyer lemons, washed and cut into quarters
  • 9 cups of water
  • 4 vanilla beans, cut in half and split down the center with a sharp paring knife
  • 6 cups sugar
  • 8 8oz. canning jars, seals and rings

Process: 

  • Put the tangerine halves cut side down on the board and cut into 1/8" slices. Do the same with the lemon slices and place all of the fruit in a large bowl. I like my tangerine rind to be quite thin, but if you like your marmalade quite chunky, you can made the slices wider, at 1/4"

  • Add 9 cups of water, cover with plastic wrap and allow to sit at room temperature overnight.

  • Transfer fruit & water mixture to a large pot (mine is 8 quarts and it works well for when the marmalade is boiling.)

  • Using a sharp knife, open up the slit that you made in the vanilla bean & scrape out all of the seeds, placing them in the pot with the fruit and water. Don't worry that they are all stuck together- when the mixture boils, the seeds will separate. Add the vanilla beans themselves into the pot as well. 

  • Bring the mixture to a boil, then reduce the heat and allow it to simmer, uncovered for 1 hour and 15 minutes.

  • Remove the pot from the heat and add in all 6 cups of sugar. Stir well, and the sugar will dissolve in the hot mixture. Add a candy thermometer on the side of the pot so that you can check the temperature of the marmalade. Put the pot back on the stove and bring to a rolling boil, until the thermometer reads 220 degrees Fahrenheit, which will take about 1 hour and 15 minutes. You will start to hear that the boiling sounds differently, since the mixture is getting thicker. Start watching it closely around the 1 hour mark, and as soon as it reaches 220, take the mixture off of the heat. When it is getting close, you will want to get another large pot of water up to a boil, so that you can process your jars in the next step.

  • Divide the hot marmalade into eight 8oz. canning jars, placing a vanilla seed pod half into each jar. Put the seal on top and tighten the ring. Bring another large pot of water to a boil and place the jars of hot marmalade into the boiling water for 5 minutes. Remove from the boiling water and place on a rack to cool. You will hear the tops pop as they come down in temperature. By the time they are room temperature, you shouldn't be able to pop the top of the seal, and they are safe to keep in the cupboard. If you prefer to skip this step, you can keep your marmalade in air-tight containers in the fridge for 2 months.

What We're Eating Wednesday: Easy Honey Pecan Granola

Granola. This versatile mix of oats & nuts is not only perfect for topping fruit and greek yogurt for breakfast, it's equally amazing as a quick snack in the afternoon. I often have to hide the canister of this goodness in the pantry so that my husband doesn't shove it by the handful into his mouth when he gets home from work. This is a staple in our pantry & it is rare that I ever run out of this crispy, nutty mix. The recipe is originally from Martha Stewart, I just tweaked it slightly. 

Honey Pecan Granola

Ingredients:

  • 3 c. old fashioned rolled oats
  • 1-1/2 c. pecans, coarsely chopped
  • 3 Tbsp. unsalted butter, melted
  • 1/3 c. wildflower honey (In this recipe, the main flavor comes from honey, so use the good stuff! I use a local Texas wildflower honey with amazing flavor- it MAKES this recipe!)
  • 1/4 tsp. kosher salt
  • 1/2 tsp. vanilla
  1. Preheat oven to 300 degrees. Line a rimmed sheet tray with parchment paper.
  2. In a large bowl, combine oats, pecans and salt. Melt butter in a medium microwave safe bowl. Add honey & vanilla to warm butter. Mix well.
  3. Pour honey mixture over oat mixture and stir with a spatula until all oats are covered with honey.
  4. Spread evenly on the prepared baking sheet and bake for 10 minutes. Using a spatula, mix the granola up and turn over. Bake for a further 10-15 minutes, until oats are golden brown. Cool completely on sheet tray & enjoy!

What We're Eating Wednesday: The Best Blueberry Scones EVER

I am a huge fan of scones. I love making them, I love eating them. Making them because, well, they're so simple and eating them because, let's face it, they're crispy on the outside and warm and soft on the inside. In one word, 

delicious

.

I make a few different scone recipes around here, but this one is my most loved. I made two batches for a baby shower brunch this weekend and they were the first item to disappear on the buffet. I love these so much that I want to share them with you today. Be sure to share the love and pass them on, too.

Blueberry & Lemon Scones

 (

makes 8 scones) 

adapted from

this

recipe

Scones:

2 c. all-purpose flour

1 Tbsp. baking powder

1/2 tsp. salt

2 Tbsp. sugar

5 Tbsp. cold, unsalted butter, cut into chunks

1 c. fresh blueberries

1 c. heavy cream (approximately- see note below), plus more for brushing

Zest from 2 lemons

3 Tbsp. coarse demerara sugar (optional)

Preheat oven to 400 degrees F. Sift together the dry ingredients. Using a pastry blender or a food processor to make it faster, cut the butter into the dry ingredients until the mixture resembles coarse crumbs

(this was about 20 pulses on my food processor- you want to still see some butter chunks in the mix to make them fluffy!)

Place mixture back in a large bowl and mix in blueberries and lemon zest, being careful not to mash the blueberries. Make a hole in the center of the mix and pour in 1 c. of heavy cream. Using a spatula, fold the cream into the dough until it just sticks together when pressed.

(I have found that I usually need a couple of more tablespoons of heavy cream to get it all incorporated here, which is why I wrote approximately above.)

Press the round ball of dough out onto a lightly floured surface and press lightly with your hands

(minding the blueberries!)

until the flattened round is about 1" in height. Cut the circle in quarters, then in eights. Place scones on a parchment paper lined cookie sheet and brush the tops with heavy cream and sprinkle with demerara sugar, if using. Bake 20-25 minutes, until the scones are a beautiful golden brown.

They are wonderful if you just stop here, but to make them really amazing, be sure not to skip the lemon glaze.

Lemon glaze:

1/2 c. freshly squeezed lemon juice

2 c. confectioner's sugar, sifted

1 Tbsp. unsalted butter

Zest from one lemon

Mix the lemon juice with the confectioner's sugar and place over a pot of boiling water in a double-boiler until dissolved. Whisk in the butter and the lemon zest and continue to whisk for about a minute. When butter is melted, place glaze through a mesh strainer to take out the lumps and lemon zest. Drizzle or brush the glaze on top of the warm scones and serve.

Enjoy!