Birthday Greetings in a Hurry with American Crafts!

I don't know about you, but I typically realize that I've forgotten a birthday card right around the time I'm due to leave the house for a party. After that initial "oh sugar!" moment sets in, I typically grab the nearest cute paper crafting products that I have on hand to create a simple greeting, full of color and sparkle. I did this recently with the beautiful Stay Colorful collection* from American Crafts!

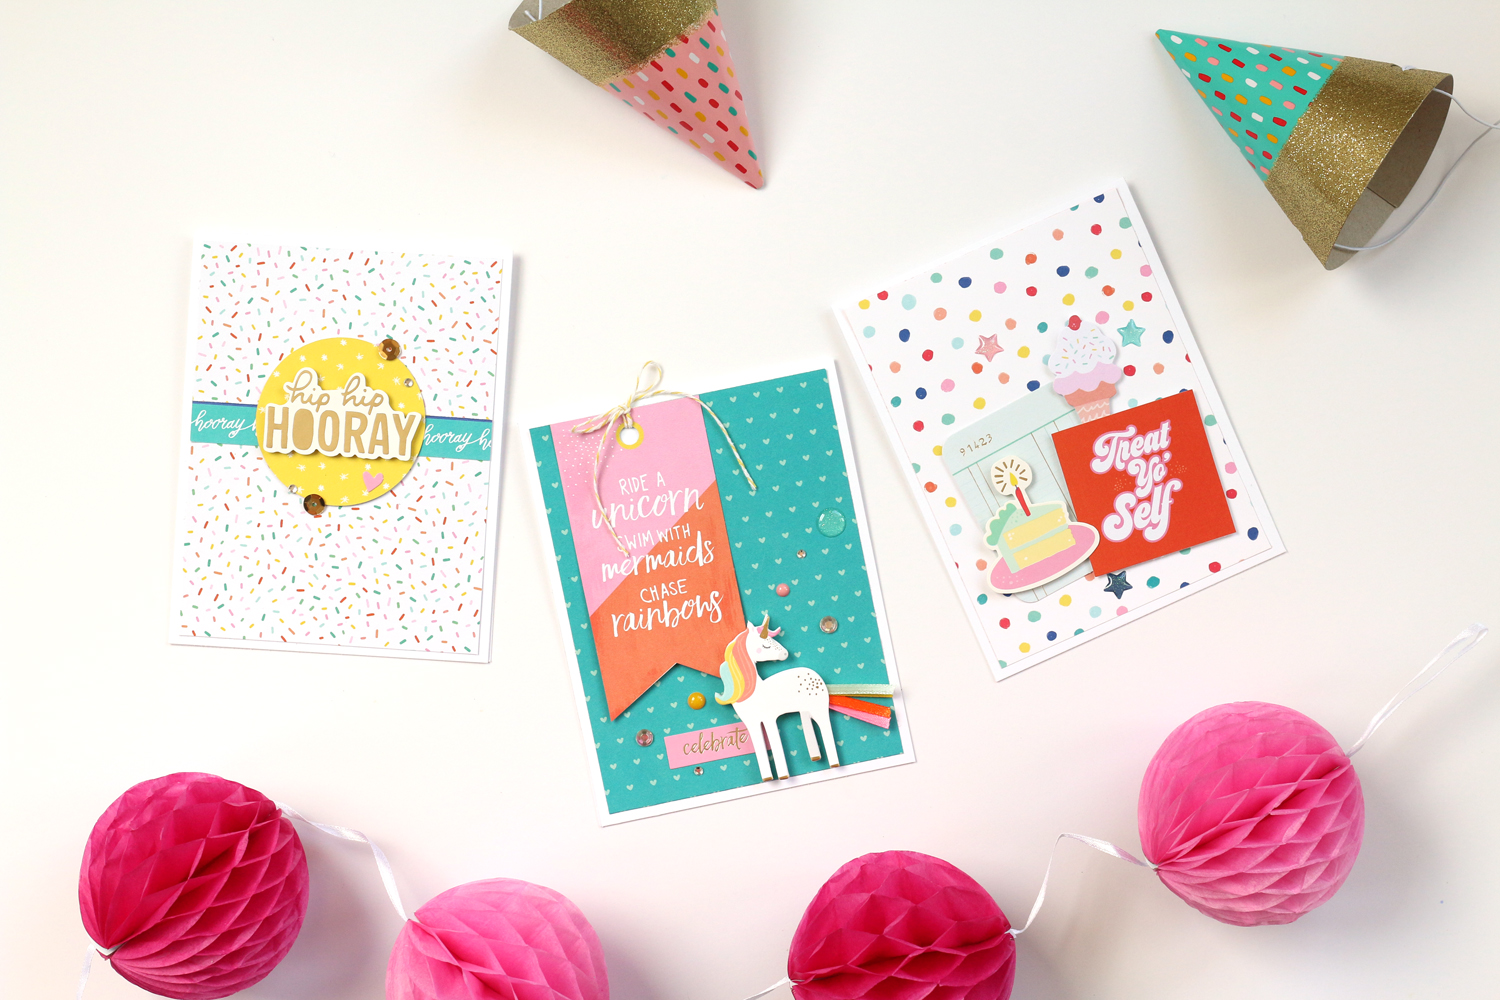
This collection is just full of bright colors and celebratory sayings, making it the perfect one to grab when you're short on time! I created three different cards quickly and easily:

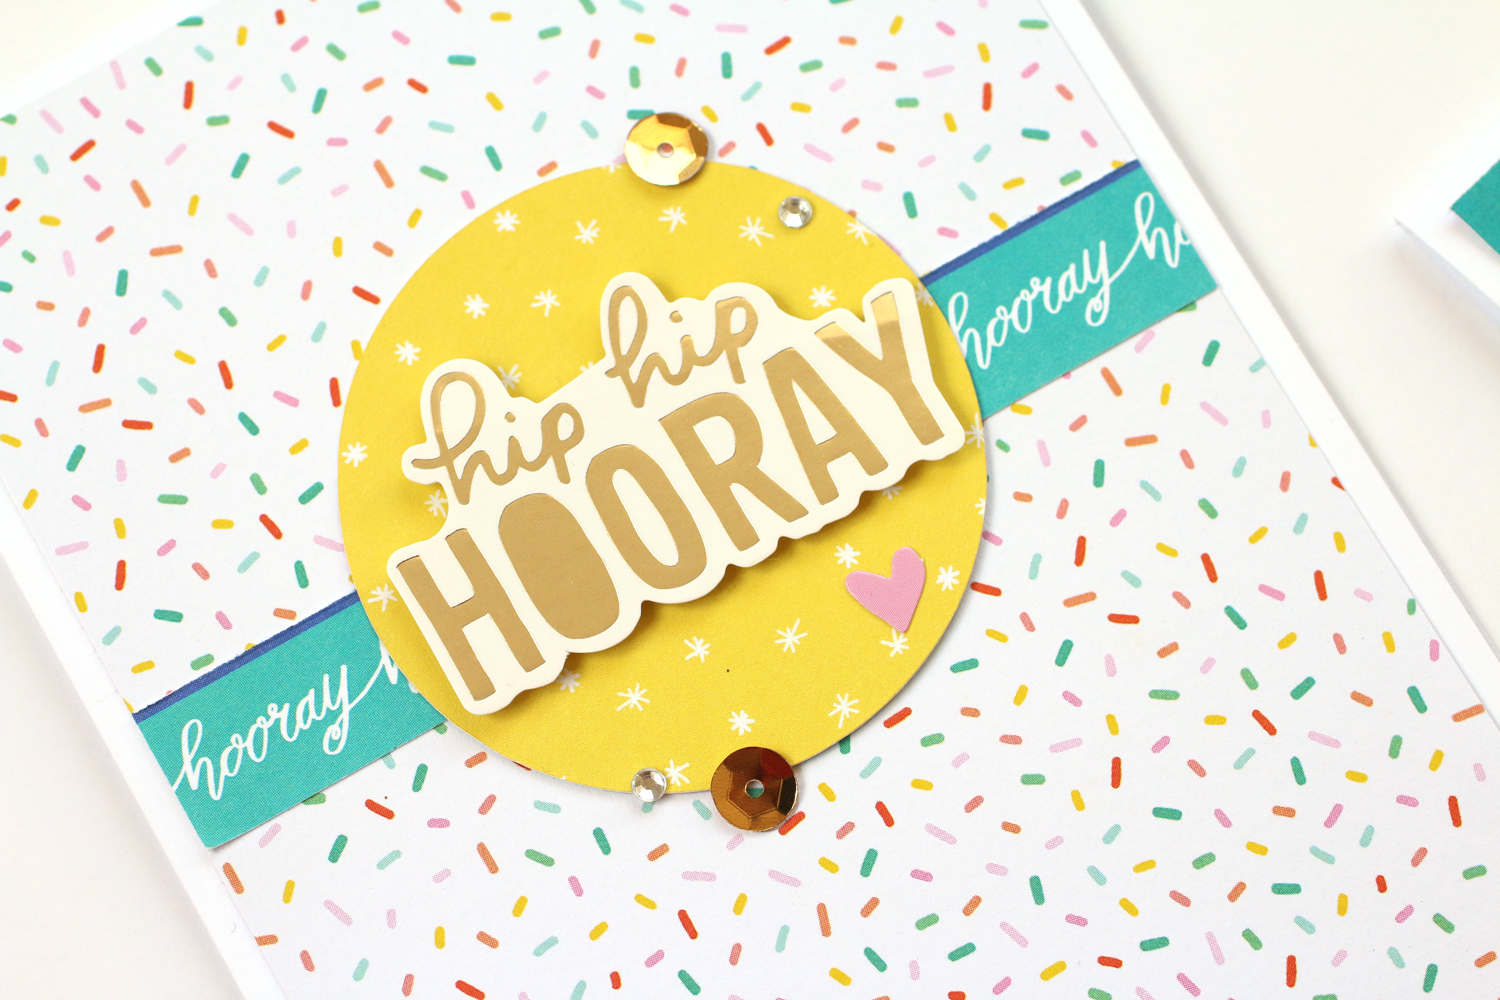
Supplies | Mood Ring paper (yellow), Jive Talkin' paper ("hooray), 6" x 6" paper pad (sprinkles), cardstock stickers, self-adhesive sequins, rhinestone stickers

"Hip, hip, hooray!" is the perfect sentiment for a birthday card! This simple design looks like a million bucks when you use a colorful sprinkle background paper and back the sentiment with a bright yellow circle of color! To really focus the eye on the sentiment, I added the "hooray" manufacturer's strip behind the circle. Don't forget the sparkle! I added a few sticker sequins and rhinestones to dress it up.

MeghannAndrew_AmericanCrafts_BirthdayCards_04.jpg

Supplies | 8 Tracks paper (dots), 6" x 6" paper pad ("treat yo' self"), ephemera die-cutscardstock stickers, glitter enamel stars

What better day to "treat yo' self" than on your birthday? This little sentiment, cut from a sheet of patterned paper in the 6" x 6" paper pad was the perfect topper for a multi-colored polka dot, then accented with die-cut ephemera and sticker treats! 

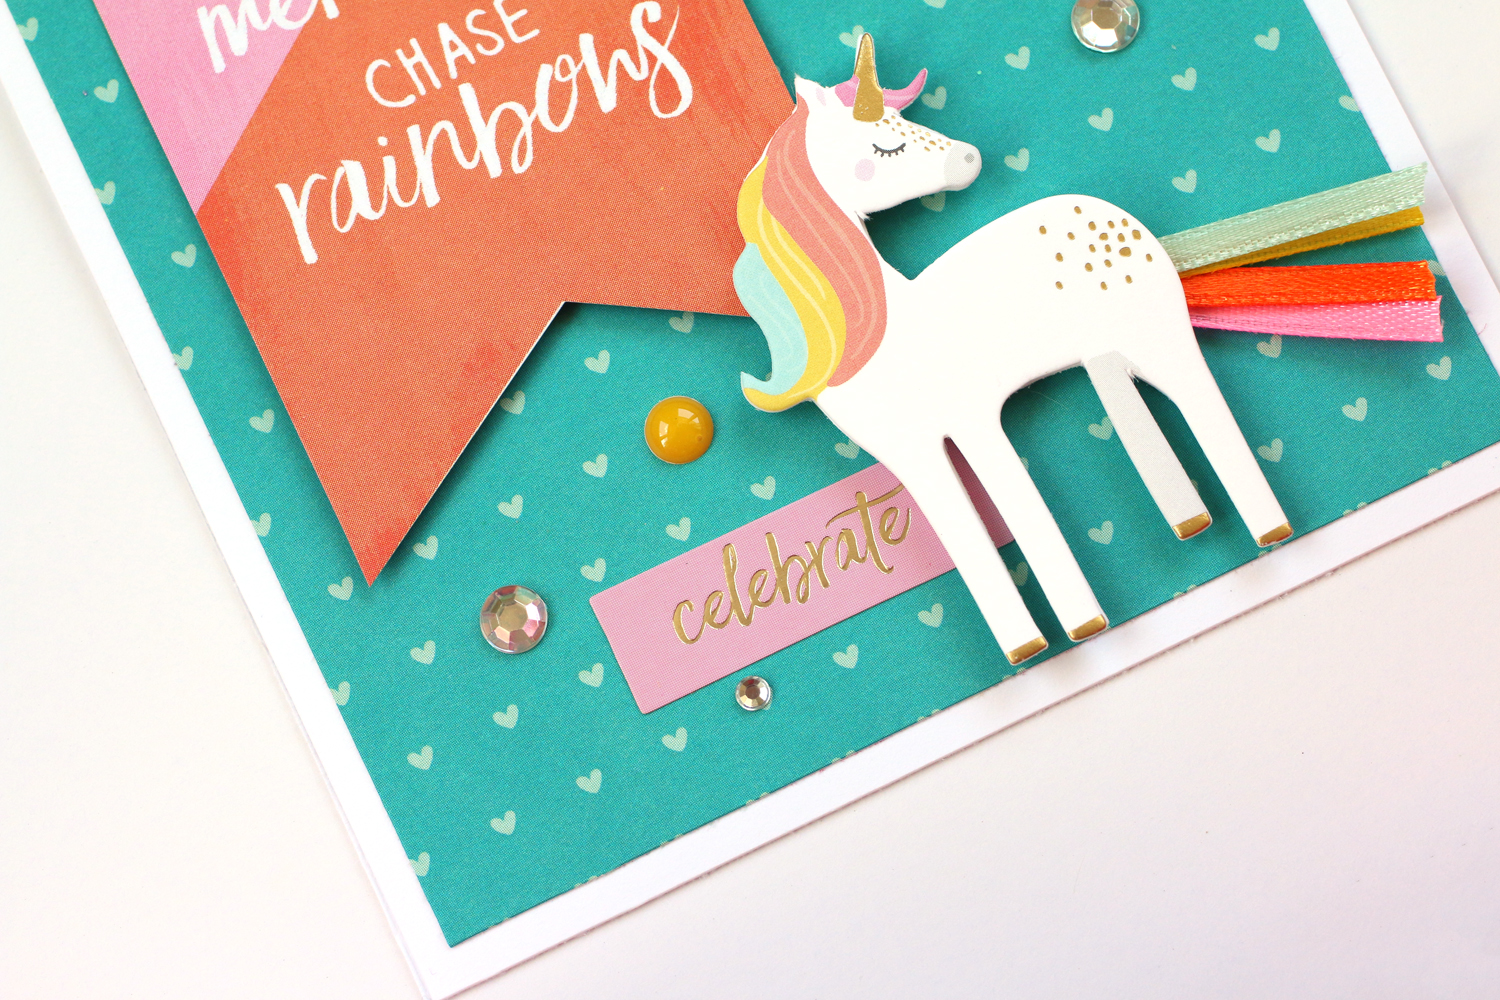
Supplies | 6" x 6" paper pad (teal hearts), Jive Talkin' paper (banner), layered stickers (unicorn), cardstock stickers, enamel dotsrhinestone stickers

Birthdays should be magical, so why not add a magical creature to the card front? I loved adding this pretty ribbon-tailed unicorn to the card front, along with the "ride a unicorn" banner, cut from the Jive Talkin' paper. This card would be perfect for a special little girl! 

These three cards prove that you don't have to run by Target on your way to the birthday party! Create your own cards at home quickly and easily with the Stay Colorful collection from American Crafts, and "wow" that special birthday someone! Be sure to check out the product I used, via the gallery links to the Scrapbook.com store below:

(*All product links contained in this post are affiliate links. You don't pay any extra, but I get a small percentage of your sale! Thanks for your continued support of my YouTube feed and this blog!)

Elle's Studio Pocket Page Process Video #2 with the July 2018 Kit

Hello there! In case you missed it, this is my second post today. You can see my Elle's Studio July 2018 kit reveal post which includes an unboxing video and pocket page process video #1 here

This afternoon I'm here to share the back side of the pocket page layout that I created using the July 2018 kit and add-ons* from Elle's Studio! 

Sticking to essentially the same products that I used on the front side of my layout creates a flow across the two sides of my page, but I added a few fun details that were different from the front. I'd love for you to watch this video to see how the page came together:

Be sure to shop all of the fun products that I used on this page via the gallery below, while supplies last! You won't want to miss having these summery, fun details to add to your projects!

* This post contains product affiliate links. Clicking any of these links will take you directly to the Elle's Studio shop, and when you purchase, I receive a small percentage of the sale. It doesn't cost you any extra, so thanks so much for your support!

Elle's Studio July 2018 Kit Reveal & Process Video!

Welcome to my blog! I'm so excited that today is the 10th, because that means brand-spankin' new product is available from the Elle's Studio shop! The July 2018 kit and add-ons* do not disappoint, and I know that you'll love using them to document your summer memories as much as I did. How about we take a look at my unboxing video to check out all of the new product?

How about this July kit? Not a stitch of pink to be found, and I love it! It has a lot of energy in this fun color scheme, and awesome graphics and fonts to really make your projects stand out!

The add-ons this month are SO fun! There is so much product here to embellish any project that you'd want to create, you won't really need any other options in your stash!

This month I created two 12" x 12" pocket pages using the new kit and embellishments! The color scheme, you guys, just has me at teal, orange and navy. I can't even handle the awesomeness. Just take a look:

While making my page, I filmed a process video so that you can see how the page came together, and the decisions I made around the new product I was using. Pull up a chair and watch this short video for all of the details:

The July kits are typically the most popular kits of the year, so be sure to grab this one quickly, and don't forget about the awesome add-ons this month that coordinate with the kit. You can shop all of the product I used on this pocket page in the gallery below, and be sure to stop by later today when I'll be sharing the back side of the page, along with another process video!

* This post contains product affiliate links. Clicking any of these links will take you directly to the Elle's Studio shop, and when you purchase, I receive a small percentage of the sale. It doesn't cost you any extra, so thanks so much for your support!

American Crafts Stay Colorful Collection: Swan Lake

MeghannAndrew_AmericanCrafts_SwanLake_03.jpg

A beautiful summer day spent on a lake on the south coast of England deserves an equally beautiful layout, and I created one using the Stay Colorful collection* from Dear Lizzy and American Crafts! 

MeghannAndrew_AmericanCrafts_SwanLake_01.jpg

Supplies | Stay Colorful collection: Bellbottom Blue paper, Jive Talkin' paper, 8 Tracks paper, 6" x 6" paper pad, cardstock accent and phrase stickers, washi tape book, ephemera die cut shapes, glitter chipboard Thickers, glitter clothespins, layered stickers; All the Good Things collection: phrase stickers; Shimelle Box of Crayons collection: alpha sticker folder; Shimelle Glitter Girl collection: glitter enamel dots, embellishment pack; Stickers and Bling collection: adhesive rhinestones 

I have to admit, I struggled with this layout at first. I had a general idea of how I wanted it to look, and what I was putting on paper just didn't match with what was in my mind. My break-through moment came when I added the flag embellishment from the layered stickers, which inspired me to create a column of colorful pennants against the left side of my page.  

MeghannAndrew_AmericanCrafts_SwanLake_04.jpg

Swans were the reason why I went with this collection! I loved the die-cut swan included in the ephemera die cut shapes and on the little cut-out included in the 6" x 6" paper pad, which I attached using a glitter clothespins. They were the perfect little embellishments for this fun layout. 

MeghannAndrew_AmericanCrafts_SwanLake_06.jpg

Ah, my title. I love looking at it! It's the perfect mix of glittery hand-drawn Thickers and little tile alphas, set on a pink pennant, which matches the ones throughout my layout. 

MeghannAndrew_AmericanCrafts_SwanLake_02.jpg

I'd love to show you how this layout came together in this process video! You can see my struggles and triumphs, all in 20 minutes, by watching the video below:

Be sure to check out all of the product used on this layout at Scrapbook.com via the gallery below! Thanks so much for stopping by and have a great weekend!

(*All product links contained in this post are affiliate links. You don't pay any extra, but I get a small percentage of your sale! Thanks for your continued support of my YouTube feed and this blog!) 

Elle's Studio June Kit + Add-Ons: At the Museum

In case you missed my first post of the day, the Elle's Studio June 2018 kit and add-ons* were released today! I already shared an 8-1/2" x 11" layout and process video, but for my second project, I wanted to switch things up a bit and document more photos with a 24" x 12" double-page spread!

(*All product links contained in this post are affiliate links. You don't pay any extra, but I get a small percentage of your sale! Thanks for your continued support of my YouTube feed and this blog!)

This spread records a fun day at the Houston Museum of Natural History with 5 photos, sized at 6" x 4", 3" x 2" and 4" x 4"! I love getting all of these photos on my page together, and the colors in the kit and add-ons this month coordinated perfectly with them!

EllesStudio_MeghannAndrew_AtTheMuseum_03.jpg

I started off the spread with a base of the blue grid found in the Noteworthy paper collection. After I topped that with a clean, white base, I added full 6" x 6" Shine paper stack patterns that coordinated with the colors in my photos. The circles included on the Let's Relax stamp are meant to be for creating ice cream cones, but who says you have to use anything as intended? I made them float across my page from the top left corner to the bottom right, helping your eye move across this wide spread.

EllesStudio_MeghannAndrew_AtTheMuseum_04.jpg

There's a new girl in the shop. Her name is Chloe, and we are already good friends! The Chloe alphabet stamp is fun and whimsical, and it contrasts perfectly with the font in the Hello Happy puffy words

Two 3" x 4" tags from the June 2018 kit were perfect for adding my typed journaling to, and I love the added texture that the "favorite snapshot" Noteworthy wood veneer piece adds to the page. I layered it on top of one of the June print and cut labels—a new product for Elle! They're so easy to use! 

EllesStudio_MeghannAndrew_AtTheMuseum_05.jpg

I couldn't finish a layout about the natural history museum without including a few butterflies, chosen from the Noteworthy bits and pieces and puffy stickers! They were the perfect addition to the movement already created on this page by my stamped circles. I also love breaking my title up across the page—it's yet another tactic for making your eye move from the top left to the bottom right of the spread.

Check out all of the supplies that I used to create this layout in the gallery below, which will take you to each product in the Elle's Studio shop:

Thanks so much for stopping by! Be sure to grab the new June goodies while supplies last. Happy creating! 

Elle's Studio June 2018 Kit + Add-On Reveal!

Hello there! Summer is quickly approaching, and the June 2018 kit and add-ons* from Elle's Studio will get you ready to document all of your summer memories! Let's take a look at the kit and extras in this short unboxing video: 

(*All product links contained in this post are affiliate links. You don't pay any extra, but I get a small percentage of your sale! Thanks for your continued support of my YouTube feed and this blog!)

The fun June 2018 kit, which was created by collaborating with Geralyn Sy of In a Creative Bubble, is summery, graphic and contains the perfect amount of fresh color for your projects! 

EllesStudio_June_2018_Kit.jpg

The add-ons will complement any project you create, with an awesome mix of stamps, embellishment, labels and a new paper stack! 

EllesStudio_June2018_AddOns.jpg

From left to right, you can find: the Let's Relax stamp, Shine acrylic, June blank label stickers, Summer wood veneer frames, Hello Happy puffy words, Shine 6" x 6" paper stack, Chloe alphabet stamp, Jane alphabet stickers — white, bright hand-drawn acrylic hearts

I just had to search through my summer memories to find the perfect photos for this kit, and when I found two photos of my daughter running into the ocean waves, I knew I had to document them with the new supplies!

EllesStudio_MeghannAndrew_BeachFunInTheSun_01.jpg

How awesome is this kit when paired with the Noteworthy collection? I couldn't love this layout more: the movement, the fun, graphic design and those awesome stamps! YES!

EllesStudio_MeghannAndrew_BeachFunInTheSun_02.jpg

The awesome Hello Happy puffy words are perfect to recolor with an oil-based paint or marker, like the Sharpie oil-based markers that I used here. I also love how the Jane alphabet stickers pair with the puffy words to create the perfect title!

EllesStudio_MeghannAndrew_BeachFunInTheSun_03.jpg

This awesome striped pattern appears in the June kit, as well as in the Shine 6" x 6" paper stack! It was perfect for customizing with the "summer vibes" phrase from the Let's Relax stamp! Don't forget to add the bright hand-drawn acrylic hearts to your cart to add a different texture to your page.

Take a look at how this quick and easy layout came together in this process video:

Check back here in just a couple of hours when I will be sharing a new 24" x 12" double page spread featuring the June 2018 kit and add-ons! Until then, click the links in the gallery below to shop all of the fun product that I used on my "Beach Fun in the Sun" layout:

Box of Crayons Collection: Firefighter Lizzy

AmericanCrafts_MeghannAndrew_FirefighterLizzy_03.jpg

Hello there! Hopefully you've planned some crafty time this Memorial Day weekend! Today I'm kicking off this long, creative weekend a bit early, and I'm here to share a bit of colorful inspiration with you using the Box of Crayons collection from Shimelle and American Crafts!* 

AmericanCrafts_MeghannAndrew_FirefighterLizzy_01.jpg

Box of Crayons Collection Supplies | A New Thought patterned paper, Spell it Out patterned paper, On a Roll patterned paperjournaling 6 x 8 paper pad, Crayon Box alpha Thickers, cardstock stickerssticker and washi book, alpha sticker folder, ephemera die cuts, enamel dots with glitter, self-adhesive patches 

This fun and playful layout began by matching my photo to the yellow, black and white A New Thought patterned paper. Once I added the rainbow of colors using a manufacturer's strip, giving my photo a "shelf" to sit on, I opened up the door to adding more color on my page!

AmericanCrafts_MeghannAndrew_FirefighterLizzy_04.jpg

As is usually the case, my title is my favorite part of this layout. I loved combining the red tile alphas from the Box of Crayons alpha sticker folder with the Crayon Box alpha Thickers, and the addition of the "hello" self-adhesive patch just topped it off perfectly.

AmericanCrafts_MeghannAndrew_FirefighterLizzy_02.jpg

While creating this page, the space above my journaling just felt like it needed something "more." I was so excited to find the "e" on the Spell it Out patterned paper, which I cut a banner shape into before tucking it under my photo. It was the perfect addition to create the visual triangle of embellishment that I needed on this layout. 

Guess what? With all of that free time you have relaxing this weekend, you can also watch a process video of how this layout came together! Hooray! 

Thanks so much for watching! Be sure to find all of the product I've used on this layout in the product gallery below while it is ON SALE at Scrapbook.com! Happy creating!

(*All product links contained in this post are affiliate links. You don't pay any extra, but I get a small percentage of your sale! Thanks for your continued support of my YouTube feed and this blog!)

Elle's Studio May 2018 Kit + Add-Ons: Girly Fun

EllesStudio_MeghannAndrew_GirlyFUN_04.jpg

Hi there! I'm having so much fun creating with the May 2018 kit and add-ons* from Elle's Studio, and I created a girly, blinged-up layout to prove it! When I saw the colors in the kit, I immediately thought of a photo of my daughter and oldest Goddaughter playing dress up, complete with makeup!

(*All product links contained in this post are affiliate links. You don't pay any extra, but I get a small percentage of your sale! Thanks for your continued support of my YouTube feed and this blog!)

EllesStudio_MeghannAndrew_GirlyFUN_01.jpg

This 8-1/2" x 11" layout came together easily, and my favorite part, the BIG title was created with a mix of the Title Builder Vol. 2 stamp and the wood veneer fun word!

EllesStudio_MeghannAndrew_GirlyFUN_05.jpg

I used every single bit of the 4" x 6" yellow tag from the May 2018 kit—I cut the word "sunshine" from the middle to use on my "Good Times in the Sunshine" layout, then I used the bottom half, here, to house my typed journaling and title, then added the top part above my photo. That big space at the bottom here was just perfect for stamping "perfectly girly" using the Title Builder Vol. 2 stamp. Just a little trick: The word "girl" is included in the stamp, so I added the "y" from the word "boy" to use the word "girly" in my title! I love how versatile this stamp set it for creating fabulous titles!

EllesStudio_MeghannAndrew_GirlyFUN_02.jpg

Now, how about this wood veneer fun word? It's natural wood, so you can use it as-is, or paint it, spray it; or do what I did here and bling it up using gold shapes and dots puffy stickers, the new spring mix puffy heart stickers, and pearls and bling from your stash! I backed this word with another favorite 4" x 6" tag from the May kit—the tiny, colorful polka dot tag. It added the perfect amount of color behind the word.

EllesStudio_MeghannAndrew_GirlyFUN_03.jpg

With all of that bling at the bottom, I had to balance out the top of the layout a bit with some product! The amazing Hello stamp has a fun label that you can add your own phrases and dashed lines to, to create your own custom design! I stamped that and added the word "hello" to the center, then used the bottom corner to stamp my date. To the left of that, I added the purple "fav" die-cut clip from the May kit, then stamped the cute heart with dotted circle from the Hello stamp behind. Below that, I added the "play all day" sticker from the Play All Day phrase stickers (which are almost sold out, so grab them fast!) for another layer. I love this little grouping of product! 

I hope you love this layout as much as I do, in all of its girly glory! Be sure to pick up the products I used to create it before they're gone from the shop forever, by clicking the gallery links below. Thanks for reading and happy weekend creating!

Ali Edwards Story Kit: Documenting Our Home

In the summer of 2016, we were hoping to make a big move to Kentucky. However, for some reason that just wasn't in God's plan, so we ended up staying in Texas. We had spruced up our  home to get it ready to lease out, which included professional photos. So to make lemonade out of lemons, I have a really lovely documentation of how our house looked that summer, and I decided to record it in a pocket page using the Ali Edwards Home Story Kit.  

MeghannAndrew_AE_HomePocketPage_01.jpg

This kit included the perfect colors for documenting our home, and I used the "home is" add-on labels to record what home is, from the perspective of each room that I documented. 

Recording "the story of" my daughter's playroom on the 3" x 4" card was important, as when she became old enough to have enough toys, we decided to forgo a formal dining room to make it her playroom—one of the best decisions we have made in this house! I wanted to get that down in writing.

Even two years later, our bedroom looks completely different now, with new furniture, color on the walls and new bedding. I'm happy to have what it looked like before recorded, and it will be interesting to re-create all of these images again to compare them to our home in 2016.

MeghannAndrew_AE_HomePocketPage_02.jpg

The backside of the layout includes my daughter's room and my creative space—my two favorite places in the house! The teal in the kit worked perfectly with all of the teal in my photos.

This "five senses of home" card was really special to me. I sat down and closed my eyes to think about what home looked, smelled, tasted and sounded like. It makes me happy to have these down on paper.

MeghannAndrew_AE_HomePocketPage_06.jpg

We as a family like to embrace the "less is more" attitude, so it was important for me to add that home is a space that we fill with things that mean something to us, like the Monaco Grand Prix print on the wall in the background of this photo. 

I loved creating with the Home Story Kit, and after creating three projects with it as a guest storyteller, I still have plenty of product to record more memories. I'm so happy to have these photos recorded, as I know that the images and details of each home we've lived in slip away after a few years. 

Thanks so much for stopping by! Happy creating this weekend!

Elle's Studio Let's Go Traveler's Notebook Kit!

I am so excited to introduce you to the Let's Go traveler's notebook kit*—one that Elle and I collaborated on when we were together earlier in the year. We loved creating this fun travel-themed kit, and I know you will love creating with it, just like I did! (*All product links contained in this post are affiliate links. You don't pay any extra, but I get a small percentage of your sale! Thanks for your continued support of my YouTube feed and this blog!)

Getting the physical kit in my hands was such an awesome moment for me, and creating with it was even more special! I decided to document a trip that we took to Seattle last fall, in my new gold dot Webster's Pages traveler's notebook, which is so gorgeous! I love that teal interior!

I kept the title page on the front of my insert quite simple, adding a 3" x 4" photo of my family and my favorite "location" stamp included in the kit, which I stamped with the Stanley Jr. solid and outline stamps.

EllesStudio_MeghannAndrew_SeattleTN_02.jpg

On the first page, I added another 3" x 4" photo with typed journaling above to the "oh the places we go" paper. I love that all of the colors in the kit are on this fun page. I also used the Adventure puffy stickers in my notebook—they work perfectly with the Let's Go kit

EllesStudio_MeghannAndrew_SeattleTN_03.jpg

This spread uses the same piece of paper, halved between the two pages. I love those tags included in the kit—they're perfect for adding journaling to my notebook!

Want to see how these pages came together? Watch my process video, which includes an unboxing of the kit itself! 

Be sure to grab the Let's Go traveler's notebook kit while supplies last! It's perfect for documenting adventures big and small! 

Elle's Studio May 2018 Kit + Amazing Add-Ons!

Hooray for a fresh, new month and a new Elle's Studio kit to go along with it! Take a look at my unboxing video to take a firsthand look at all of the new goodies released in the Elle's Studio shop* today! 

(*All product links contained in this post are affiliate links. You don't pay any extra, but I get a small percentage of your sale! Thanks for your continued support of my YouTube feed and this blog!)

Check out all of the beautiful colors included in this May 2018 kit! I especially love the yellow and greens added this month! The 4" x 6" tags are my favorite, and I've used all of them on the projects that I'm sharing here on the blog this week!

In addition to the kit, there are some fabulous new add-ons this month—ones that will make your projects: whether layouts, pocket pages or traveler's notebooks, truly shine!

EllesStudio_May2018_Add-Ons-2.jpg

In addition to the add-ons, be sure to add the new Hello Good Times printables and May digital cut files to your library!

EllesStudioMay2018Digitals.jpg

I started out with the kit by creating a new 8-1/2" x 11" layout with a big, favorite photo, and a BIG title! I couldn't love it more:

EllesStudio_MeghannAndrew_GoodTimes_01.jpg

Check out how this page came together in a quick process video! Grab a cuppa and take a look:

I have another project to share in a few hours—one that's a first for me: a traveler's notebook with the new Let's Go traveler's notebook kit! Until then, check out the products that I used in this video by shopping the gallery below: 

A Custom Background Using AC Kelly Creates Products!

Hello there! I recently shared a new layout on the American Crafts blog that I just LOVE, using the Kelly Creates products*, and I wanted to share it here too, to show you how easy it was to create a custom hand-lettered background for my 8-1/2" x 11" layout. 

(*All product links contained in this post are affiliate links. You don't pay any extra, but I get a small percentage of your sale! Thanks for your continued support of my YouTube feed and this blog!)

AmericanCrafts_MeghannAndrew_Enjoy_01_squarejpg.jpg

Supplies | Kelly Creates collection: Dream pens8-1/2” x 11” dotted paper pad, acrylic traceable stamps, journal accessory kit; All The Good Things collection: Mixed media foundations paper, Color Pop acrylic paint- set 2, Color Pop acrylic paint- set 3, On a Positive Note paper, chipboard letter stickers, diecut frames, finishing embellishments; Sunshine and Good Times collection: Shoe In paper, sticker book; Star Gazer collection: accent and phrase stickers; Other: Vicki Boutin sticker book, Amy Tangerine sticker book, Bazzill Basics 8-1/2" x 11" white vellum

You may look at this beautiful background, and think, "There is no way that I could create that," but let me show you how simple it is to re-create for even the biggest perfectionist! Ahem, that would be me. 

AmericanCrafts_MeghannAndrew_Enjoy_08.jpg

I began by stamping words that fit the beautiful photo of my daughter, using the acrylic traceable stamps onto a sheet from the 8-1/2” x 11” dotted paper pad.  These dots allowed me to keep my stamped words nice and straight. 

AmericanCrafts_MeghannAndrew_Enjoy_09.jpg

After I filled the page, I added a sheet of vellum over the top and started tracing with the beautiful turquoise blue pen in the Dream pens set. These are double-ended pens, and I used the thicker end for this project. I love how easy they are to work with: even a novice hand-letterer like me can create beautiful lines with them! It was such a relaxing exercise, and I sat at my desk with my cup of coffee and finished off the whole page.

AmericanCrafts_MeghannAndrew_Enjoy_10.jpg

I wanted to back that beautiful sheet of hand-lettered goodness with some additional colors from my photo, so I grabbed the Color Pop acrylic paint- set 2 and set 3. These paints have gorgeous saturated colors, and I used them on the mixed media foundations paper, which does not buckle at all. This is a perfect base for any mixed-media project! I bunched the color around where I wanted my photo to be placed, so that your eye would naturally go to the photo. Once that was dry, I machine-stitched my vellum to this painted background using white thread.

AmericanCrafts_MeghannAndrew_Enjoy_06.jpg

Next, I added my photo, matted with two patterned papers—On a Positive Note and Shoe In
and journaling, which I added to two tags in the diecut frames pack, then started adding embellishment, using the same colors that I painted on my page background. 

So that I didn't cover up any more of that gorgeous hand-lettered background that I worked so hard to create, I added my title directly to the negative space on my photo, using the "let go" sticker included in the Kelly Creates journal accessory kit (so many awesome phrase stickers in here!) and paired that with the black All the Good Things chipboard letter stickers

AmericanCrafts_MeghannAndrew_Enjoy_04.jpg

The beautiful birds and foiled butterfly stickers from the Sunshine and Good Times and the Amy Tangerine sticker book created the perfect accents for this page about living in this happy moment with my family. I also finished off the page with a few All the Good Things finishing embellishments

AmericanCrafts_MeghannAndrew_Enjoy_03.jpg

I can't wait to create more beautiful, bespoke backgrounds using these easy-to-use Kelly Creates products! They're the perfect products to perfect your hand-lettering! 

Thanks for stopping by! Be sure to check out all of the products that I used on this layout at Scrapbook.com via the gallery below, and thank you so much for clicking to support this blog and my YouTube feed! 

AC Sunshine and Good Times: Wonderful Coronado Adventure

Hello there! Last fall we spent five days in beautiful San Diego, California, and I have so many wonderful memories to record from our trip. Today, I'm here to share my latest layout about a gorgeous day we spent bicycling around Coronado Island, using the latest American Crafts and Amy Tangerine collection, Sunshine and Good Times. (*All product links contained in this post are affiliate links. You don't pay any extra, but I get a small percentage of your sale! Thanks for your continued support of my YouTube feed and this blog!)

AmericanCrafts_MeghannAndrew_CoronadoAdventure_01.jpg

Supplies | Sunshine and Good Times Collection: Rainbow Love patterned paper, Shoe In patterned paper, Slice of the Good Life patterned paper, ephemera die-cuts, sticker book, puffy phrase Thickers, glitter alphabet Thickers, washi tape, rotary stamp; Other collections: Box of Crayons photo corners, All the Good Things finishing embellishments, Glitter Girl embellishment pack

These energetic and colorful photos deserved the same vibe of product to work with, and the Sunshine and Good Times collection was the perfect choice! I pulled the blue, green and red hues out of my photos to match with my layout, choosing the Rainbow Love, Shoe In and Slice of Life patterned papers to go with my clean, white background. 

AmericanCrafts_MeghannAndrew_CoronadoAdventure_04.jpg

I had three biking photos that I wanted to use on this page, and only one was a vertical photo. So, I decided to place that in the center of the layout, with the two horizontal photos on either side, tucking them underneath the central photo so that they were essentially squares. Once my patterned papers and photos were in place, I noticed that my page had a central focus with the vertical image placed there, so I decided to create a central column for the title and journaling, with embellishment emanating from them.

AmericanCrafts_MeghannAndrew_CoronadoAdventure_02.jpg

This is where the other colors came in! Once I found the "adventure" die-cut in the ephemera die-cuts, I knew that I wanted to get more colorful on this page, and built a title using it, the glitter alphabet Thickers and the "wonderful" clear sticker from the sticker book, which I adhered to white cardstock before sticking it on with foam adhesive. After my title was in place, I immediately added the colorful manufacturer's strip to the base of the page, then to balance all of the color in the center and the bottom, I added an acetate flower die-cut from the ephemera die-cuts to the top. Balance achieved!

AmericanCrafts_MeghannAndrew_CoronadoAdventure_03.jpg

Adding my journaling in typed strips, the only thing left to do was to embellish! I added larger embellishments, like the "fun starts here" ribbon from the All the Good Things finishing embellishments, and the wooden camera button from the Glitter Girl embellishment pack. Is anyone else hoarding these fun embellishments like me?

AmericanCrafts_MeghannAndrew_CoronadoAdventure_05.jpg

The last step was to add a spray of colorful hearts coming out from my central column, and I did that with the large hearts in the puffy phrase Thickers sheet and small, stamped hearts using the rotary stamp. To add even more hearts to show my love for this day, I also added a row of heart washi tape just below my journaling. 

I love this page, and the fun day with my family that it records! Click the product links below to shop the Sunshine and Good Times collection products that I used on this page to document your own colorful adventures!

Introducing Title Builder Volume 2!

EllesStudio_May2018_MeghannAndrew_BetterTogether_02.jpg

Today is an exciting day, as my second collaboration with Elle's Studio, Title Builder Volume 2, is now available in the Elle's Studio shop!*

(*All product links contained in this post are affiliate links. You don't pay any extra, but I get a small percentage of your sale! Thanks for your continued support of my YouTube feed and this blog!)

EllesStudio_May2018_TitleBuilderVol2Bundle.jpg

I LOVE creating titles! Not only coming up with clever titles, but also choosing the product to make them! When I launched my class, Terrific Titles, at Big Picture Classes, I wanted to create a product that made title building easier, and that's when I paired with Elle's Studio to bring you the original Title Builder products! Now, Title Builder Volume 2 will add even more title possibilities to your stash! Watch this introduction video to see what you can create with this fun product!

I had so much fun creating with these new products last week! I quickly and easily made three simple projects, with beautiful and poignant titles! I love how easily they come together with these Title Builder products! 

EllesStudio_May2018_MeghannAndrew_ThisSweetGirl_05.jpg

Title Builder has been designed to work as a series of a 6" x 8" stamp, acrylic and wood veneer which you can get in a specially-priced bundle for 15% off the retail cost, or you can buy each piece individually. 

EllesStudio_TitleBuilderVol2_PDFsneak.jpg

With your purchase of the Title Builder Vol. 2 stamp or the bundle, you will also receive a PDF via email with over 100 title combinations that you can create with the stamp only! Add on the words from the acrylic, wood veneer or alphas from your own stash, and the possibilities are endless!

I can not wait to see what you create with these fun, new products! Be sure to tag me, @meghannandrew on Instagram, or simply use the hashtag #EllesStudio if you order, when your box arrives, or when you create with Title Builder Volume 2

U.S.S. Midway Layout + Pocket Page with Process Video

The April kit and extras* from Elle's Studio are so fabulous, I've created another project to share with you today, and this is my favorite type of project—a layout and pocket page combination! I created this project about a wonderful day that we spent on the U.S.S. Midway in San Diego, California.

(*All product links contained in this post are affiliate links. You don't pay any extra, but I get a small percentage of your sale! Thanks for your continued support of my YouTube feed and this blog!)

MeghannAndrew_USSMidway_01.jpg
MeghannAndrew_USSMidway_05.jpg

I loved creating this custom embellishment with the April 2018 cut filesCurrently stamp and Adventure puffy stickers

MeghannAndrew_USSMidway_07.jpg

The new Mini Dated stamp was perfect for adding the date to this die-cut from the April 2018 kit.

While creating, I filmed a video so that you could see my process! Grab a cuppa and have a look:

I also added to the pockets on the back side of this spread, and continued the star theme:

MeghannAndrew_USSMidway_02.jpg

With such a fantastic choice of tags, die-cuts and embellishments this month, this spread was easy, and so fun to put together! Be sure to check out all of the new product in the Elle's Studio shop, including the Noteworthy collection! 

MeghannAndrew_USSMidway_09.jpg

Elle's Studio April Kit + Noteworthy REVEAL!

What an exciting day it is at Elle's Studio! Not only do we have a new kit and add-ons available in the shop, but a new collection, called Noteworthy! I have two different unboxing videos available to show you all of the new goodies! 

How fun are all of these new products! I was in heaven this month creating with all of these beautiful, new supplies:

The April kit is just fantastic. I love all of the beautiful colors and easy-to-use sentiments! 

EllesStudio_April2018_Add-Ons.jpg

Hello add-ons! They coordinate perfectly with the kit, as well as the new Noteworthy collection! From left to right you have: Everyday Goodness stickers, acrylic stars, Currently stamp, April labels, Adventure puffy stickers, Adventure acrylic, yellow puffy alphabet stickers, Mini Dated stamp, banner stickers, Currently wood veneer tabs and vellum sentiments

Let's not forget about the Noteworthy collection

This beautiful collection is available in a bundle with everything you see above, specially priced, and comes with free goodies! You can also purchase each element of the collection separately.  

I'm going to show you two projects that I created today, and save my favorite for later this week! First off, I used the April 2018 kit and Noteworthy collection to create a "wonderful" page about a wonderful day spent with my little family in the U.K., created with just a few products from the new release:

MeghannAndrew_WonderfulDay_01.jpg

I loved creating this border of banners using Noteworthy paper, tags from the new kit and stickers! How great is the new Mini Dated stamp, too? It's the perfect size for any place on a project! 

My next layout was created using Noteworthy only, and it records a very special moment in my daughter's life: the day she met her most favorite Disney character.

EllesStudio_MeghannAndrew_Favorite_01.jpg
EllesStudio_MeghannAndrew_Favorite_03.jpg

I really can't choose a favorite product in this collection. From the stamp, to the puffy stickers and paper... it's all fabulous! 

Be sure to pick up the newest April 2018 kit at its introductory day price of $9.99 while supplies last, and don't forget to grab a Noteworthy bundle while they're in the shop! Happy shopping, and happy creating with these beautiful products! 

Altenew’s 4th Anniversary Blog Hop Day 2 + Giveaway

Welcome to my blog, Brioche and Blessings, and happy 4th anniversary Altenew! I'm excited to share my latest layout with you, created with fun Altenew products! You've probably arrived here from Debby Hughes' blog, but if you've gotten lost along the hop, check out the bottom of this post for the Day 2 master list. You can also head over to the Altenew blog for all of the details about this celebration!

Altenew_Snapshots_MeghannAndrew_Day2_02.jpg

I've been creating with some fun Altenew products, and I'm excited to share what I've made with you! Stamping is one of my favorite techniques, and to create a new 8-1/2" x 11" layout, I chose a stamp set from the Altenew shop that is perfect for scrapbook layouts!

Altenew_Snapshots_MeghannAndrew_Day2_01.jpg

Altenew Supplies | "Our Family" scrapbook kit, "Snapshots" stamp set, "Basic Borders" stamp set, "Crafty Life" stamp set

I loved creating a watercolor effect on my stamped cameras from the "Snapshots" stamp set. I wanted to share how easy it is to re-create, so I filmed a quick process video while stamping the layout background. Grab a cuppa and watch how this page came together!

Now, here is the fun part: You can win one of 30 prizes just for leaving a comment along each blog post on the hop! Check out this amazing list of prizes, and leave me a comment today telling me what you love most about stamping! Be sure to leave comments by April 15th, 2018 at 11:59 PM EDT for a chance to win! 30 WINNERS will be chosen at random from the comments left on any of the blogs listed below and will be announced on the Altenew blog on April 17th, 2018.

Altenew_Snapshots_MeghannAndrew_Day2_04.jpg

Your next stop along the hop is with Mindy Baxter, but here is the full hop list, should you have gotten lost along the way:

Altenew

Kristina Werner

Lilith Eeckels

Jessica Frost-Ballas

Agnieszka Malyszek

Keeway Tsao

Terhi Koskinen

WOW! Embossing Powder

Debby Hughes

Meghann Andrew

Mindy Baxter

My Sweet Petunia

Laura Jane

Julia Altermann

Justine Hovey

Thanks for stopping by, and happy creating! 

Scrapbook and Cards Today: Blue Skies and Butterflies Kit Layout

Hello there! I am so excited to share one of my favorite layouts created so far this year, using the beautiful Blue Skies and Butterflies Kit from Scrapbook and Cards Today Magazine. If you've never purchased one of their kits before, you're in for a treat! They include the latest products from the industry, along with beautiful exclusives, plus a well-designed, useful stamp! I created a few projects with the kit, and as a bonus, instructions on how to create them can be found in a full-color download when you purchase the kit.

This was my favorite creation using the kit—a 12" x 12" layout documenting a favorite photo of my little girl.

MeghannAndrew_SCTSpringDelivered_ShineOn_01.jpg

I have held on to this photo for AGES, as I loved it so much, and didn't have the "perfect" products to go along with it. That all went out the window when my Blue Skies and Butterflies Kit arrived! I wanted the layout to be playful and a bit haphazard, but colorful and fun, just like my little girl.

MeghannAndrew_SCTSpringDelivered_ShineOn_04.jpg

Do you see those adorable little pinwheels? They are from the exclusive stamp, which I stamped onto patterned paper from the kit! I love all of the beautiful colors included in this kit—from spring to fall, they will work with any season you want to scrap! 

I also did a bit of fussy-cutting on this layout. Those lovely American Crafts All the Good Things butterflies and Pink Paislee Pick Me Up frame just needed to be cut out and added to this page. I even used the frame to add a tiny bit of journaling, along with the date of the photo.

MeghannAndrew_SCTSpringDelivered_ShineOn_02.jpg

Another exclusive download that you will receive when you purchase the kit is a sheet of large tags—great for journaling or adding to your page for embellishment, like I did with the black and white gingham tag here. I simply cut a banner notch at the bottom to hang it from the base of my heavily-layered photo mat. 

Those tiny little bows (included on the exclusive stamp in the kit) stamped around my page added the perfect girly touch and tiny elements that I love to add around embellishment groupings.

MeghannAndrew_SCTSpringDelivered_ShineOn_05.jpg

You know, I'm not a massive fan of sparkle, but the Heidi Swapp frame and "shine on" glitter Thickers from the All the Good Things collection included in this kit added just the perfect touch to this layout, and made my photo the focus of all of the lovely layers included on this page. Plus, the glitter on them does not come off—a must for this glitter-phobic girl!

MeghannAndrew_SCTSpringDelivered_ShineOn_03.jpg

I really loved working with this kit! Stay tuned to see more projects that I created using it, and be sure to grab one of the Blue Skies and Butterflies Kits while supplies last! Happy creating!

Elle's Studio March 2018 Reveal: Hello Easter

Hello! I'm here to share my second layout created with the March 2018 Kit and add-ons from Elle's Studio, which released today. To see all of the new product that was released today, as well as my first layout and process video, go to my previous reveal blog post

Easter is a big theme in this month's kit, and the beautiful colors in the kit were a perfect match to my daughter's dress that she wore for an Easter egg hunt at her school last year.

"Hello Easter" supplies | March 2018 Kit, Happy Day printables, Big Moment phrase stickers, vellum and wood veneer bunnies, little acrylic heartsHappy Moments stamp, Title Builder stampLive Laugh Love puffy stickers, XOXO 6" x 6" Paper StackFamily Fun 12" x 12" Paper Collection

How cute are these vellum bunnies? I love their fun, bright colors! I used them to flank my photos and draw attention to them. The Live Laugh Love puffy stickers flowers were also perfect to peek out from behind my photos.

EllesStudio_MeghannAndrew_HelloEaster_05.jpg

My title is often my favorite part of a layout, and this one is no exception! I used the word "hello" from the Title Builder stamp and layered it with the word "Easter" from this month's Happy Moments stamp. I love that beautiful handwritten font!  

EllesStudio_MeghannAndrew_HelloEaster_04.jpg

To the right of the title, I added the "love this so much" circle die-cut from the Happy Day printables. The "big smiles" Big Moment phrase sticker matched the pink paper from the XOXO 6" x 6" Paper Stack perfectly, and a flower from the Live Laugh Love puffy stickers finished off the grouping. To add a tiny bit of yellow and some texture to my paper strips, I used the dots border from the Happy Moments stamp. I love all of the fun sayings, patterns and images on this stamp!

EllesStudio_MeghannAndrew_HelloEaster_02.jpg

Be sure to check out all of the product I used on this layout while supplies last, and happy creating!

Elle's Studio March 2018 Reveal!

The March 2018 Elle's Studio kit and add-ons* are live, and full of color and spring themes for your paper crafting projects! I filmed an unboxing video, so that you can see each piece from the latest release here: 

(*All product links contained in this post are affiliate links. You don't pay any extra, but I get a small percentage of your sale! Thanks for your continued support of my YouTube feed and this blog!) 

The colors in the March 2018 kit are really amazing! From rainbow stripes to a bold kelly green and beautiful cerulean blue, this kit offers a wide palette to choose from:

EllesStudio_March2018_Kit.jpg
EllesStudio_March2018_Add-Ons.jpg

Finally, you can get more "bang for your buck" with these awesome Happy Day printables and March digital cut files:

EllesStudioMarch2018Digitals.jpg

With all of the gorgeous color in this month's kit, I was inspired to document a photo full of colorful balloons, from our most recent trip to Disneyland. 

EllesStudio_MeghannAndrew_DisneyMoment_01.jpg

One of a Kind Disney Moment by Meghann Andrew – supplies used | March 2018 Kit, March Labels, One of a Kind Wood Veneer, Cerulean Blue Puffy Alphabet StickersPuffy Star StickersHappy Moments Stamp, Family Fun 12" x 12" Paper CollectionLive Laugh Love 12" x 12" Paper Collection

Watch this process video to see how the page came together, and how I created that fun title from several of the add-ons this month!

I will be sharing my second layout created this month here later today, but until then, you can shop the items that I used in my One of a Kind Disney Moment layout here: