Elle's Studio May Kit Reveal
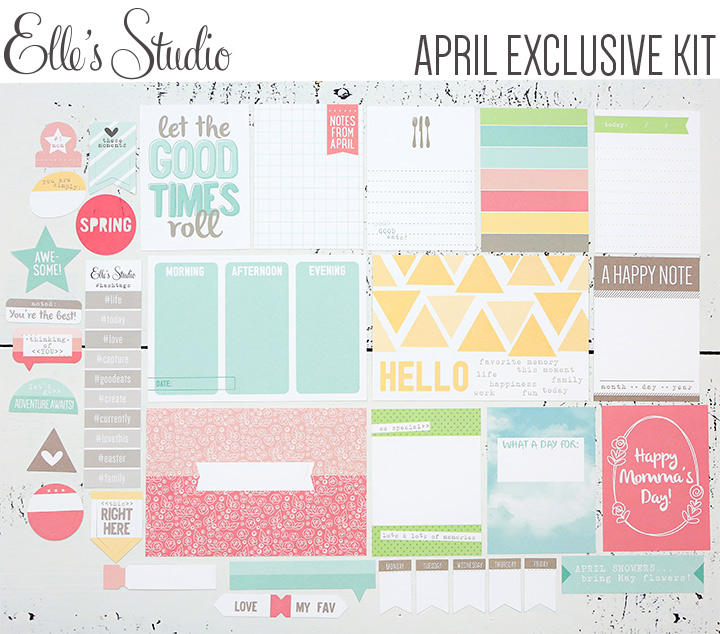
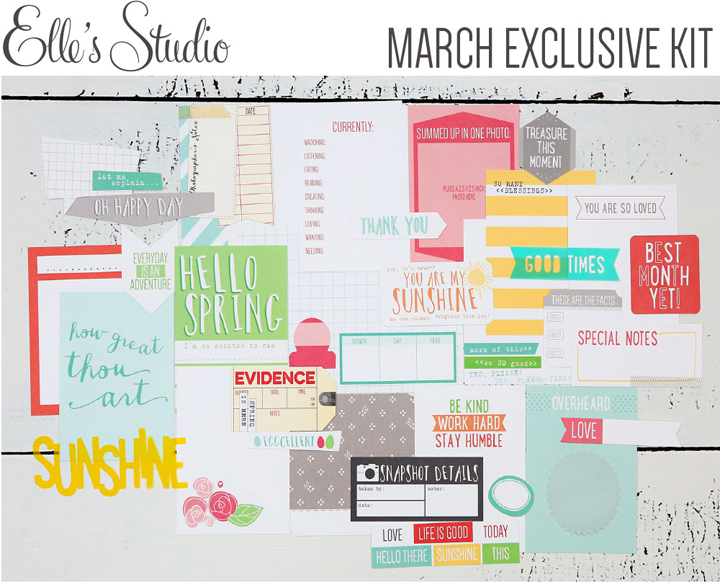
The Elle's Studio May exclusive kit is releasing a day early this month to keep the 10th all about Mom! This beautiful kit has everything you need to document your stories this month, including tags for Dad!

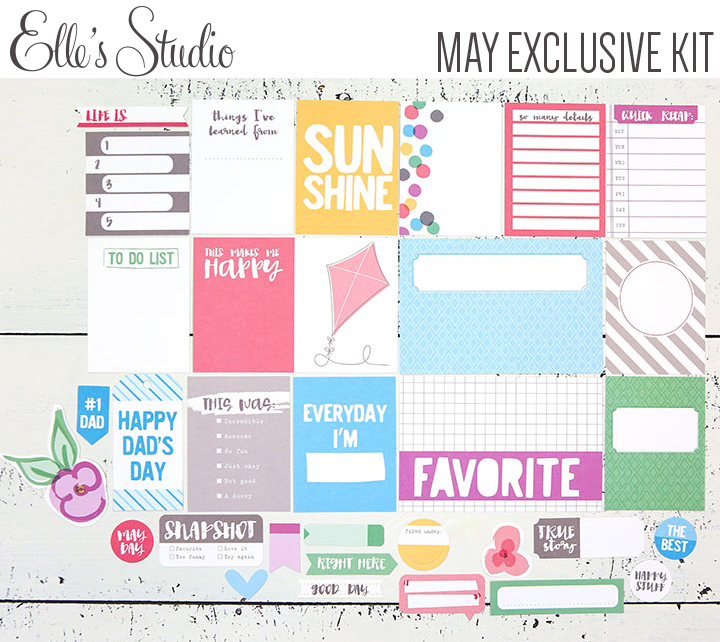
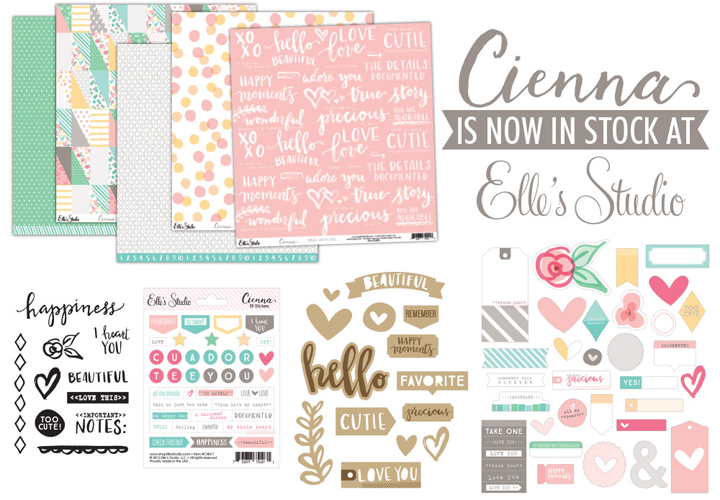
In addition to the kit this month, there is an exclusive 'Good Day' stamp, as well as printables and cut files

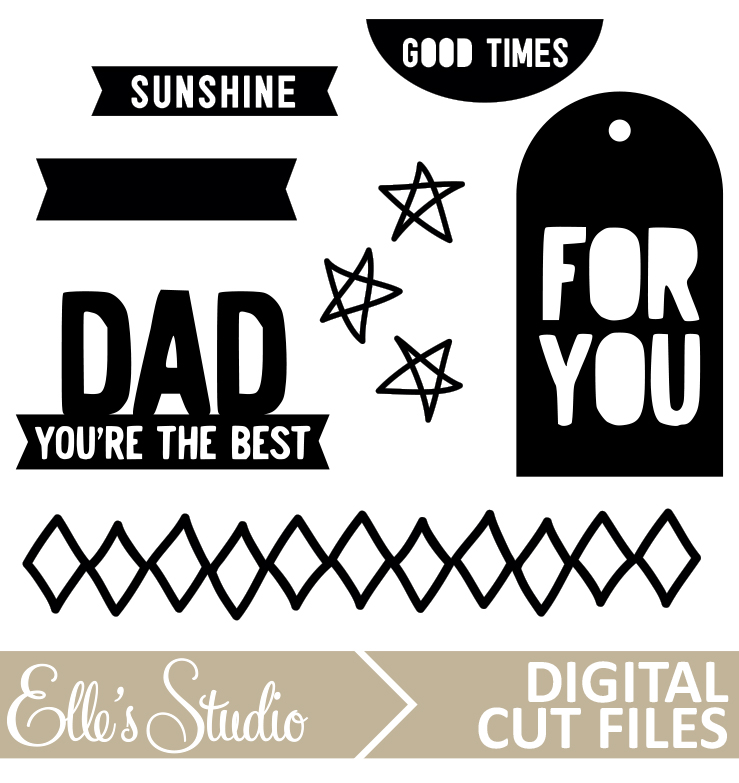
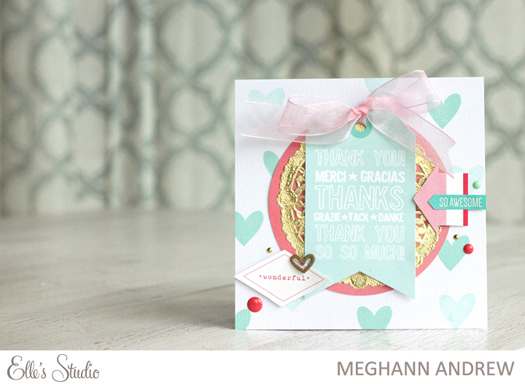
For my first project, I used the kit tags exclusively, along with the digital cut files to create a Father's Day card for my dad. 

Supplies: May exclusive kit, May cut files

After going through a box of old photos from my childhood, I found this gem of my daddy and I on the beach in Florida at sunset. I changed the image to black and white, added the PNG 'Dad, You're the Best' file at the top corner and recolored it to match the kit. Just adding a few small tags, a cork button and a few enamel dots finished off the card.

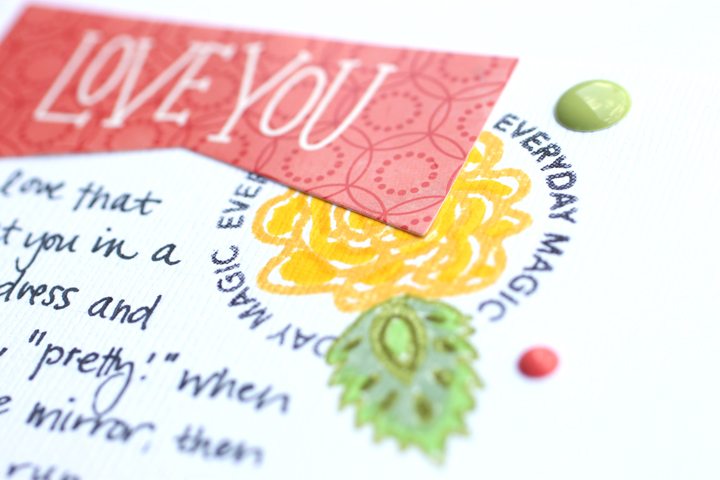
For my second project, I created a 12"x12" layout, and hand stitched the 'sunshine' tag, as well as cut out and hand stitched the kite. The colors in this kit worked perfectly with this photo of my girl.

To grab your kit on launch day for $9.99, check out the Elle's Studio store

Love Built Our Happy Home

I had a post up on the Chickaniddy blog last week in which I created a layout inspired by a pin on Pinterest. I searched for an image that would really inspired me, and as soon as I saw this, I had a layout in mind.

Using a mix of three different Chickaniddy collections, and sticking to a green and neutral color scheme, I created this layout. 

This layout was so simple to put together, but what resulted is my favorite layout created for Chickaniddy to date. It's definitely a very 'me' layout. For all of the details on how I put it together, and the products I used, see the original post from the Chickaniddy blog here

Elle's Studio April Reveal Day!

The April exclusive kit at Elle's Studio is live and more gorgeous than ever! 

In addition to the kit. I also loved the cut files and printables this month. 

Using the kit, I first created a scrapbook layout with a favorite photo of Lizzy and Simon from her birthday party.

I loved all of the colors in this month's kits and I paired the kit with the Cienna collection to create this layout. For the full supply list, see the DT gallery post here.

For my second project, I created a mother's day card using the 'how lucky I am to have you' tag from the printable digital file. 

I also added a few extra bits from the Cienna collection. See this post in the designer gallery for the full product listing, and be sure to look at the other beautiful projects by the talented design team girls.

In addition to the kit, ES is also offering grab bags, too! This only happens twice a year so this is your chance to stock up and save! There are three different types of bags to choose from: scrapbook, stamp and journaling tags. These grab bags are available while supplies last, but they probably won't last long, so make sure you grab them now!

Scraptastic Club April Kits: My Lovely Tomboy

The new Scraptastic kits are live and this month I'm working with the lovely 'I Lived' kit and add-on, a change from my typical chosen 'girly' kits. I fell in love with the bright colors and the amazing red acrylic 'happy' word. 

For my first layout using the kits, I was feeling a bit rusty after not scrapping for a week with my family here in town, so I started with a vertical grid and a recent favorite photo of Lizzy from Easter weekend.

In addition to the kits, I also used the fantastic 'I Lived' and 'Sentiment Series V.7' stamp sets, as well as my favorite alpha stamp set from Scraptastic yet, the 'Darlene' stamp set.

The alpha stamps paired so well with the 'lovely' word from the Snap bits and pieces included in the main kit.

To include the circular words around my flowers, I stamped the flower and leaf first, then stamped an additional leaf to use as a mask on my first stamped image, which covered up the image so that I could stamp the circular phrase. 

I am so loving this bright and cheerful kit! Be sure to check out all that Scraptastic has to offer this month

Jot Magazine March Mood Board

The Jot Magazine mood board has been posted for March, and its blue, teal, green and yellow color scheme will inspire you to create!

This month, I was so instantly inspired by the colors, I knew exactly what photo I wanted to document- a quayside photo from a beautiful French town that we visited in 2011, La Rochelle.

Supplies: Paper- Studio Calico (background), Shimelle for American Crafts (yellow, teal herringbone & 'Go Somewhere Lovely' cut), Elle's Studio (blue floral), Chickaniddy Crafts (teal heart); Embellishment- American Crafts (cork Thickers, Shimelle ticket die-cut, mini clothespins), Crate Paper (banner border), Elle's Studio (cork), October Afternoon (chipboard journaling card), Studio Calico (ribbon, enamel dots, 'enjoy every minute' stamp)

To create this layout, I used a lot of old product, and items that were sitting in my 'anything' bowl on my desk. That's the bowl that houses leftover pieces of ribbon, small pieces of die-cuts and embellishments that I don't feel like organizing in their correct place. Please remind me to get rid of that black hole for embellishments! 

The background patterned paper, from the February 2013 Studio Calico Front Row kit, was actually saved for the yellow diagonal stripe B-side, but when I saw the nautical images on this side of the paper, I knew it would be perfect for this photo. I added additional papers from the Shimelle collection 6x6 paper pad, along with a Shimelle die-cut tag and topped it all with a lot of older embellishments- DIY Shop Thickers by American Crafts, Elle's Studio cork, and October Afternoon mini alphas and chipboard. 

The mood board was so inspiring that my layout came together in about 30 minutes. Completed during nap time. Ultra score. Be sure to check out what the other Jot Girls created with the board and link up your own creation on the mood board page before the end of the month. 

Elle's Studio March Kit Reveal

It's the day of the Elle's Studio March exclusive kit release and this kit is sure to help you document your spring (or just brighten up a dreary day) with it's beautiful bright colors, and today only, you can purchase the kit for $9.99. 

To go along with your kit, the March Daily Grind printables and digital cut files are sure to take your project to the next level.

In addition to the new kit, the new, gorgeous Cienna collection is also in the store! 

Using a combination of the March kit and the Cienna collection, I created this layout about my sweet girl. 

Then, when I saw the "eggcellent" and "thank you" tags in the kit, it inspired me to create a thank you card for your Easter host or hostess with the March kit and Cienna collection.

Be sure to pick up your kit today, and save on shipping by bundling with the new Cienna collection. They're perfect together for any papercrafting project! 

Journaled labels tutorial

I'm up on the Scraptastic Club blog today with a new layout that uses an entire sheet of journaling labels, along with the It Takes Two kit & add-on. These labels coordinate with the Scraptastic Club kits each month & are available to subscribers, but you can also get the same labels for free download from Kaitlin Sheaffer's blog

Lizzy is currently saying and doing so many things that I know will change quickly. To get all of these "Lizzy-isms" down on a layout, I decided to put a different fact in each label & without a cute vintage typewriter, I used Photoshop Elements to type my journaling directly in the PNG file.

25months blog.jpg

After typing out my journaling, I opened the modified PNG file in my Silhouette Cameo software and used the print and cut feature, saving me a lot of time cutting out each individual label! To show you how I did this, I created a video tutorial showing the step-by-step process on my computer screen.

If you found the tutorial helpful, I'd love it if you could leave a comment letting me know. Have fun incorporating these useful labels into your next project! 

Jot Magazine Issue 9- Bucket List

I was so honored when Kim asked me to be a part of the Jot Girls for 2015, but at first when I thought about the projects I would create, the task seemed a bit daunting. It has been quite a while since I have had free range of product to use on a layout, and wasn't working from a collection or a kit. Once I started, though, the process was totally freeing & I loved every minute of it! 

I'm so excited to tell you that Issue 9 is now available at jotmagazine.com and I'm blown away by the talent on this team and truly honored to be a part of it. I'm really proud of what I contributed this month, and I'd love to share one of the layouts with you. 

Supplies| Patterned papers: Crate Paper (pink & floral), My Mind’s Eye (polka dot). Cardstock: Bazzill Basics. Stamps: Scraptastic Club (phrase), Studio Calico (alphabet). Embellishments: American Crafts (foam letters, epoxy sticker, yellow label sticker, chalkboard die-cut, yellow flower, twine), Crate Paper (heart stickers, rub-on, tag, journaling label, die-cut ‘e’), The Girl’s Paperie (ribbon). Other: Stampin’ Up! ink and markers, Staz-On ink, Tim Holtz tiny attacher

As soon as I read the prompts for Sian's bucket list article, I immediately was drawn to the 'journaling as a title' prompt and thought of this line from Love You Forever. The photo was taken with my Timer Cam app when getting Lizzy out of bed after her afternoon nap. I just walked in the room & sat the phone on the dresser before getting her out of her crib. I love photos like this. It shows a daily routine in such a lovely way.

I wanted the page to be graphic and simple, but still full of my soft, feminine touches. When I saw the beautiful floral paper by Crate Paper, it was just the thing I needed to pull different colors together for my title. Adding 'my baby' in black, foam Thickers emphasized the words and made the title really pop. To offset the black in the title, I backed my embellishments with a chalkboard label by American Crafts on the opposite side.

How would you interpret this challenge? A text, or a funny quote as a title, perhaps? Or maybe your favorite line from a book? The possibilities are endless! 

The Blanket

I shared this story a few weeks ago on my Instagram profile, so if you follow me there, you'll probably have a bit of déjà vu reading this post. 

Lizzy and I were in my office, where I have multiple photos hanging up from our time in the NICU. She's at the stage where she loves to point out loved ones in photos and we were looking at multiple pictures hanging up and naming Daddy, Papaw, Nana, etc. When she came to this photo, she couldn't name the baby in the picture.

Dated April 15th, 2013. 37 weeks adjusted gestational age. Almost 3 months old actual.

Dated April 15th, 2013. 37 weeks adjusted gestational age. Almost 3 months old actual.

The blanket that she was laying on in the photo just so happened to be in my office where she was playing, so I grabbed it and showed it to her, pointing out that it was the same blanket as the baby in the photo was laying on. Then I explained that the baby was her, when she was very little and needed to get bigger and stronger in the hospital. She hugged the blanket and pointed to the photo, saying, 'Lizzy,' (or 'Liddy', as she calls herself). It was definitely one of those wow moments for me as a mother. I had to take a photo of the two of us after that to remember the moment. 

As a documenter, these are the stories that I want to get down on paper so that, years from now, I can turn to this page in my album and say, "Yes, that was an amazing moment." So, I decided to create a very clean layout which focused on this story. 

Supplies: Scraptastic Club 'It Takes Two' kit & add-on, Scraptastic Club 'Counting Stars' stamp set, 'Counting Stars' digital files, 'It Takes Two' stamp set, 'It Takes Two' labels, 'It Takes Two' digital files, vellum, sewing machine, Stampin' Up! ink, Shimelle date stamp, black mist spray, 'Rough Typewriter' font

To keep the patterned paper behind my photos from attracting too much attention, I covered it with a sheet of shimmery vellum, which gives the layout a very pretty appearance. I absolutely love the heart digital cut file from the 'It Takes Two' digital files and used it to separate my two photos- sort of a 'then' and 'now' juxtaposition of images- and glued small pieces of patterned paper to the holes at the back of the cut. To make that stand out a bit more and give more weight to my photos backed the heart with a black cardstock, slightly larger than the original cut file. 

The 'Counting Stars' alpha stamps have to be one of my favorite things from this month's offerings. Designed by the talented Kaitlin Sheaffer, they are the perfect font for this subject, and I love that you can put colored blocks on top of the letters, or color them in yourself with watercolor or pens. So fun. 

I've also been typing out my journaling a lot in the last few weeks- not because I have a problem with my writing, but simply because I can fit more words in a small space with a typewriter font as opposed to my handwriting.

To finish off the page, I added a black label (check out Kaitlin's free label downloads!) and stamped 'my heart is so full,'- a perfect phrase for this story- with the 'It Takes Two' stamp set.

I am so happy to have this moment on paper. What stories do you need to document today?

Elle's Studio February Kit Reveal

I'm excited to tell you that the Elle's Studio February exclusive kit is now live! I loved this month's kit and there are endless creative possibilities with it! 

I fell in love with the red, teal and yellow colors in the kit, with my favorite being the yellow ampersand card above. I used it to created the title on my layout. 

I used the kit, as well as this month's 'Always & Forever' stamp set (Elle's stamps are SO fantastic!) and 'Key to my Heart' wood veneer

I also created with the lovely digital files- the cut file and printables

My second project, a series of three Valentines Day cards, is a great example of how you can use kit contents to make your handmade greetings- simply or not-so-simply! 

For full details on the products I've used for all of my projects, please see the Elle's Studio design team gallery.  

Also, don't miss the Elle's Studio sale! I LOVE ES stamps- the quality and the designs- and you'll want to take advantage of these savings! 


Jot Magazine February Mood Board

Sometimes when I need help starting a layout, a mood board is just the thing I need to get my creative juices flowing. The mood boards on the Jot Magazine blog are always so beautiful, I can't look at them without envisioning a layout. This month's board is no exception!

smallFEBRUARYMOODBOARD.jpg

I was especially inspired by the color scheme, the square shapes of the cookies & pillows, as well as the bold, graphic font. Here's what I created.

Love the Details blog.jpg

'Love the Details' Supplies | Cardstock: American Crafts | Patterned paper: Crate Paper (black & white stripes, light pink floral, bows, vellum), American Crafts (hearts), Gossamer Blue (red & pink stripe) | Embellishments: Crate Paper (label & 'recorded' sticker, rub-ons, floral chipboard, tag), Pebbles (large gold letters), American Crafts (date stamp, black chipboard 'a'), Webster's Pages (small letter stickers), Heidi Swapp (chipboard heart) | Stamps: Scraptastic Club | Tools: Stampin' Up! (heart confetti punch) | Other: Ink & markers (Stampin' Up!), sequins, twine

Be sure to check out the amazing projects from the other Jot Girls over at the Jot blog and link up your own creation for a chance to win a prize!

Also, if you'd like to have your work featured in the upcoming Issue 9 of Jot Magazine, submit your projects today based on the submission themes. All details can be found in the link.

Thanks for stopping by and happy Monday! 

Scraptastic January Projects

Last month I received the Scraptastic Kit Club's 'This Must Be the Place' kit and add-on, as well as the This Life Noted kit (sold out). I love what I created with the kits & I want to share them with you today.

'The Story of Us' was created as my Project Life 2014 title page. All of the details about this layout can be found at the post below.

Batada blog.jpg

'Ba-Ta-Da' was created using the January sketchy Thursday challenge and records my daughter's love of butterflies, which she calls, 'ba-ta-das.'

I shared all of the information about this month's This Life Noted spreads on the Scraptastic blog, as well as a peek into my process for creating monthly Project Life spreads. If you're interested in using the Collect App for documenting, or are looking to switch from weekly to monthly layouts, check out this TLN Friday post

Finally, I made a few cards with pieces from the kits, and the awesome Sentiments Series Volume 4 stamp set, which I loved since it has SO many different phrases included! On this card, I stamped 'hello' repeatedly on the heart, as well as 'thinking of you' on the teal tag.

This card uses the 'Whoa!' This Life Noted 3"x4" card for part of the sentiment, but I also stamped 'Congratulations' and 'You Did It!' on the blank tag included in the kit. I used the gold vellum leaves die-cut to mimic the tail of a shooting star, which I created with the starburst sticker, a stamped star circle and a few sequins.

Some of the pieces from the kit were just too perfect for me not to get a jump on my Valentine's Day cards. For this one, I used the banners from the Teresa Collins die-cut pack, the exclusive wood veneer from Scraptastic, a Maggie Holmes vellum heart and 'I Treasure You' sentiment, and the Jillibean Soup cork 'love' sticker. 

The February kits from Scraptastic are now live and I am so excited to create with the 'It Takes Two' kit and add-on this month.

Be sure to check out all of the Scraptastic Kit Club's beautiful kits and stamp sets before they're gone! 

2014 Project Life Title Page

As I'm about to wrap up my 2014 Project Life album, I've realized that I have not created a title page. Before I show you my layout, can I please just say how awesome it is to find my groove in my PL album & to be so close to completion on such a huge project? 

When I started my album last year, I started with my January spreads, not a title page. As the year went on, I decided that the title page should be an overview of photos from the entire year, not something that I created before any of our memories were documented.

When I saw the January 'This Must Be The Place' background cut file from Scraptastic, I realized that this would be the perfect background to create my title page, filling the spaces with a photo from each month of the year as well as pretty paper from the January Scraptastic Club kit.

I first decided where I wanted to put my title and before I had anything glued down, I adhered my title so that I kept those spaces open. I used a mixture of the Dear Lizzy Thickers from the kit, the wood veneer 'us' (cut from the 'all of us' wood veneer piece in the kit) which I colored with black acrylic paint and the Jillibean Soup stickers.

After the title was in place, I marked the 12 squares in which I wanted to put photos. In Photoshop Elements, I resized my photos to 1-5/8"H x 2"W and changed some of the photos to black and white if the colors in the photo didn't work with my layout. After printing the photos and cutting them out, I slid them behind my background cut file and decided which papers from the kit and add-on to use. This month was the first month that Scraptastic Club had exclusive designs in the kits, and I loved all of them! I cut them to the same size as my photos and hand-cut the ones on the edges at an angle.

Once I had all of the papers and photos in place behind my background, I adhered everything to the white cardstock background, first my paper and photos, making sure that they were straight behind the background cut file, then adhered my grey cut file. 

After all of the paper was in adhered, I added a few small embellishments from the 'This Must Be The Place' print and cut file, the kit, add-on and a few enamel dots from the January This Life Noted kit. To me, this layout is much more about the photos, so I kept my embellishment simple. 

I'm two months away from finishing my album, and this layout is the perfect overview for our memories in 2014!

Thanks for stopping by and be sure to check out the NEW,

beautiful Scraptastic Club website

Elle's Studio January Reveal!

It's the 10th, and that means that it's time for a new Elle's Studio exclusive kit and add-on! As I say every month, this kit is beautiful and versatile to use on so many different projects. If you haven't checked them out yet, the price is reduced to $9.99 for the 10th ONLY. After midnight PST, the price will go up to $11.99, so take advantage of the savings and grab this lovely kit.

Since I am on the design team again, I will be creating two projects with the kit every month and sharing them here and at the design team gallery, which you'll want to check out for tons of inspiration! I started with a layout, and was so inspired by the pie-chart heart tag that I centered my entire layout around it, hand-stitching the lines to my photos. 

Supplies: January exclusive kit12"x12" heart cut file, January cut file,  'A Bushel & A Peck' stamp, 'Lots of Love' wood veneers'Love You More' paper collection'Hello 2015' stamp'Hello 2015' stickers

The heart background cut file is perfect for getting the tone-on-tone texture that I thought this layout needed to make the rest of the elements shine. The 'love' cut from the January cut file was perfect for my title, and the font is so on-trend! 

I also used the 'Bushel and a Peck' stamp to stamp 'You Love' on my journaling tag. 

Next, I created a BIG 6"x6" card based around the large 'thank you' tag in the kit. 

Supplies: January exclusive kit'A Bushel & A Peck' stamp'Lots of Love' wood veneers'Love You More' paper collection'Hello 2015' stickers

I used the stamp on the 'Bushel and a Peck' stamp set to stamp the background, stamping off on some of the hearts so that they were lighter than the others. A few other tags from the kit, a sheer ribbon, along with the wood veneer heart, embossed with gold embossing powder, finished the card off.

Thanks for stopping by to check out the new exclusive kit & be sure to take advantage of the reveal day savings! For more inspiration using the kit, check out the new 2015 design team gallery

Scraptastic Club Layout: Cambridge

Every once in a while I print out a stack of photos and I have one that just sits around waiting for the perfect supplies to scrap it. In 2012, on a trip back to the UK to visit family, we met our good friends who had just moved to Lakenheath with the U.S. Air Force. We wanted to introduce them to some of our favorite things about the U.K., so we went to Cambridge and spent a lovely day exploring the city. We had a Marks & Spencer picnic in the park (my favorite way to spend a nice, sunny, British day!), browsed shops, walked on cobbled streets and visited a National Trust garden nearby.

When I picked up the December Heartbeats kit (sold out) and add-on (still available!) from Scraptastic, I knew I had to finally use this photo taken in front of Cambridge University.

This is my favorite part about this layout- the 'hello adventure' banner at the top and arrows, created with bits of paper sewn to the page, Amy Tangerine Stitched die-cuts and stickers, radiating downward towards the photo.

I also added a camera die-cut from the Amy Tangerine Stitched collection on the negative space in my photo, topped with a puffy heart from Evalicious.

Again on the right side of my photo, I added a die-cut tag, and stitched the 'wonderful' cut along the right side of my patterned paper. The title, created with the wood veneer letters found in the Heartbeats add-on (still available!) was colored with grey acrylic paint before adding to the layout.

Do you have photos waiting around for the perfect supplies?