Elle's Studio August Reveal & NEW Mini Courses!

Hi there! Today is the 10th, and it's a very exciting day for me, not only because it is reveal day for the August exclusive kit, but also because today is the day we are debuting the new Exclusive Kit Mini Course to coordinate with the kits, and as I am the new Classroom Coordinator for Elle's, it is a big day for me!

Each month, we will be asking three different contributors to give you extra inspiration using the kit on a scrapbook layout, cards and a double pocket page spread. Once purchased, for a bargain price of $4.99,  you will receive a link via email to download the course, allowing you to print or view on your tablet! The class will only be available until August 31, 2015, so be sure to purchase at the same time as your kit! This month's contributors are amazing, and I'm sure you will be inspired to put your kit to use once you have seen their projects! 

I'm extremely proud of our first month's course, and I can't wait to share the contributors we have coming up for the next few months! Now on to the kit

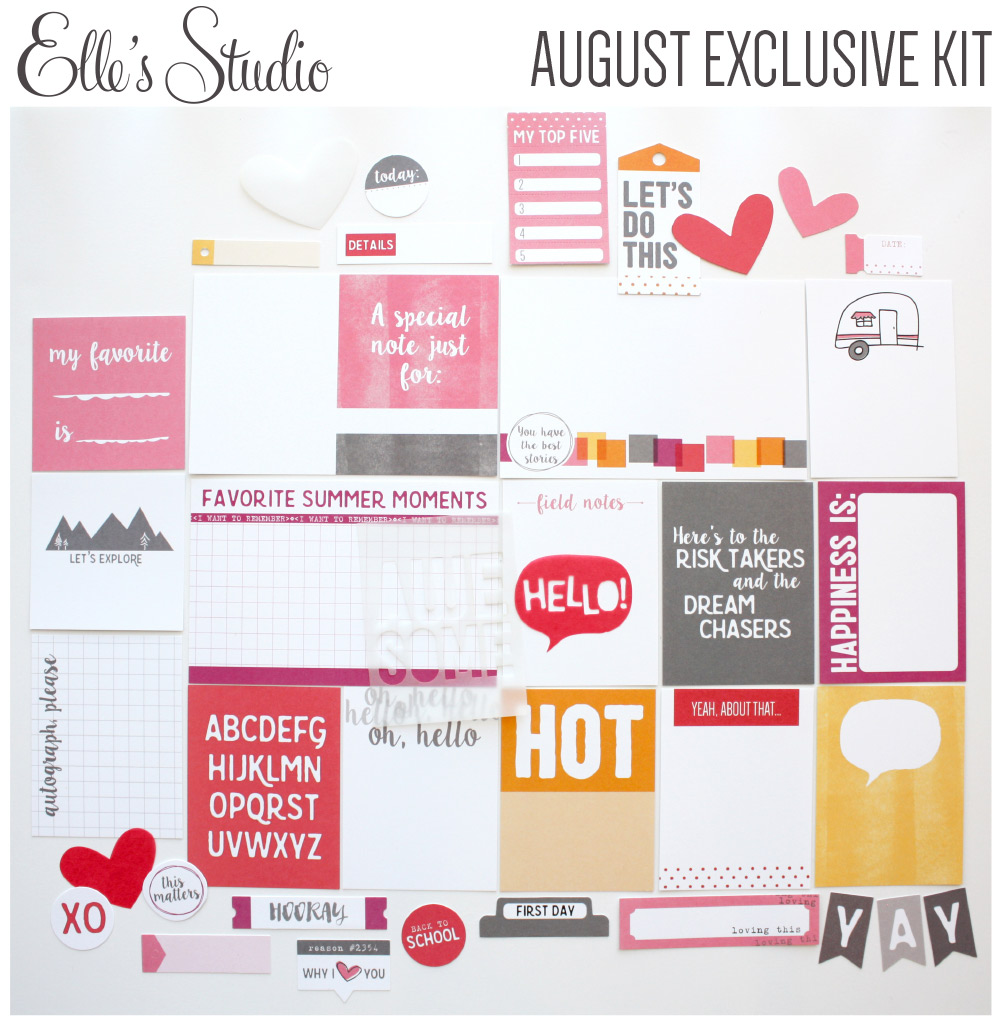
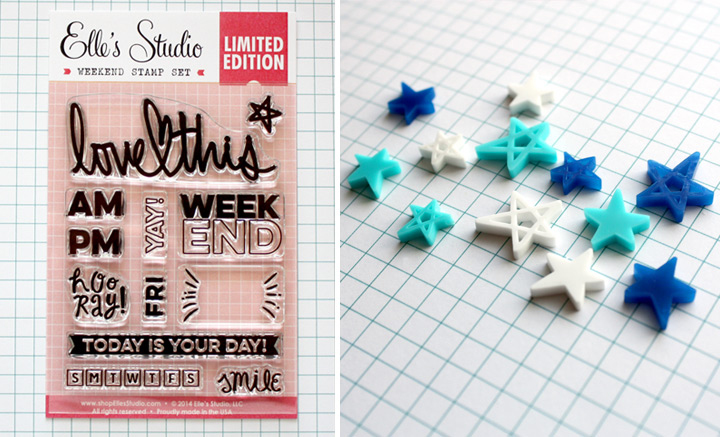
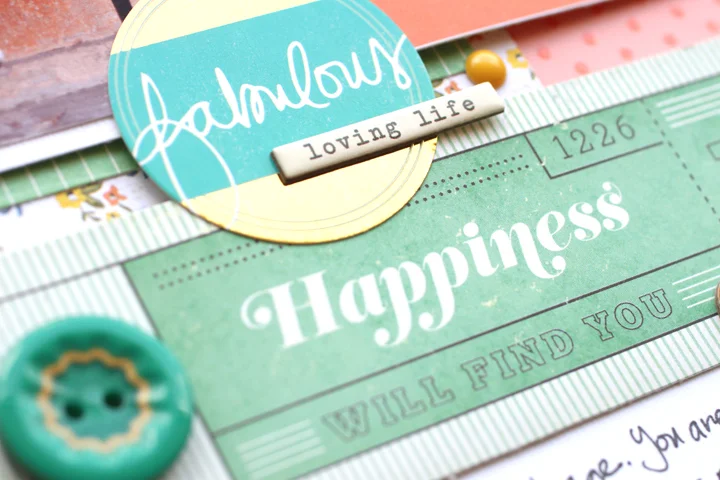
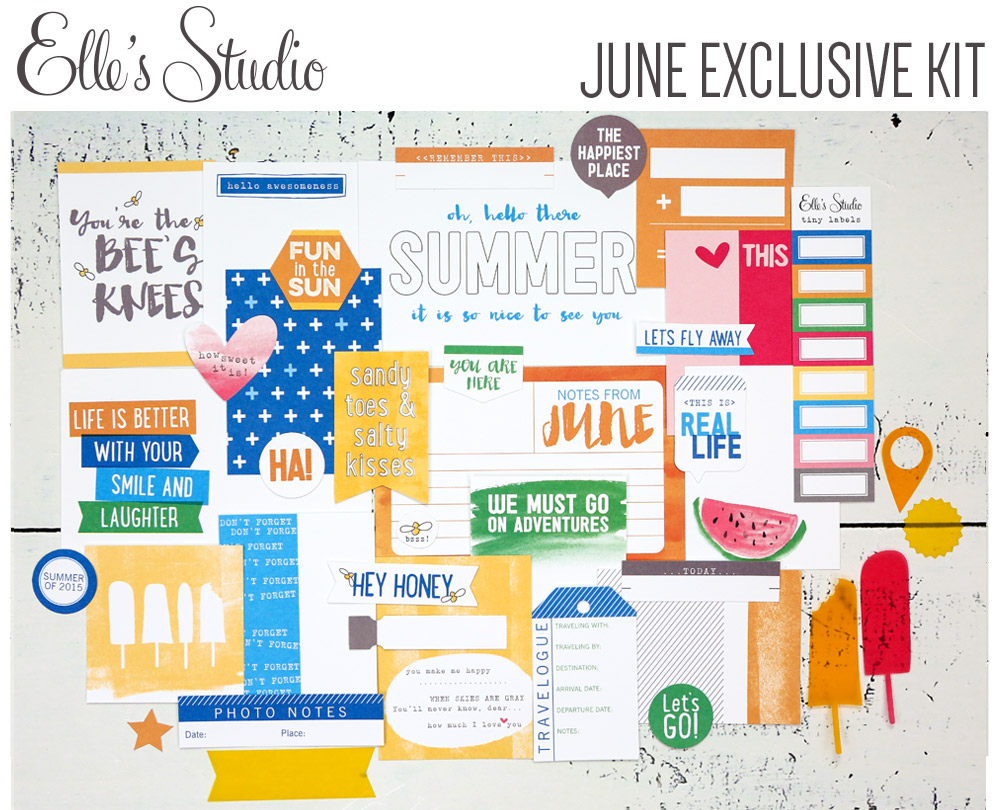
A beautiful mix of bright, bold colors, mixed with white and neutral grey make up this month's kit, which I totally and completely am in love with! In addition to the kit, the "Oh, No!" stamp set and XO acrylics will be all you need to embellish your projects.

EllesStudio-August-Stamp-XO.JPG

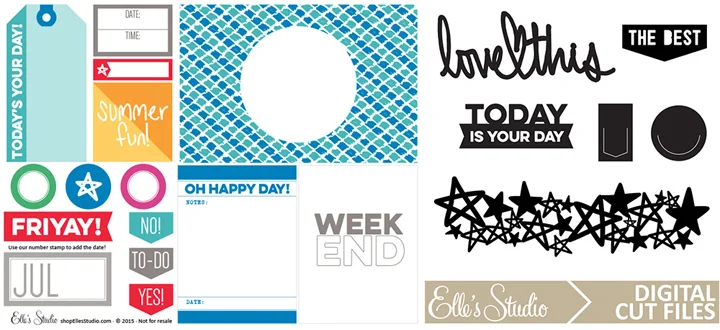
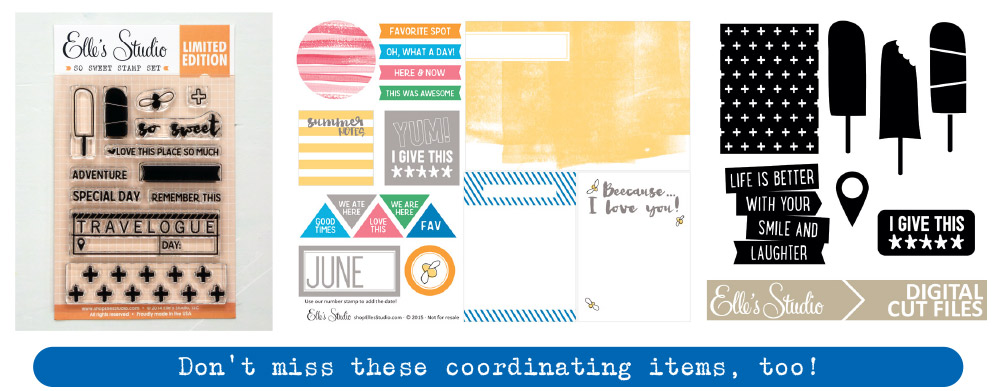
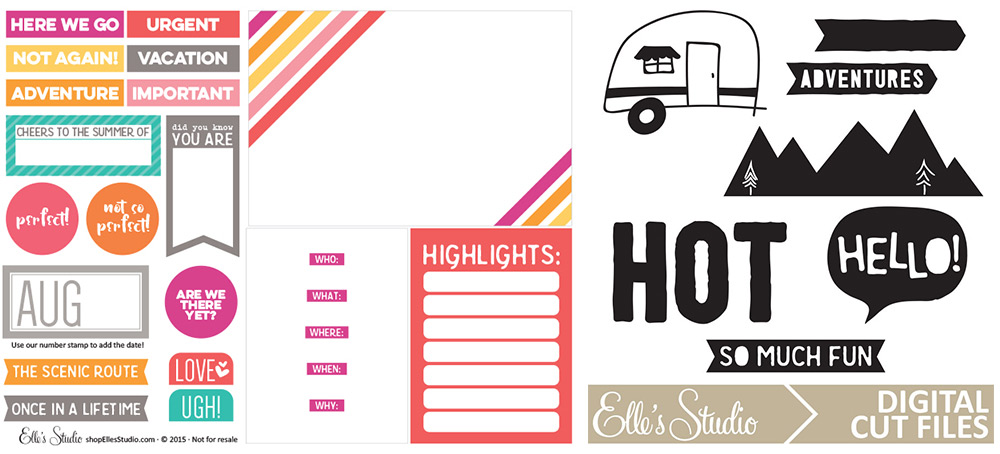
If you like adding printables and cut files to your projects, these coordinating digital files will be perfect for you! 

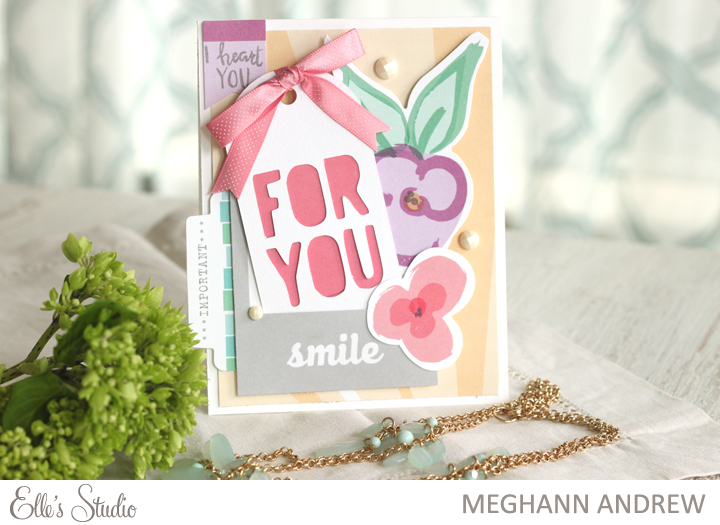
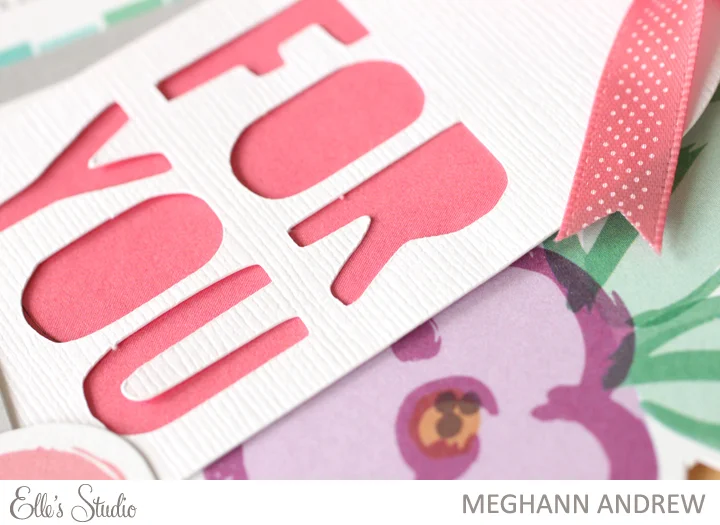
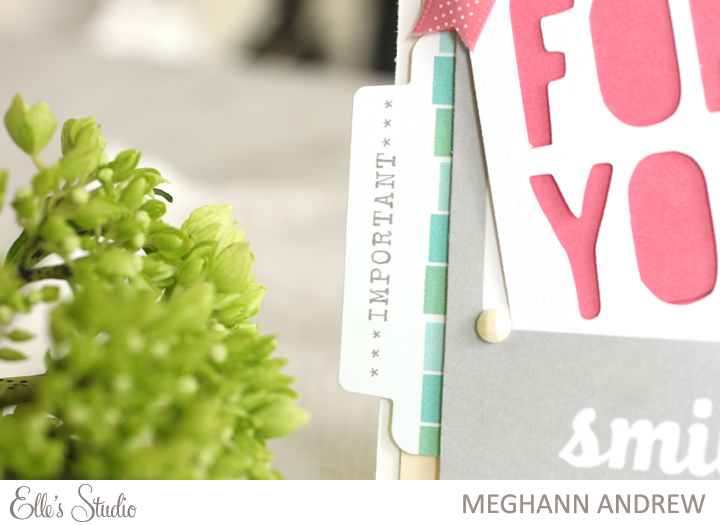
This month, I created two layouts to share with you today. I also have some cards on the way, which will be featured later in the month on the Elle's Studio blog.

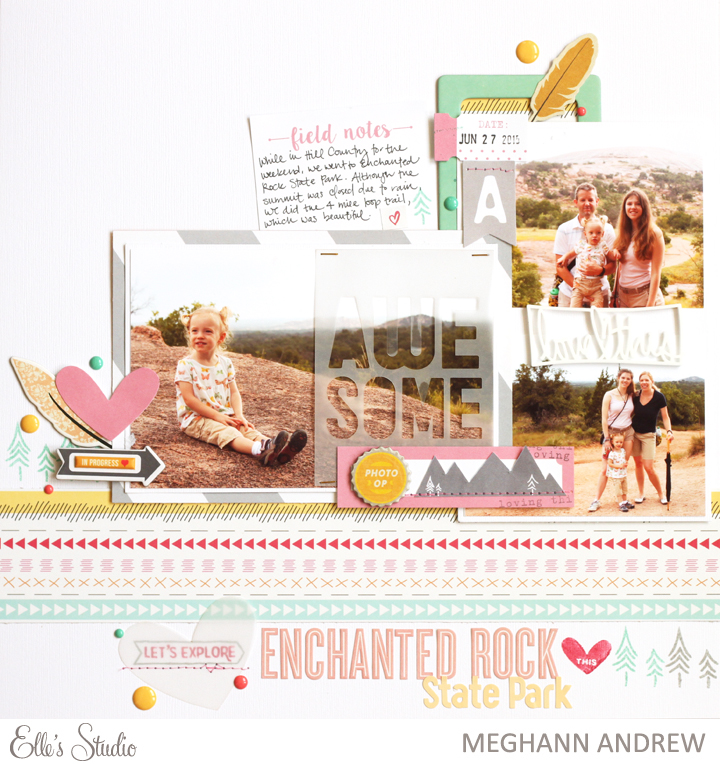
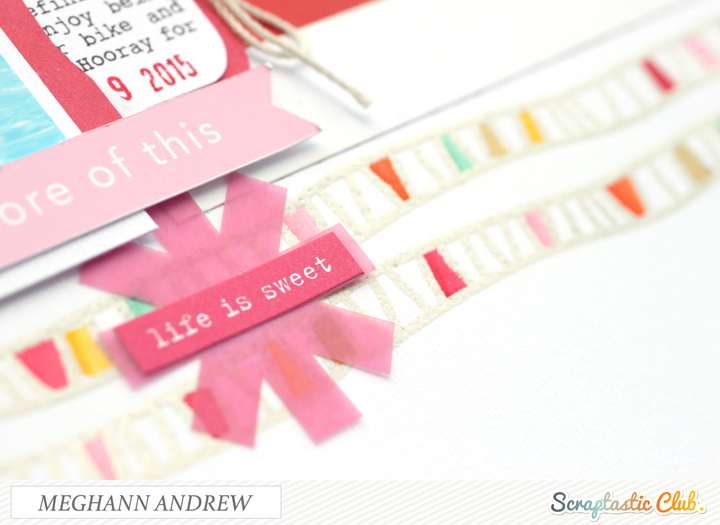
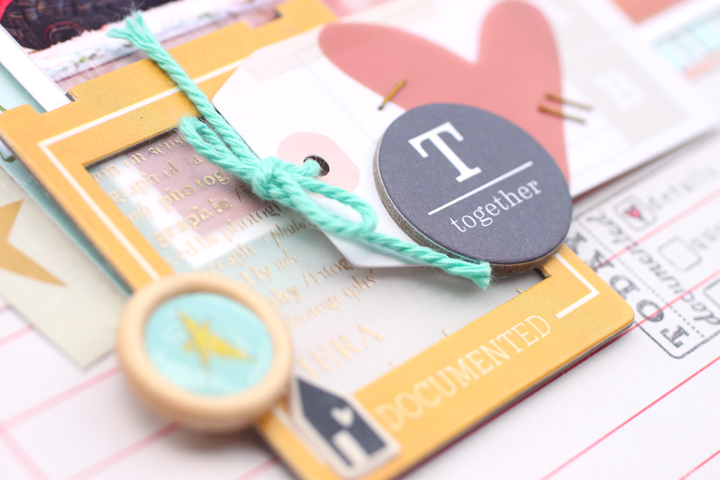
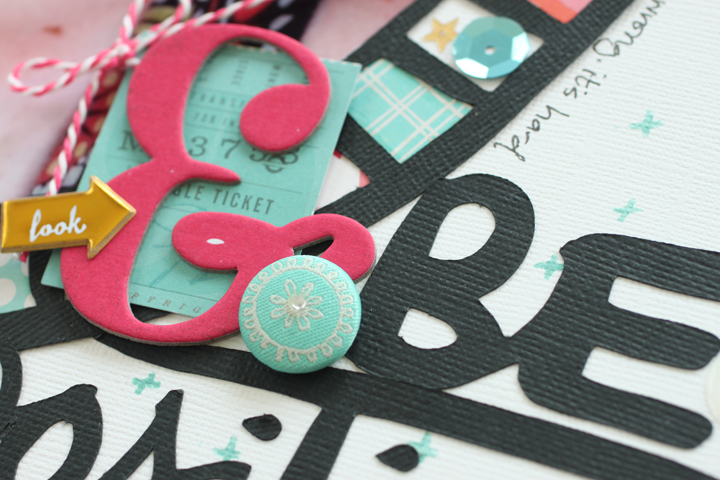
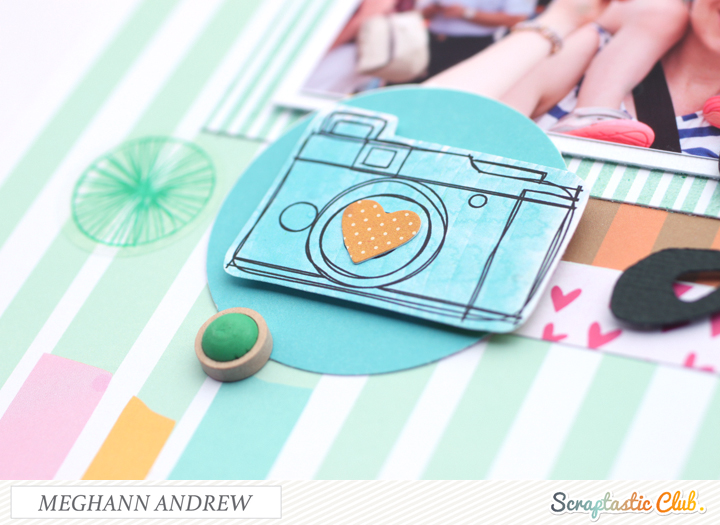
My first layout, Enchanted Rock, features the softer side of the kit. Along with the kit, I used my favorite paper from the Sycamore Lane collection, along with the grey and white stripe from the Let's Eat collection paper pack. The "awesome" vellum piece from the kit was perfect for layering over the negative space in my photo, and I cut out the mountain range from a 3" x 4" card from the kit to layer on top of another tag and stitch to make it seem more like a custom embellishment than a tag.

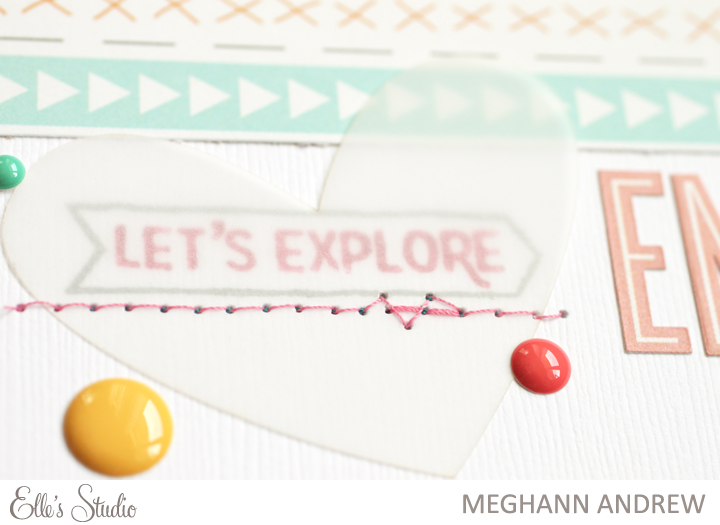
I also loved adding little sayings and trees from the "Oh, No!" stamp set around my layout.    

TomChee_blog.jpg

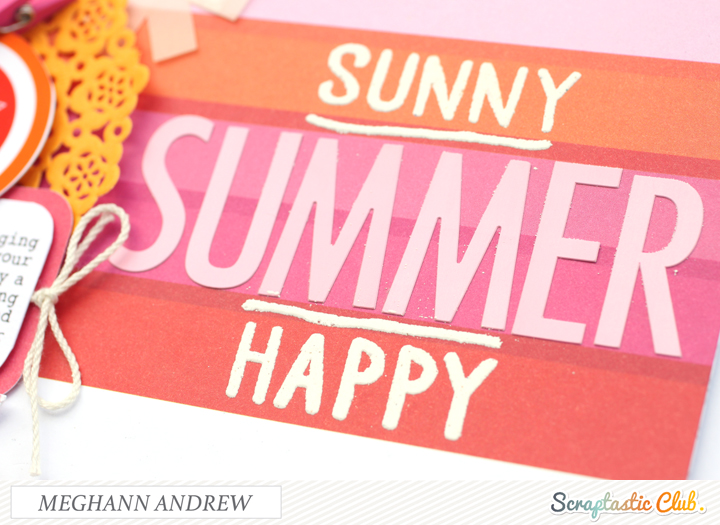
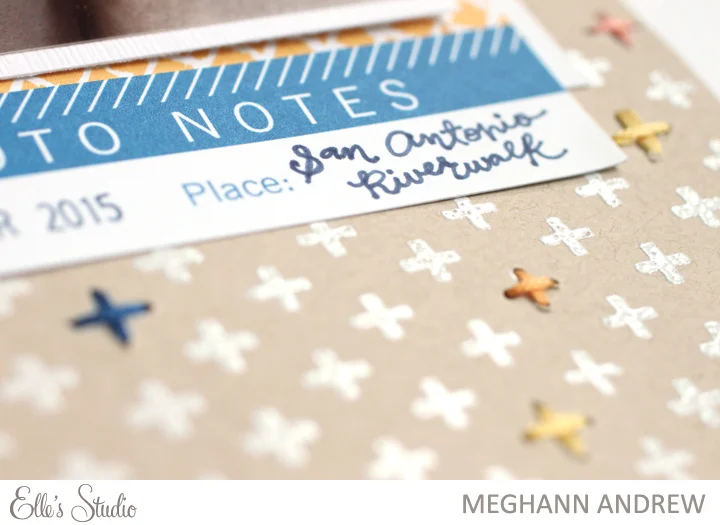
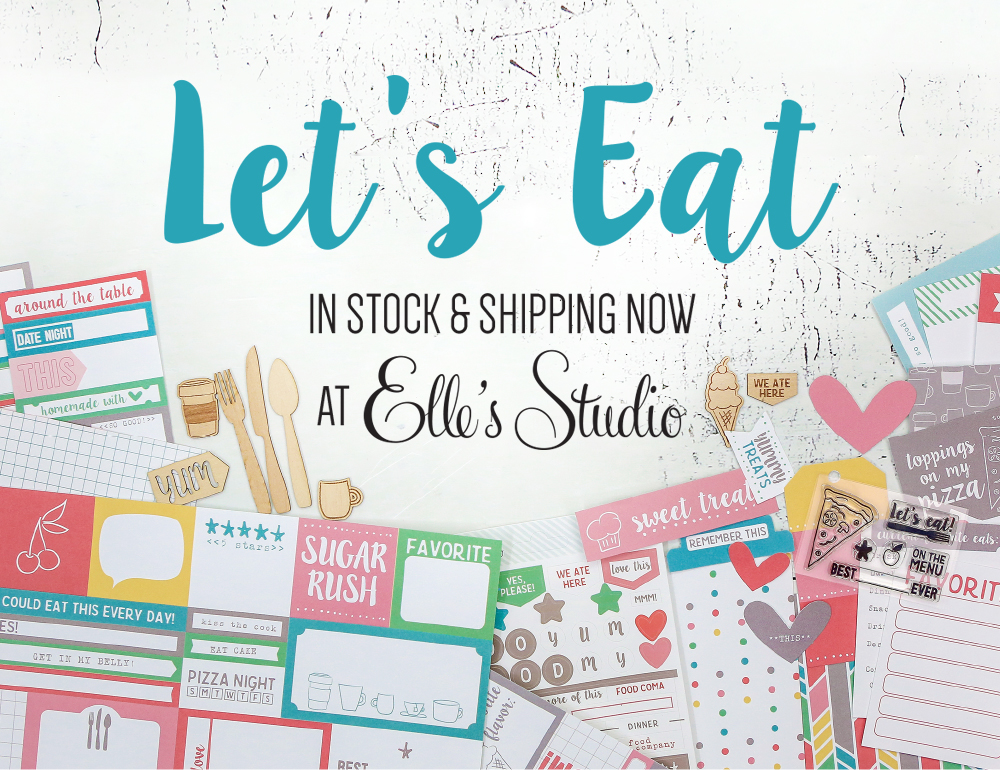
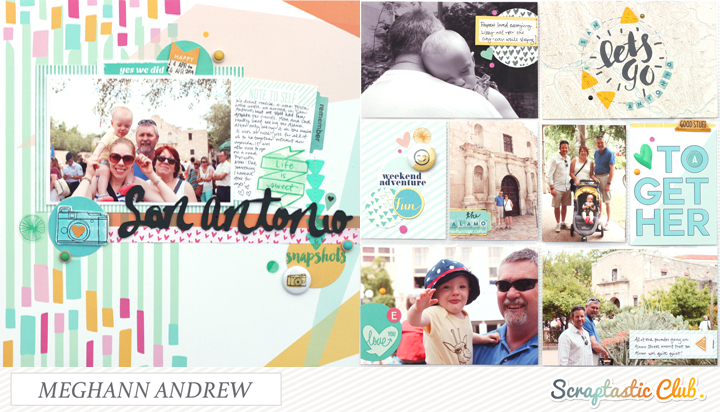
My second layout is my first 8-1/2" x 11" layout in years, and I couldn't love it more! The photos that I took from a recent trip to Tom + Chee, a Cincinnati-based tomato soup and grilled cheese shop, coordinated perfectly with this kit. To the kit, I added papers from the Let's Eat collection pack. The striped triangle pieces in the corners came from the "Here We Go" printables.

I had to use the adorable wood veneers from the Let's Eat collection in between my photos. 

That's it from me this week! In addition to the new exclusive kit and new course, there is also a huge sale going on in the shop! 

June Pocket Page Spreads

Hi there and happy FRIDAY! Today on the Scraptastic Club blog, I shared the second half of my June pocket page spreads, using the This Life Noted kits, and I wanted to share my entire month of June here with you, too! 

The first half of my month started with our trip to Savannah, so I used a bit more color than I normally would on a spread. I used the June 2015 This Life Noted kit to complete the spread. 

My favorite card for the spread - possibly in the entire album so far - is this custom 4" x 6" card. To create it, I just cut large letters out with my Silhouette Cameo, twice, in color and in grey to create a shadow. After adhering them to the card, I cut it in half so that it fit in two 3" x 4" sleeves and then journaled at the bottom, finishing off with a stamped car from the June 2015 Can't Go Home stamp set (sold out.)

My second spread, created with the July 2015 This Life Noted kit, shows the second half of my month. In this spread, I included a few cards printed with typed journaling to give more information about the stories shown. I love the yellow, grey and tomato red color scheme on this spread.  

My favorite card on this spread was, once again, a 4" x 6" card, placed at the top of my spread. To create it, I added "June," stamped with the awesome July 2015 Sentiments Series v.10 alphabet stamp. To this, I added a tag with the "#summer" sticker, along with the yellow sunburst and cork quote embellishment.

I also loved the stamp set included in the July 2015 TLN kit. The "game changer" bubble couldn't have been more perfect for this card about new spin bikes at the gym. 

Thanks for stopping by and taking a look at my album. Be sure to check out the TLN kits if you're in the market for a pocket page kit subscription. They make documenting our everyday so much easier! 

Tutorial: Print and cut journaling inside a circle

I recently shared a layout, "The Twos" that included a circular cut file in the background. To keep my design clean and consistent, I decided to include my journaling on the largest die-cut circle. My writing, however hard I try, is not very small, so to get all of my words down in the 2" circle, I was going to have to type it on my computer and print it out, and I figured that the quickest way to cut it would be with my Silhouette Cameo. Today I'd like to share this process with you using Photoshop Elements and Silhouette Studio software, so that you can try it on your next layout! 

1. In Photoshop or Photoshop Elements using the ellipse tool, draw a circle just smaller than the diameter of the circle that you will be adding to your layout. In my case, my largest die-cut background circle was just over 2" in diameter, so I sized my circle at 2", using the ellipse option menu at the upper left side of the toolbar.

Screen Shot 2015-08-01 at 1.26.43 PM.png

2. Choose your horizontal text tool. Although the screen shot doesn't show it, when you hover your cursor over the edge of your circle after choosing this tool, a small circle appears behind your cursor. When you see that, click and the boundaries of your text box will be placed inside that circle.

3. Type your journaling so that it fits inside the circle. You can adjust the font and size to make it fill up the entire circle shape. Once your journaling is complete, save the file as a PNG. 

4. Open Silhouette Studio software and in the Design Page Settings menu, make your sheet 8-1/2" x 11", and turn on the print and cut border. Locate your PNG file and drag and drop it into this new document, being sure not to adjust the size. Your text should be well inside the print border lines.

Screen Shot 2015-08-01 at 1.41.30 PM.png

5. Using the ellipse shape tool on the toolbar, draw a circle. In the Scale menu, adjust your circle size to fit your die-cut size, which is slightly larger than your journaling circle, in my case 2.2" in diameter. Turn on your registration marks in the Registration Marks menu and be sure that everything fits inside the guides. 

6. Print your journaling from the Silhouette Studio software. This will also print the registration marks, which are the key to being sure that your circle will cut in the correct place.

7. Once your journaling is printed, load the paper in your Silhouette Cameo and cut according to the paper type settings for your chosen paper. The Silhouette should cut it exactly as it is shown on your screen and you can then adhere to your layout! 

I hope you find this useful on your next project! Thanks for stopping by!

The Twos

Since I became pregnant, I've heard that the "terrible twos" are a definite force to be reckoned with, however, I was a bit spoiled for the first six months of Lizzy's second year of life, and I figured that they just weren't going to be an issue for us.

Until now.

IMG_7833.JPG

In the past two weeks, the terrible twos have hit us hard. Screaming, kicking, and just general grumpy moods have now become a new thing to deal with here in the Andrew household. The phrase that echoes around the house now is, "I NO LIKE [insert object/person]," whether it is aimed at a toy she is tired of playing with, or myself or Simon. It has definitely been a game-changer for us in terms of planning activities and in how we approach her. 

In my life of documenting, I try to get both the good and the bad down on paper, so you can probably expect to see quite a few photos of a moody toddler in the future. On a recent trip to Lexington, Kentucky, my alma-mater town, I wanted to snap a few photos of her in front of the fountain at Triangle Park, but, surprisingly, she didn't have the same plans.

The Twos_blog.jpg

Instead of filing this photo away in the "uncooperative toddler" file, I decided to scrapbook it with the True Colors kit and add-on from Scraptastic Club. The beautiful Dear Lizzy wide washi tape included in the add-on matched Lizzy's outfit perfectly from that day, so that was the starting point for my layout.

To create my fun, artsy background, I cut the True Colors digital cut file from the same white cardstock that I used for my background. I also punched circles, corresponding to the size of the circles in the cut file, from watercolor paper. Using the pie shapes in the cut file as a guide, I used my Stampin' Up ink pads and a water brush to watercolor the colors from the washi tape in the circles.

Since I already had a lot going on in my background, I kept my embellishment simple with pieces from both the kit and add-on, as well as the True Colors printables.

To make my journaling fit into the design of the layout, I decided to put it inside the largest circle on my background. Typing it up in Photoshop Elements and cutting it out with the Silhouette Cameo was quite easy. Look for the tutorial on how you can do this too on Monday! 

Have a great weekend! 

Scraptastic Layout: Sunny, Happy Summer

Over at Scraptastic Club this month, I worked with the bright and bold True Colors kit and add-on. With the pink, orange, yellow, white and black color scheme, it was the perfect kit to use with a sunny, summer photo of Elizabeth in the pool, however, I wanted to add a few more colors to highlight the colors in my photo.

In addition to the kits, I added the wonky border from the July 2015 Summertime Rolls stamp set to add additional colors into my layout.

To make my colorful borders, I stamped the border onto my background (using the patterned paper I had already adhered as a guide to keep it nice and straight) with Versamark. I added American Crafts Zing white embossing powder, to keep the background clean, then heat set. Once it was cool, I added little bits of watercolor in the spaces randomly. To add a bit of shine, I also colored in a few squares with a PenTouch gold metallic pen.

I love using an embossing technique when coloring in stamped images! The raised surface is perfect for helping me to color in the lines.

I kept most of my embellishment around my photo, using a sleeve for my journaling tag, In addition to the beautiful bright yellow doily, I also added the star circle, attached with a mini clip, and 'more of this' from the True Colors digital files

I knew I had to use the beautiful stamp set again to create my title, and I opted to leave the word "sandy" out, since we weren't at the beach, and replace it with the Bella Boulevard alpha stickers spelling, "summer." To make the words really stand out against the colorful paper, I again heat embossed "sunny" and "happy" with white embossing powder. 

I love how versatile and useful stamps can be on my layouts. Thanks for stopping by & have a great week! 

Around the web...

Summer is busy around here. We have been enjoying time spent with family, going on adventures and taking it easy at the same time. I have been living in the moment, which means that I haven't shared everything that I've been doing around the scrapbooking web-o-sphere lately. So today, I'd just like to give you a head's up on a few places I've been featured.

Basic Grey June Guest Designer

I was so excited to be asked as the Basic Grey guest designer for the month of June! I created four different layouts using the Tea Garden collection, which at first I was afraid would be a bit busy for me. However, the beautiful colors drew me in and I created four projects that I absolutely love, not to mention am so proud of. Check out the original guest designer post on the Basic Grey blog to see my other projects. 

Pocket Talk Podcast

Layout featured in Jot Magazine, Issue 10.

Layout featured in Jot Magazine, Issue 10.

Earlier this month, I sat down to have a chat with the lovely Jess Forster on her podcast, Pocket Talk. I have been a listener since episode one, and when she asked me to chat with her, I was so excited. In my episode, episode 12, we chat about my pocket page documentation failures and successes, as well as how I photograph and edit my pocket page photos for design team work. 

Traveler's Notebook for Scraptastic Club

Yesterday, I was featured on the Scraptastic Club blog using the packed, beautiful "Can't Go Home" kit and add-on to make a traveler's notebook insert that I plan to use on an upcoming trip to Boston. The process was so easy and I can't wait to use it to document my trip! 

If you want to be sure to catch everything I'm up to in my personal, as well as scrapbooking life, I update my Instagram account regularly, so be sure to follow me there! 

Thanks for stopping by and I hope you're having a wonderful summer! 

Elle's Studio July Exclusive Kit Reveal

Hello there and happy Friday! The new Elle's Studio exclusive kit is live and beautiful, and along with the main kit, the coordinating add-ons will help you create beautiful layouts, pocket pages and cards!

In addition to the kit, the Weekend printables and July cut files will help to add that extra touch to your projects.

In addition to the awesome Weekend stamp this month, new acrylic stars coordinate with the colors in the kit.

This month, I created a layout and a card with the kit and add-ons. I loved the celebratory 'American' feel of the kit this month, and a recent photo taken at a baseball game seemed perfect to document with these goodies. 

ES Supplies used: July exclusive kit, 'Weekend' stamp, acrylic stars, 'Weekend' printable, July cut file, 'Let's Eat' paper collection ('Meal Planner' paper), letter & number stickers-teal. Other supplies: Studio Calico (glitter stars, 'Hooray' banner), Gossamer Blue ('We are here' arrow), Evalicious (gold puffy camera), American Crafts (red chipboard alpha), enamel dots. 

I also created a colorful, celebration card with the kit. I loved joining the kit tag with the tag from the Weekend printable

ES supplies used: July exclusive kit'Weekend' stampacrylic stars'Weekend' printable'Let's Eat' paper collection ('This + That' paper). Other supplies: Ribbon (American Crafts- teal, Stamping' Up!- yellow & pom pom), enamel dots.

Remember, the kit will be $9.99 for TODAY ONLY. Also, the first 150 orders placed will receive a free lovely acrylic embellishment! 

Jot Magazine July Mood Board

The July mood board at Jot Magazine is live, and the beautiful board, created by Beshka Kueser, has the most beautiful color palette. 

I was so inspired by the color scheme- one that I had never created with before, that I created this layout.

Supplies | Patterned paper: American Crafts (teal dot, green ledger, '2' tag), Crate Paper (green tags), Studio Calico (floral), Doodlebug (pink dot vellum). Embellishments: Pebbles (gold alpha), Simple Stories (flower, heart & 'loving life' chipboard), Bella Boulevard (felt bow), American Crafts (heart puffy sticker, 'fabulous' die cut), Basic Grey (pennant chipboard), My Mind's Eye (twine). Other (enamel dots).

The photo of my daughter against an orange wall in Savannah was perfect for the color scheme, and I paired it with a wide range of teal, yellow and green product, with a tiny bit of pink thrown in for good measure.

She Is 2 closeup 2.jpg

As soon as I saw the photo, I knew I wanted to journal about how active and difficult that Lizzy is at the age of two. When I was taking her photo, I couldn't get her to sit still or look at the camera at all. This momma business is such a wild, beautiful ride. 

Be sure to link up your creation to the Jot Magazine blog using this beautiful inspiration board by the end of the month! 

Scraptastic Club June Projects

June was definitely a great month at Scraptastic. I worked with the Can't Go Home kit and add-on this month, as I was drawn to the travel theme and the bright, bold colors. 

My first project this month was a 'main kit only' project and documented my daughter's first flight- a pretty momentous occasion.

My favorite part about the kit was the Can't Go Home stamp set, which I used to stamp the top of my journaling.

My second layout used both the main kit and the add-on to document my daughter's start to walking while we were in Paris. 

I loved the mix of the Shimelle True Stories collection with the Pink Paislee Atlas collection in these kits. I also used a label from the June Can't Go Home digital files on this one.

My third layout, again documenting a part of our Parisian trip, records an amazing boat tour down the Seine.

I also used the June 2015 This Life Noted kit to record the start of my June. 

My favorite part of the spread was this bold, colorful title to highlight the start of our vacation to Savannah, which I created by die-cutting letters (with Bebas Neue font) from my Silhouette Cameo and adhered to a 4"x6" TLN card.

I followed the same color scheme on the right side and used a lot of this month's stamps on my title card.

With a mix of the Can't Go Home and Thinking Out Loud stamp sets, using stamp pad colors to match the rest of the spread, I created a perfect accent card for my layout. 

Be sure to check out the beautiful June kits, which are still available in the Scraptastic store

Jot Magazine Issue 10: Story Telling

Today I'd like to share a layout with you that was featured in Jot Magazine's Issue 10, which released on June 1st. This celebratory 2nd birthday issue is jam packed with inspiration from my fellow design team members as well as readers. My layout, "Leg!" was featured in the "Story Telling" gallery and our assignment this month was to document funny sayings from our loved ones. Months ago, I snapped this photo of Lizzy and I playing ball by setting my DSLR camera on the floor and using the timer. As soon as I read the assignment, I knew this photo would be perfect to document an everyday activity here at our home.

Supplies | Cardstock: Bazzill. Patterned papers: Shimelle for American Crafts (ledger & pink dots), Studio Calico (letters), We R Memory Keepers (stars), Crate Paper (vellum); Embellishments: Heidi Swapp (letters & metal clip), Studio Calico (heart), Gossamer Blue (‘happy memories’ banner, ‘together’ chipboard), Crate Paper (tag, tab sticker), American Crafts (house puffy sticker, wooden flair, small stars & heart stickers), Simple Stories (chipboard frame); Stamp: Scraptastic Club; Other: Stampin’ Up! (ink & twine)

The story: One of Lizzy's favorite activities is playing ball, but she is very particular on how it will be played. She shouts, "leg!" whenever she wants to play, which means that you have to sit down on the floor wherever you are standing, and spread your legs so that she can pass the ball to you. She's a bit demanding, but still quite cute. 

How I created this layout: 

  1. I printed a 4"x6" photo and matted with a 4-1/2" x 6-1/2" piece of white cardstock. 
  2. Next I layered three different patterned papers at the upper half of a 12"x12" sheet of ledger patterned paper and adhered the photo to the top of the layers with dimensional adhesive.
  3. At the upper right-hand corner of the photo, I tucked a tab label behind the photo & add a 'love' sticker. To the right of the label, I added a metal clip and slid the 'happy memories' die-out label under it.
  4. At the bottom left-hand corner of the photo, I added a grouping of embellishment. I framed a piece of vellum in a chipboard frame, and added a tag on top, on which I stapled a transparent heart. On top of that, I added another chipboard element, the 'together' circle. On the left side of the frame I added a puffy sticker house and a wooden enamel button. The frame served as the base for all of the embellishment in this grouping.
  5. At the right bottom corner of the embellishment grouping, I added a 'today documented' stamp.
  6. At the bottom right-hand corner of the patterned paper grouping, I added a large title in transparent letters. Beneath it, I handwrote my journaling.
  7. To finish off my layout, I added three different groupings of small heart and star stickers.

Thanks for stopping by! Over the next couple of weeks, I will be sharing my Jot Issue 10 layouts here on my blog, but in the meantime, check out the full, FREE issue of Jot today!  

Elle's Studio June Exclusive Kit Reveal!

The June Elle's Studio exclusive kit is live and it is the biggest one yet! Packed with colorful, versatile tags and journaling cards, the possibilities with this kit and add-ons are endless! 

You definitely won't want to miss the add-ons: the 'So Sweet' stamp is perfect for scrapbooking as well as dressing up your planner; the printables are fun and easy to use on any project and the cut files are a must-have for your cut-file library.

This month, I used the kit and all of the add-ons to create my two projects. First up, a layout, on which I used the 'So Sweet' stamp cross background to add a custom embossed and hand stitched background.

Supplies: June exclusive kit, 'So Sweet' stamp, 'Let's Eat' paper collection pack (the yellow paper is my favorite from the collection!)

I absolutely loved the predominance of blues, yellows and oranges in the kit this month and wanted to use them in this layout to highlight a recent photo of my daughter. After stamping and embossing the background crosses with white embossing powder, I hand stitched the same colors onto random crosses to give the layout more texture and visual interest. I love the result.

My next project was created so that you could see just how versatile ES kits and collections are. The 'because I love you' journaling card from the 'Good Times' printables gave me the idea to create a little honey gift set for a friend who has been wanting some of my favorite Texas wildflower honey!

To create the card, I used the yellow 4"x6" journaling card from the 'Good Times' printables as my card base, topped that with the cross background cut file, added a black and white ribbon and printed out the bee circle printable several times- I topped my ribbon with one, then cut the bees out of the two others to add to the yellow background. A few stamped bees from the 'So Sweet' stamp and some machine stitching finished it off.

On the honey bottle, I wanted to add a recipe for my favorite Pecan Honey Granola, so I cut out the adorable recipe card from the Let's Eat Best Ever paper, wrote out the recipe and simply stamped a bee and the 'so, so good' sentiment from the 'So Sweet' stamp set before adhering it to the bottle front.

On the top of the bottle, I added another bee circle. I then created my own tag using two tags from the 'Good Times' printables, and the same ribbon used on my coordinating card.

This month is the perfect time to try out some Elle's Studio products, if you haven't already, or to just stock up on some favorites! Elle is having a BIG retiring sale as well as a free shipping offer! Don't forget to add the new Let's Eat collection to your cart if you are a fellow foodie, like me!

JOT Magazine June Mood Board

Hooray for a new month! The schools are out here and summer is now in full swing- when it isn't raining here in Houston! The JOT mood board for this month is full of bright, summery colors and icons.

I chose a photo of Lizzy (from her first summer!) asleep in the shade after a swim to document with the pinks, greens and blacks from the mood board. It seemed like the perfect choice since she was wearing a pink hat and laying on a green towel.

"Summer Snooze" Supplies | Cardstock: Bazzill | Patterned Paper: American Crafts (pink stripe, black polka dot) Crate Paper (red & pink geometric, black on white polka dot), Studio Calico (green arrow), My Mind's Eye (green solid), Basic Grey (green ticket), Chickaniddy Crafts (pink & red arrow) | Embellishments: Pink Paislee (black alphas), American Crafts (pink alphas, camera sticker), Crate Paper ('e' die-cut, green date label, butterfly, pink frame), Simple Stories (black heart sticker, enamel dots), Elle's Studio (watermelon card- sneak of the June kit!), Fancy Pants (flair button)

I rummaged through my stash searching for products with bright pinks, reds, greens and black. Having a color scheme in mind made the process so much faster for me.

To create the scalloped piece on the left side of the layout, I first found a piece of scalloped patterned paper from an old Studio Calico kit and used it as a template to add my own circles, punched from patterned paper, on top.

Once all of my patterned paper was down, it was a quick process to embellish and finish the layout. I like using a mix of cardstock and chipboard elements, along with hard embellishments, like enamel dots, to give some variety to the page.

Be sure to stop by the Jot Magazine blog to upload your summery project today! 

This Life Noted: May

Happy Friday! Today my May pocket pages, or Project Life spreads using the May 2015 This Life Noted kit, are being featured on the Scraptastic Club blog and I would also like to share my pages with you here. 

May was a month of highs and lows for us, and the left side shows the highs- Lizzy sleeping in her "big girl" bed for the first time and our Mother's Day celebration in the pool with dear friends.

My favorite card from the spread is the "my super power is" card, which I added to with bits and pieces from the kit, as well as my own handwriting, which I have been working on! I'm really pleased with the way it turned out.

The right side, which also features the same teal, green and yellow color scheme, goes from the highs of an awesome date night at a Dave Matthews Band concert, to the lows of another hospital visit for Lizzy. 

The "terrible horrible" stamp was perfect for this spread. Who else absolutely loved that book when they were a kid?

So that's a wrap for May! Bring it on June.

Scraptastic Club's May Sketch Challenge!

It's the final Thursday of the month & a new sketch is up on the Scraptastic Club blog!

I used the sketch as-is this month to create a clean, bright and colorful layout using the May 2015 Janglin kit, add-on and stamp set.

This kit was perfect for documenting Lizzy's bright bear picnic on a very rainy, grey day while stuck indoors.

I love the mix of the exclusive paper (the rainy cloud), exclusive embellishments (the acrylic raindrops) with the Pinkfresh Studio and American Crafts goodies in the kits. Using the sketch, my layout came together in under 30 minutes. I love when that happens!

Be sure to link up your layout using the sketch to the sketch post for a chance to win a gift certificate to the Scraptastic Club site!

Elle's Studio Quick Card

On Wednesday, I had a card featured on the Elle's Studio blog and I'd love to share it with you.

ES Supplies: May 2015 exclusive kitMay digital cut fileShine paper collection packCienna bits & piecesCienna Happiness stamp; Other: ribbon, enamel dots.

Here’s how I put it together:

1) Cut a piece of white cardstock to 4-1/4″ x 11″. Fold in half. Cut a piece of the ‘So Bright’ paper to 4″ x 5-1/4″. Adhere to the front of the white, folded cardstock.

3) Cut the ‘for you’ tag from a piece of white cardstock and back it with the dark pink tag from the exclusive kit. Tie a pink ribbon at the top and keep the legs of the bow in place with glue dots. Cut a grey rectangle out of the ‘Say Cheese’ paper from the Shine collection and cut a slit at the bottom of the photo opening. Slide the ‘for you’ tag inside the slit at an angle and adhere to keep it in place. Tuck the purple flower from the exclusive kit behind the ‘for you’ tag and adhere to keep in place. Adhere the pink flower from the exclusive kit to the front of the grouping. Set aside.

4) Adhere the ‘important’ tab from the Cienna bits & pieces to the bottom left corner of the card. Stamp ‘I heart you’ onto the purple banner from the exclusive kit using the Cienna ‘Happiness’ stamp. Adhere to the top left corner of the card.

5) Using dimensional adhesive, adhere the frame/tag/flower grouping to the bottom left corner of the card. Embellish with enamel dots.

Be sure to check out all of the beautiful inspiration on the Elle's Studio blog, and while you're there, check out the shop to see the awesome new collection, Let's Eat

Jot Magazine May Mood Board Layout

Hello there! We've had a bit of a rough week with a sick girl in the hospital. 

On Tuesday, Lizzy was having a hard time breathing after just beginning to cough that morning, and by dinner time, her nebulizer treatments just weren't doing enough. As it was rush-hour and we knew it would take a while to get to our home hospital downtown, we took her to our local ER. Later that night, she was transferred to Children's Memorial Hermann, where she only spent one night and was diagnosed as having a viral pneumonia. We were lucky that she wasn't as sick as she has been in the past. She didn't even require oxygen on this trip.

She's doing much better here at home, but is still having a bit of a hard time breathing, so we're hoping that her regular nebulizer treatments and a steroid will get her back to normal in no time.

You may be asking, why are you writing about this when the subject of this blog post is "Jot Magazine May Mood Board?" Well, the gorgeous mood board this month includes a brush script file that reminds me to 'stay positive,' something I REALLY needed to be reminded of this week. 

When we came back from the hospital, I wrapped up this layout, inspired by the mood board and using the brush script file from the Polka Dot Creative site.

Supplies: Cardstock- Bazzill Basics; Patterned Paper- American Crafts, Studio Calico, KI Memories, Studio Tekturek; Embellishments: Heidi Swapp (puffy teal arrow & heart, glitter 'M' and '+'), Elle's Studio (hello sticker), My Mind's Eye (enamel bow & teal brad), American Crafts (chipboard arrow), Gossamer Blue (puffy geotag & '+'), Mark Richards (gold metal dots), Evalicious (gold 'look' arrow), Simple Stories (gold heart, black enamel dots), Basic Grey (pink ampersand, cloth brad), Other: Enamel dots, twine; Stamps: Studio Calico (ink smear), American Crafts (date stamp), Scraptastic Club ('+' groupings from the November 2014 Shake it Off stamp- ONLY $5.99!)

I was a bit nervous about printing a photo of my face in such a late size, but I knew that I wanted the circular cut file to be BIG on the layout, so I just went with it, after using a gaussian blur technique to soften the lines on my face. 

After changing the JPG brush script to a PNG in Photoshop Elements, I opened it in my Silhouette Software and traced the image to create a cut file. After cutting in black cardstock with my Silhouette Cameo, I backed the little spaces with scraps of patterned paper to match the mood board colors. The empty spaces became homes for tiny embellishment.

The stamps that I used on this layout are ones that I reach for time and time again, especially the Shake it Off stamp set (which is a BARGAIN at $5.99!) I love the texture they add to the background!

I used the 'be positive' words from the image as my title, only adding a small embellishment cluster to add emphasis to the title. I love using hoarded items like the Basic Grey chipboard ampersand and cloth brad on such a loved layout! 

You have until the end of the month to link up your creation inspired by the mood board on the Jot Magazine May Mood Board post! What will this mood board inspire you to create?

Day in the Life: Photos & Words

When Ali Edwards announced that she was documenting a 'Day in the Life' on May 12th, I was excited. I had attempted a 'Week in the Life' several times before, only to give up on day 3 or 4. One day of intense photo documentation is plenty for me, and I love that it gives a glance into our daily, boring lives right now. Today I want to share with you the photos and words from that day.

7:00 AM | (My clock is 20 minutes fast) I wake when I hear Lizzy stirring on the monitor. I see her slip out of bed and head towards mine. She has only been sleeping in a toddler bed for three days, and this is the first night that she has slept through in her own bed. Hooray for a good night's sleep.

7: 15 AM | I get Lizzy a cup of milk and she asks to watch Peppa Pig on my iPad. (This is totally one of those photos that I wish I had captured on my DSLR instead of my iPhone.) I check up on Instagram and my email on my iPhone while in bed next to her. I decide to get a shower before breakfast today, as it makes me feel like I'm totally conquering the morning.

8:00 AM | I hold off on blow drying my hair, since Lizzy is asking for 'egg bread'- her most requested breakfast. I get to the kitchen and start making her request while she watches PBS Kids on the iPad at the table.

Egg & bread, really an Ezekiel English muffin. I keep half of mine to spread on some homemade vanilla bean tangerine marmalade to have with my coffee.

8:30 AM | Breakfast is always a time for listing- I have to have a list of goals for the day to feel like I've accomplished anything. These to-do list printables are from Ann Marie Espinoza. (I print a big stack and bind them with some Glossy Accents.)

9:45 AM | After getting Lizzy ready, blow drying my hair & getting one more cup of coffee, we are in the car and headed toward 'toddler time' at our local library branch.

10:00 AM | I (very cleverly) remembered to let Lizzy wear her wellies to the library today, and luckily, there were some puddles in the parking lot that made good use out of them.

10:30 AM | Toddler time is hard work. Because of her inability to be around other children during cold and flu season, her social skills are still lacking and she's still learning how to do things like sing and dance. Her attention span is also extremely short- more so than most 2 year olds, a side effect of prematurity. Some days I really don't want to take her to this, but I know that it is important for her to grow socially, so we continue to go once a week in the summer.

11:00 AM | After we check out our new books, we head to Costco for some salmon & beans. We end up spending over $100. Typical, and the reason why I hate going to Costco. Simon usually stops on his way home.

12:00 PM | Girly is super hungry. I make us a wrap of homemade guacamole, grilled chicken and veggies and serve it with Pirates Booty cheese puffs. She eats the entire wrap. High five for me.

1:00 PM | Taking Toby and dinosaur for a 20-minute walk around the neighborhood.

1:30 PM | Once Lizzy is down for her nap, I start working on packing up a set of onesies for my cousin, who just had a baby that morning! I also had to make a card, so I pulled out some old Studio Calico kits to help me out. I love making pretty things for other people.

4:00 PM | When Lizzy wakes from her nap, we head to the post office to drop off the gift for my cousin. Lizzy's bestie, Jack, lives just around the corner from the post office so we drop in to see him. Jack's grandmother shows Lizzy photos of a gecko that she took on her phone.

5:00 PM | We get home just as Simon arrives home from work. I get into the kitchen to sort dinner out and Simon distracts a hungry Lizzy with building blocks, one of her favorites.

IMG_1423.JPG

6:00 PM | Dinner consists of honey-mustard glazed salmon, Trader Joe's multigrain rice pilaf with vegetables (love that I had a bag of this in the freezer, as I was going to make my own rice pilaf!) and sautéed lemon green beans with almonds. Lizzy ate almost all of her salmon and some of her rice

7:00 PM | Simon takes Lizzy and Toby for a walk, with teddy, piggy and dinosaur, of course. I stay home and tidy the kitchen. The kitchen has to be completely clean before I can wind down for the evening. 

7:30 PM | Simon does bath time with Lizzy.

8:00 PM | Lizzy is quite tired tonight, so after only one story, she is down.

10:00 PM | After tidying my office and just doing a general pick-up around the house, I sit down to start on medical paperwork for Lizzy, which I realize will take me hours. Feeling a bit defeated, I decide to call it a night and head to bed. 

After looking back through my photos, I see that the next time I do this project, I really want to grab my DSLR instead of my iPhone, especially in low-light situations. I also want to get more photos from Simon's day at the office. I noticed that my photo taking lagged towards the end of the day and I missed the bedtime routine photos, like brushing teeth and reading stories. 

Thanks for stopping by! Have you done this photography project before, and if so, were you successful in documenting your entire day?

Two Page Layout Challenge

Today on the Scraptastic Club blog, myself and some fellow design team members were challenged to create a two-page spread. After thinking about it (and dreading it!) I decided that a two page spread didn't have to be two 12"x12" layouts! I decided to document an event which I had several photos of and create one 12"x12" layout and one pocket page spread, so that I could share all of the other photos that complete the story of a family road trip to San Antonio in April 2014.

To say that I love this spread is an understatement. Everything about it makes me happy- from the beautiful colors in the Scraptastic Club's May 2015 Janglin' kit and add-on, to the perfect cards from the April 2015 TLN kit that worked so well with the photos. 

Since the Pinkfresh Studio background patterned paper that I used was quite busy (the bright colors called to me!) I kept the rest of the layout as simple as possible. To break up the vertical lines on the left, I added a manufacturer's strip just underneath the orange horizontal line, which also served as a place for my title AND helps to draw your eye from the photo to the pocket page spread on the right.

To break up all of the lines on the page, I added a triangle of three circles, punched from another Pinkfresh Studio In The Clouds paper in the kit. These circles housed additional embellishments and a part of my title.

On the right side, I chose cards from the April 2015 TLN kit that had the same colors as on the left. The three cards I chose were perfect accompaniments to my photos and the story. 

San Antonio closeup 2 blog.jpg

To create balance from the left to the right sides, I added circular elements to my pocket pages. On this card, I traced a dashed circle around the 'let's go' title and added mini alphas, vellum arrows and enamel dots. 

This 'weekend adventure' card was embellished with more circles- punched, from a die-cut pack, a sticker sheet and a flair badge. It's purely for embellishment & it is my favorite on the spread.

That's all from me today! Thanks for stopping by! How do you feel about double-page spreads? Do they intimidate you? 

Scraptastic Club Janglin' Main Kit Process Video

Hello there! I just wanted to let you know that I'm sharing a new layout using the Scraptastic Club's May 2015 Janglin' kit, with a process video over on the Scraptastic Club blog today. I really love challenging myself to create with a main kit only, as it usually means that I create SO much faster than my normal 2-3 hour time frame for a page.

You can see the entire process for this layout, which I absolutely love, in my video. 

Do you love working with main kits only if you're a kit subscriber?